> On Jan 7, 2017, at 3:42 AM, Pete Turnbull <[email protected]> wrote:
>
> On 07/01/2017 04:08, Robert Armstrong w#rote:
>>> Paul Koning <[email protected]> wrote:
>>> one would think unplugging the power to the head actuator coils  ...
>>
>>  One might think that, and that plan works for an RK05, but an RL02 is
>> smarter.  Unless the heads go on cylinder within a few seconds of the head
>> load signal, the drive logic just faults and spins down again.  Not very
>> useful...  What's needed is a way to stall or fake out the drive startup
>> state machine logic.
>
> I haven't done this for a while, but I think it might work if you also
> disable the SK TO (Seek Timeout) signal on the main logic board, and maybe
> also POS SIG (Position Signal).
>
> There are several setup and adjustment procedures that require one to move
> the heads by hand, including right back onto the loading ramp. You'd do this
> with the cover open, the logic board swung up and resting on its clip at the
> back of the drive, and with the amplifier box turned to a vertical position
> sitting on its right-hand supports.  The procedures require the above signals
> to be disabled, and the servo drive (the single inline connector under the
> amplifier box) to be disconnected.  However, they all start by pressing LOAD
> and allowing the heads to load at least as far as the loading area at the
> outside edge of the disk before disconnecting the servo drive; I can't
> remember if the heads actually go beyond that into the area where the data
> tracks are.
>
> How you disable the signals depends on the version of the main logic board -
> there are three different types, all described in the pocket service guide.
>
> --
> Pete
> Pete Turnbull
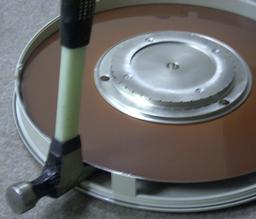
What is the best way to approach evaluating old RL02 Packs for cleaning?  Does
anyone have experience opening up all the little plastic tabs on the covers?
I have a large stash of RL02’s that I had planned to backup.   I was planning
on just doing a visual inspection on each before loading.

The only disassembly information I have found uses the proverbial hammer  -
http://williambader.com/museum/vax/43rl02topremoval.jpg
<http://williambader.com/museum/vax/43rl02topremoval.jpg>

Jerry