This is an automated email from the ASF dual-hosted git repository.

casion pushed a commit to branch dev
in repository https://gitbox.apache.org/repos/asf/incubator-linkis-website.git
The following commit(s) were added to refs/heads/dev by this push:
new 4ac9910239 update how to release (#587)
4ac9910239 is described below
commit 4ac991023921e8b1f30ed03981f3d1ad76230b5a
Author: Casion <[email protected]>
AuthorDate: Wed Nov 16 22:56:18 2022 +0800
update how to release (#587)
---
.../current/how-to-release.md | 157 ++++++++++++++++-----
.../current/how-to-verify.md | 2 +-
2 files changed, 121 insertions(+), 38 deletions(-)
diff --git
a/i18n/zh-CN/docusaurus-plugin-content-docs-community/current/how-to-release.md
b/i18n/zh-CN/docusaurus-plugin-content-docs-community/current/how-to-release.md
index ab5f26f670..86909ba43a 100644
---
a/i18n/zh-CN/docusaurus-plugin-content-docs-community/current/how-to-release.md
+++
b/i18n/zh-CN/docusaurus-plugin-content-docs-community/current/how-to-release.md
@@ -4,11 +4,11 @@ sidebar_position: 3
---
# Apache 发布指南
-> 本文以发布 1.1.2 Apache版本为示例。如果是非Apache版本的发布指引见
[详细信息见](https://incubator.apache.org/guides/releasemanagement.html)
https://incubator.apache.org/guides/releasemanagement.html
+> 本文以发布 1.1.2 Apache版本为示例。如果是非Apache版本的发布指引见
[详细信息见](https://incubator.apache.org/guides/releasemanagement.html)
+> https://incubator.apache.org/guides/releasemanagement.html
-理解 Apache 发布的内容和流程
-Source Release 是 Apache 关注的重点,也是发布的必须内容;而 Binary Release 是可选项,
-请参考以下链接,找到更多关于 ASF 的发布指南:
+理解 Apache 发布的内容和流程 Source Release 是 Apache 关注的重点,也是发布的必须内容;
+而 Binary Release 是可选项, 请参考以下链接,找到更多关于 ASF 的发布指南:
- [Apache Release Guide](http://www.apache.org/dev/release-publishing)
- [Apache Release Policy](http://www.apache.org/dev/release.html)
@@ -28,7 +28,9 @@ Apache的maven和SVN仓库都会使用到GPG签名来验证物料文件的合法
(以Window系统为例,如果有安装过git客户端,gpg可能已经存在,无需再次安装)
-在[GnuPG官网](https://www.gnupg.org/download/index.html)下载二进制安装包(GnuPG binary
releases)。目前最新版本为[Gpg4win-3.1.16 2021-06-11](https://gpg4win.org/download.html)
下载后请先完成安装操作
+在[GnuPG官网](https://www.gnupg.org/download/index.html)下载二进制安装包(GnuPG binary
releases)。
+目前最新版本为[Gpg4win-3.1.16 2021-06-11](https://gpg4win.org/download.html)
下载后请先完成安装操作
+
注:GnuPG的1.x版本和2.x版本的命令有细微差别,下列说明以2.2.28为例
安装后gpg命令添加至系统环境变量且可用
```sh
@@ -116,7 +118,8 @@ $ gpg --keyserver keyserver.ubuntu.com --send-key 584EE68E
# 其中,keyserver.ubuntu.com为挑选的keyserver,建议使用这个, 因为Apache Nexus校验时是使用的这个keyserver
```
### 1.4 查看key是否创建成功
-验证是否同步到公网,大概需要一分钟才能查到,未成功可以进行上传重试几次
+
+验证是否同步到公网,大概需要一分钟才能查到, 未成功可以进行重试上传几次
```shell
方式一
#584EE68E是对应的key id
@@ -251,28 +254,17 @@ mvn --encrypt-password <apache password>
## 2 准备物料包&Apache Nexus发布
-### 2.1 准备分支/Tag/Release Notes
+### 2.1 准备分支/Release Notes
-从待发布分支拉取新分支作为待发布分支,如现在要发布$`{release_version}`版本,则从待发布分支拉取新分支`release-${release_version}-${condition_version}`,此后所有操作都在`release-${release_version}-${condition_version}`分支上进行,在最终发布完成后,合入主干master分支。
+从待发布分支拉取新分支作为待发布分支,如现在要发布$`{release_version}`版本,则从待发布分支拉取新分支`release-${release_version}-${condition_version}`,
+此后所有操作都在`release-${release_version}-${condition_version}`分支上进行。
-step1 基于待发布的开发分支,创建release-${release_version}-rc分支
+step1 基于待发布的开发分支,创建release-${release_version}-rcx分支
如当前开发的源码分支为dev-1.1.2,需要发布1.1.2的版本,创建分支:release-1.1.2-rc1

-step2 创建新的github release
-
-进入到创建页面 https://github.com/apache/incubator-linkis/releases/new
-基于之前`release-1.1.2-rc1`分支创建名为`1.1.2-rc1`的tag,填写标题`Apache Linkis(incubating)
Release-1.1.2-incubating-RC1`,并勾选`This is a pre-release`,将该版本的release notes链接写入
-
-
-
-step3 检查
-
-
-
-
-step4 clone对应的release分支到本地
+step2 clone对应的release分支到本地
```shell script
#-b release-1.12-rc1 指定clone分支 -c(config) 指定使用的配置 core.autocrlf=false
关闭自动换行符的转换
git clone -b release-1.1.2-rc1 -c core.autocrlf=false
[email protected]:apache/incubator-linkis.git
@@ -284,20 +276,45 @@ git clone -b release-1.1.2-rc1 -c core.autocrlf=false
[email protected]:apache/in
- Window下,安装git客户端,默认情况下,git clone 项目到Windows本地,git会强制将文件的换行符转成CTRL,而不是LF。
这会导致window下打的发布包 ,对于shell脚本在linux下直接运行,会出现换行符问题 ,clone时通过 `-c
core.autocrlf=false` 关闭自动转换
-- 主仓库apache/incubator-linkis准备好发布分支/tag/release
notes后,请克隆源码对应的发布分支release-1.1.2-rc1,进行下列步骤
+- 克隆对应的发布分支release-1.1.2-rc1源码,进行下列步骤
:::
### 2.2 版本号确认
-如果版本号不正确,需要统一修改版本号
+版本号的检查与确认
+
+```shell script
+# 一键修改所有module中的 pom中的版本号 -DgenerateBackupPom=false不生成pomback备份文件
+mvn -N install & mvn versions:set -DnewVersion=1.3.0
-DgenerateBackupPoms=false
+
+# 检查部分非module模块的版本号(可能未使用 但是最好保持一致)
+linkis-spring-cloud-services/linkis-service-gateway/plugins/linkis-gateway-datasource-ruler/pom.xml
+linkis-computation-governance/linkis-jdbc-driver/pom.xml
+linkis-computation-governance/linkis-engineconn/linkis-clustered-engineconn/linkis-streaming-engineconn/pom.xml
+linkis-web/pom.xml
+
+# 检查 linkis-web/.env
+set VUE_APP_VERSION=1.3.0
+
+# 检查 linkis-web/package.json
+"version": "1.3.0"
+
+
+# 检查 env.sh版本号
+#linkis-dist/deploy-config/linkis-env.sh
+set LINKIS_VERSION=1.3.0
+
+# 检查
org.apache.linkis.engineplugin.spark.config.SparkConfiguration#DEFAULT_SPARK_JAR_NAME
+set default value linkis-engineconn-core-1.3.0.jar
+
+```
+
+如果版本号存在不正确,需要修改版本号提交代码后,删除原来分支后重新创建对应分支,再次从步骤2.1进行发布。
+
+
-```shell
-$ mvn versions:set -DnewVersion=1.1.2
-#修改最外层pom.xml中的配置
-<linkis.version>1.1.2</linkis.version>
-```
检查代码是否正常,包括版本号,编译成功、单元测试全部成功,RAT检查成功等等
```
#build检查
@@ -331,7 +348,7 @@ Archives: 0
$ mvn -DskipTests deploy -Prelease -Dmaven.javadoc.skip=true
-DretryFailedDeploymentCount=10
```
:::caution 注意
-出现下列情况,请先登陆https://repository.apache.org/#stagingRepositories
+出现下列情况,请先登陆 https://repository.apache.org/#stagingRepositories
drop掉异常的任务,重新执行本步骤。
- 若使用网络代理或则请求方ip变化,可能会导致apache maven 拆分为了多次上传记录,最好关闭网络代理
@@ -339,7 +356,11 @@ $ mvn -DskipTests deploy -Prelease
-Dmaven.javadoc.skip=true -DretryFailedDeplo
:::
-上述命令执行成功后,待发布版本包会自动上传到Apache的临时筹备仓库(staging
repository)。所有被deploy到远程[maven仓库](http://repository.apache.org/)的Artifacts都会处于staging状态,访问https://repository.apache.org/#stagingRepositories,
使用Apache的LDAP账户登录后,就会看到上传的版本,`Repository`列的内容即为${STAGING.REPOSITORY}。
**点击`Close`来告诉Nexus这个构建已经完成,只有这样该版本才是可用的**。
如果电子签名等出现问题,`Close`会失败,可以通过`Activity`查看失败信息。
+上述命令执行成功后,待发布版本包会自动上传到Apache的临时筹备仓库(staging repository)。
+所有被deploy到远程[maven仓库](http://repository.apache.org/)的Artifacts都会处于staging状态,
+访问https://repository.apache.org/#stagingRepositories,
使用Apache的LDAP账户登录后,就会看到上传的版本,
+`Repository`列的内容即为${STAGING.REPOSITORY}。
**点击`Close`来告诉Nexus这个构建已经完成,只有这样该版本才是可用的**。
+如果电子签名等出现问题,`Close`会失败,可以通过`Activity`查看失败信息。
同时也生成了二进制文件 `linkis-dist/target/apache-linkis-1.1.2-incubating-bin.tar.gz`
@@ -357,7 +378,6 @@ $ git archive --format=tar.gz
--output="dist/apache-linkis/apache-linkis-1.1.2-i
```
-
### 2.5 拷贝二进制文件
步骤2.3执行后,二进制文件已经生成,位于linkis-dist/target/apache-linkis-1.1.2-incubating-bin.tar.gz
@@ -496,23 +516,57 @@ $ status
$ svn commit -m "prepare for 1.1.2-RC1"
```
+
若svn命令出现中文乱码,可尝试设置编码格式(设置编码格式:export LANG=en_US.UTF-8)。
-## 4 验证Release Candidates
+
+## 4 验证物料包&创建git tag
+
+### 4.1 验证流程
+
+准备的物料最好在window和类unix系统中都进行验证,避免系统兼容问题 如换行符问题
详细可以参见[How to Verify release](/how-to-verify.md)
+### 4.2 创建git tag
+
+验证无误后,可以创建git tag
+
+:::caution 注意
+git tag 一旦创建不可删除(分支可以删除),所以在创建tag前 确保前面步骤相关的验证都没问题。
+:::
+
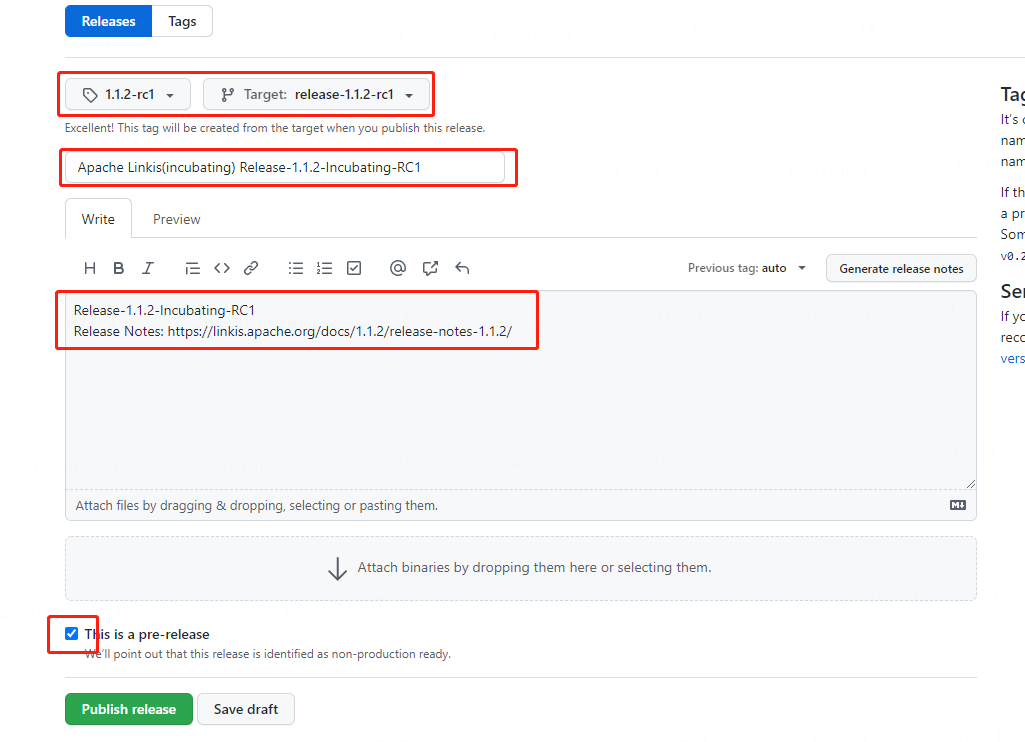
+**step1 创建新的 github release**
+
+进入到创建页面 https://github.com/apache/incubator-linkis/releases/new
+基于之前`release-1.1.2-rc1`分支创建名为`1.1.2-rc1`的tag,
+填写标题`Apache Linkis(incubating) Release-1.1.2-incubating-RC1`,并勾选`This is a
pre-release`,将该版本的release notes链接写入
+
+
+
+**step2 检查**
+
+
+
+
+
## 5 发起投票
:::tip
发送邮件时请使用您的 apache.org 邮箱发送,并使用纯文本格式,详细见[附录-邮件切换纯文本格式](#邮件切换纯文本格式)
+
+邮件发布前 可以进行双人帮忙复合check邮件内同
:::
:::caution 注意
-所有指向校验和、签名和公钥的链接都必须引用Apache主网站https://downloads.apache.org/并应使用https://(SSL)。例如:https://downloads.apache.org/incubator/linkis/KEYS
+所有指向校验和、签名和公钥的链接都必须引用Apache主网站https://downloads.apache.org/并应使用https://(SSL)。
+例如:https://downloads.apache.org/incubator/linkis/KEYS
+
+目前是用的DISCLAIMER-WIP免责申明,请在邮件中加入此说明`As the DISCLAIMER-WIP shows....`。
+如果后续解决了WIP待处理的问题后,可以去掉。WIP的使用,详细可见
https://issues.apache.org/jira/browse/LEGAL-469
+
-目前是用的DISCLAIMER-WIP免责申明,请在邮件中加入此说明`As the DISCLAIMER-WIP
shows....`。如果后续解决了WIP待处理的问题后,可以去掉。WIP的使用,详细可见
https://issues.apache.org/jira/browse/LEGAL-469
:::
@@ -521,6 +575,8 @@ $ svn commit -m "prepare for 1.1.2-RC1"
- Linkis 社区投票,发送邮件至:`[email protected]`
- incubator 社区投票,发送邮件至:`[email protected]` Linkis毕业后,只需要在Linkis社区投票
- 在社区投票的邮件正文中的${Linkis Release Manager},填写负责本次发布的人员,一般是邮件发送人,如`Shuai Di`
+
+
### 5.1 Linkis 社区投票阶段
1. Linkis 社区投票,发起投票邮件到`[email protected]`。PMC需要先按照文档检查版本的正确性,然后再进行投票。
经过至少72小时并统计到3个`+1` PMC member票后,才可进入下一阶段的投票。
@@ -529,7 +585,10 @@ $ svn commit -m "prepare for 1.1.2-RC1"
#### 5.1.1 Linkis 社区投票模板
-参考示例:[\[VOTE\] Release Apache Linkis (Incubating)
1.1.2-RC2](https://lists.apache.org/thread/8j8f8vqotpg4f2kjwq3gg436vtx40p20)
https://lists.apache.org/thread/8j8f8vqotpg4f2kjwq3gg436vtx40p20
+
+参考示例:[\[VOTE\] Release Apache Linkis (Incubating)
1.1.2-RC2](https://lists.apache.org/thread/8j8f8vqotpg4f2kjwq3gg436vtx40p20)
+https://lists.apache.org/thread/8j8f8vqotpg4f2kjwq3gg436vtx40p20
+
```html
邮件标题:
[VOTE] Release Apache Linkis (Incubating) ${release_version} ${rc_version}
@@ -655,6 +714,8 @@ ${Linkis Release Manager}
- PPMC:podling Project Management Committee (PPMC) linkis的ppmc
- IPMC: Incubator Project Management Committee (IPMC)
一般是孵化社区的PMC,linkis的导师都是这个角色
+
+
### 5.2 Incubator 社区投票阶段
1. Incubator社区投票,发起投票邮件到`[email protected]`,需至少3个 `+1` IPMC
Member投票,才可进入下一阶段。
@@ -786,6 +847,22 @@ Thanks
On behalf of Apache Linkis(Incubating) community
```
+### 5.3 其他
+
+**因投票邮件内容有问题(非物料问题,如链接问题**
+
+- 如果发现得比较早,可以取消之前的投票,进行再次投票 ,如果已经进行比较久,可以由发布经理直接对投票邮件进行回复说明。
+- RCX 可以保持不变,源码物料不做修改,邮件标题可以添加(Round2)区分 如`[VOTE] Release Apache Linkis
(Incubating) 1.3.0-RC2 (Round2)`
+
+**邮件线程问题**
+
+所有邮件存档都可以在[[email protected]](https://lists.apache.org/[email protected])
查到,一个邮件线程,可以通过下方的[Permanent link to this email]
+获取到该邮件的可访问的url地址
+
+
+有些邮箱163/sina 回复时候 默认是带上中文“回复”会导致apache 邮件 识别为一封新线程邮件,需要修改配置。
+
+
## 6 正式发布
@@ -823,7 +900,7 @@ $ svn delete
https://dist.apache.org/repos/dist/release/incubator/linkis/${last_
### 6.3 在Apache Staging仓库发布版本
- 登录 http://repository.apache.org , 使用Apache账号登录
-- 点击左侧的 Staging repositories,
+- 点击左侧的 [Staging
repositories](https://repository.apache.org/#stagingRepositories),
- 搜索 Linkis 关键字,选择你最近上传的仓库,投票邮件中指定的仓库
- 点击上方的`Release`按钮,这个过程会进行一系列检查
@@ -839,7 +916,12 @@ linkis的官网下载地址应该指向apache的官方地址
等待并确认新的发布版本同步至Apache镜像(https://downloads.apache.org/incubator/linkis/)
后,更新如下页面:
- https://linkis.apache.org/zh-CN/download/main
- https://linkis.apache.org/download/main
+- https://linkis.apache.org/zh-CN/download/release-notes-x.x.x(移除rc)
+- https://linkis.apache.org/download/release-notes-1.3.0(移除rc)
+```shell script
+
+```
### 6.5 GitHub 版本发布
1. 合并`${release_version}-RC`分支到`master`分支(如果未合并)
@@ -900,6 +982,7 @@ step2 修改 linkis.xml 中的new信息
</section>
```
step3 更新提交后,信息会在这里呈现
+
https://incubator.apache.org/clutch/linkis.html
diff --git
a/i18n/zh-CN/docusaurus-plugin-content-docs-community/current/how-to-verify.md
b/i18n/zh-CN/docusaurus-plugin-content-docs-community/current/how-to-verify.md
index da9bc2b168..05a720a2b6 100644
---
a/i18n/zh-CN/docusaurus-plugin-content-docs-community/current/how-to-verify.md
+++
b/i18n/zh-CN/docusaurus-plugin-content-docs-community/current/how-to-verify.md
@@ -245,7 +245,7 @@ $ cd apache-linkis-${release_version}-incubating-bin
详细的检查项,可以参考此文章:[ASF第三方许可证策](https://apache.org/legal/resolved.html)
-## 3.邮件回复
+## 3. 邮件回复
如果发起了发布投票,验证后,可以参照此回复示例进行邮件回复
---------------------------------------------------------------------
To unsubscribe, e-mail: [email protected]
For additional commands, e-mail: [email protected]