http://git-wip-us.apache.org/repos/asf/incubator-weex/blob/8162f8c2/doc/source/guide/images/tut2.jpg
----------------------------------------------------------------------
diff --git a/doc/source/guide/images/tut2.jpg b/doc/source/guide/images/tut2.jpg
deleted file mode 100644
index c3e8a6e..0000000
Binary files a/doc/source/guide/images/tut2.jpg and /dev/null differ
http://git-wip-us.apache.org/repos/asf/incubator-weex/blob/8162f8c2/doc/source/guide/images/tut3.png ---------------------------------------------------------------------- diff --git a/doc/source/guide/images/tut3.png b/doc/source/guide/images/tut3.png deleted file mode 100644 index 5473905..0000000 Binary files a/doc/source/guide/images/tut3.png and /dev/null differ http://git-wip-us.apache.org/repos/asf/incubator-weex/blob/8162f8c2/doc/source/guide/images/tut4.gif ---------------------------------------------------------------------- diff --git a/doc/source/guide/images/tut4.gif b/doc/source/guide/images/tut4.gif deleted file mode 100644 index eed4395..0000000 Binary files a/doc/source/guide/images/tut4.gif and /dev/null differ http://git-wip-us.apache.org/repos/asf/incubator-weex/blob/8162f8c2/doc/source/guide/index.md ---------------------------------------------------------------------- diff --git a/doc/source/guide/index.md b/doc/source/guide/index.md deleted file mode 100644 index a7f5139..0000000 --- a/doc/source/guide/index.md +++ /dev/null @@ -1,66 +0,0 @@ ---- -title: Get Started -type: guide -order: 1 -version: 2.1 -has_chapter_content: true ---- - -# Get Started - -Weex is a framework for building Mobile cross-platform high performance UI applications. Developers can leverage their existing knowledge of VueJS (a powerful JavaScript view library), by writing `*.vue` files to build native applications or pages. This page will help you to write a **Weex** application in 2 minutes. - -## Introduction to VueJS - ->[VueJS](https://vuejs.org/) (pronounced /vjuË/, like view) is a progressive framework for building user interfaces. Unlike other monolithic frameworks, Vue is designed from the ground up to be incrementally adoptable. The core library is focused on the view layer only, and is very easy to pick up and integrate with other libraries or existing projects. On the other hand, Vue is also perfectly capable of powering sophisticated Single-Page Applications when used in combination with modern tooling and supporting libraries. - -**VueJS is developed by [Evan You](https://twitter.com/youyuxi).** - -Weex now fully supports VueJS 2.x officailly. Weex put Vue 2.x as its built-in JS Framework, making it powerful for building native apps!. - -## Hello world Example - -The easiest way to try Weex is to use the [Playground App](../playground.html) to write a [Hello World](http://dotwe.org/vue/4d5a0471ece3daabd4681bc6d703c4c1) example at [dotWe](http://dotwe.org). No installation is required and you do not even have to write native code. - -To test Weex online using our Playground App: - -- Install the [Playground App](../playground.html) on your phone. -- Open [the Hello World example](http://dotwe.org/vue/4d5a0471ece3daabd4681bc6d703c4c1) in a new tab, click run, and then use the Playground App to scan the QR code. - -Nailed it! - -If you took the procedure above, you can see simple HTML semantic tags, CSS styles and Javascript code. This is one of the simplest Weex examples. The demo applications renders a "Hello World" in the page. Please note that this is not a Web page. You are running native!. - -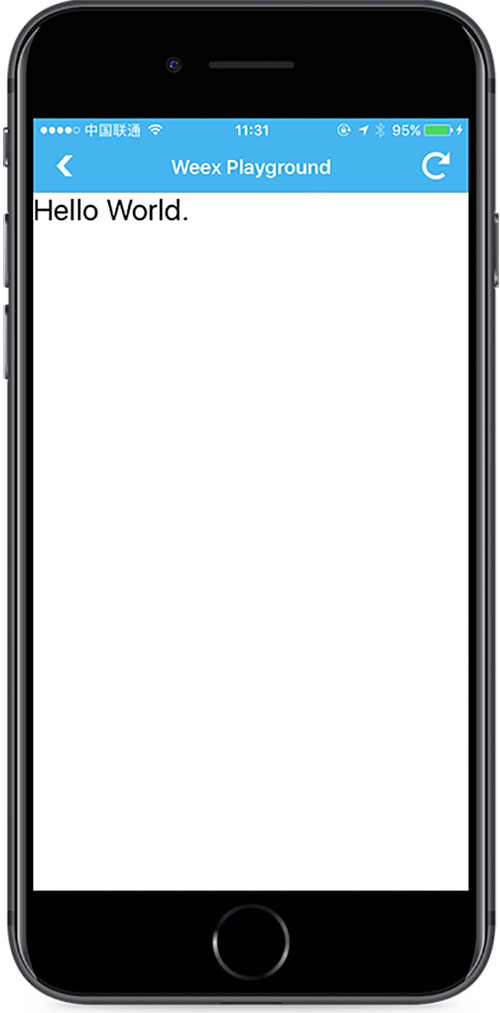 - -### What happened? - -As shown in the following codeï¼ - -```html -<template> - <div> - <text class="text">{{text}}</text> - </div> -</template> - -<style> - .text { - font-size: 50; - } -</style> - -<script> - export default { - data () { - return { - text: 'Hello World.' - } - } - } -</script> -``` - -It's too easyï¼right? Take a look at the syntax, that is vue. - -You can try to modify the Hello World example if you have previous knowledge of building VueJS examples, then generate a new QR code to scan. If you don't have previous knowledge of VueJS, don't worry, this guide will teach you just that. Moreover, you can always learn from the [VueJS Guide](https://vuejs.org/v2/guide). http://git-wip-us.apache.org/repos/asf/incubator-weex/blob/8162f8c2/doc/source/guide/integrate-to-your-app.md ---------------------------------------------------------------------- diff --git a/doc/source/guide/integrate-to-your-app.md b/doc/source/guide/integrate-to-your-app.md deleted file mode 100644 index d458ac0..0000000 --- a/doc/source/guide/integrate-to-your-app.md +++ /dev/null @@ -1,281 +0,0 @@ ---- -title: Integrate to Your App -type: guide -order: 1.2 -has_chapter_content: false -chapter_title: Intro -version: 2.1 ---- - -# Integrate to Your App - -## Integrate to Android -Tipï¼The following documents assume that you already have a certain Android development experience. - -### Android has two ways to integrate weex -1.using source code: Can quickly use the latest features of WEEX, according to your own characteristics of the project. So, you can do some related improvements. - -2.using SDK: WEEX will regularly release a stable version at jcenter.[jcenter](https://bintray.com/alibabaweex/maven/weex_sdk/view) - -### Prerequisites -Make sure the following configuration is complete: - -+ [JDK](http://www.oracle.com/technetwork/java/javase/downloads/jdk8-downloads-2133151.html) version >= 1.7 , and configure the environment variable -+ Android SDK installed and configure the environment variable -+ Android SDK version 23 (compileSdkVersion in build.gradle) -+ SDK build tools version 23.0.1 (buildToolsVersion in build.gradle) -+ Android Support Repository >= 17 (for Android Support Library) - -### Quick to use -If you are the first time to try or have a higher demand for stability, you can use the way to dependence on the SDK. -The steps are as follows: - -1. Create an Android project. There is nothing to be specified, according to your habits to. -2. Update build.gradle by adding the following dependencies: - -```java -compile 'com.android.support:recyclerview-v7:23.1.1' -compile 'com.android.support:support-v4:23.1.1' -compile 'com.android.support:appcompat-v7:23.1.1' -compile 'com.alibaba:fastjson:1.1.46.android' -compile 'com.taobao.android:weex_sdk:0.5.1@aar' -``` - -Note: the version can be high can not be low. - -#### Start writing code - -Note: There is a complete code address in the appendix - -+ Implement the picture download interface, set the initialization. - -```java -package com.weex.sample; -import android.widget.ImageView; -import com.taobao.weex.adapter.IWXImgLoaderAdapter; -import com.taobao.weex.common.WXImageStrategy; -import com.taobao.weex.dom.WXImageQuality; -/** -* Created by lixinke on 16/6/1. -*/ -public class ImageAdapter implements IWXImgLoaderAdapter { - @Override - public void setImage(String url, ImageView view, WXImageQuality quality, WXImageStrategy strategy) { - //To implement picture download interface, otherwise the picture can not be displayed. - } -} -``` - -+ initialization - -```java -package com.weex.sample; -import android.app.Application; -import com.taobao.weex.InitConfig; -import com.taobao.weex.WXSDKEngine; - -/** -* Note: add android:name=".WXApplication" into Manifest file -* To implement ImageAdapter, otherwise the picture can not be downloaded -* Gradle must add some dependencies, otherwise the initialization will fail. -* compile 'com.android.support:recyclerview-v7:23.1.1' -* compile 'com.android.support:support-v4:23.1.1' -* compile 'com.android.support:appcompat-v7:23.1.1' -* compile 'com.alibaba:fastjson:1.1.45' -*/ - -public class WXApplication extends Application { - @Override - public void onCreate() { - super.onCreate(); - InitConfig config=new InitConfig.Builder().setImgAdapter(new ImageAdapter()).build(); - WXSDKEngine.initialize(this,config); - } -} -``` - -+ Start rendering - -```java -package com.weex.sample; -import android.os.Bundle; -import android.support.v7.app.AppCompatActivity; -import android.view.View; -import com.taobao.weex.IWXRenderListener; -import com.taobao.weex.WXSDKInstance; -import com.taobao.weex.common.WXRenderStrategy; -import com.taobao.weex.utils.WXFileUtils; -public class MainActivity extends AppCompatActivity implements IWXRenderListener { - WXSDKInstance mWXSDKInstance; - @Override - protected void onCreate(Bundle savedInstanceState) { - super.onCreate(savedInstanceState); - setContentView(R.layout.activity_main); - mWXSDKInstance = new WXSDKInstance(this); - mWXSDKInstance.registerRenderListener(this); - /** - * WXSample can be replaced by any string - * Template is js file that .we converted - * Option can be empty, or through the option passed js required parameters. Such as the address of the bundle js. - * JsonInitData can be empty. - * width is -1 , default full screen, you can customize it. - * height is -1 , default full screen, you can customize it. - */ - mWXSDKInstance.render("WXSample", WXFileUtils.loadFileContent("hello.js", this), null, null, -1, -1, WXRenderStrategy.APPEND_ASYNC); - } - @Override - public void onViewCreated(WXSDKInstance instance, View view) { - setContentView(view); - } - @Override - public void onRenderSuccess(WXSDKInstance instance, int width, int height) { - } - @Override - public void onRefreshSuccess(WXSDKInstance instance, int width, int height) { - } - @Override - public void onException(WXSDKInstance instance, String errCode, String msg) { - } - @Override - protected void onResume() { - super.onResume(); - if(mWXSDKInstance!=null){ - mWXSDKInstance.onActivityResume(); - } - } - @Override - protected void onPause() { - super.onPause(); - if(mWXSDKInstance!=null){ - mWXSDKInstance.onActivityPause(); - } - } - @Override - protected void onStop() { - super.onStop(); - if(mWXSDKInstance!=null){ - mWXSDKInstance.onActivityStop(); - } - } - @Override - protected void onDestroy() { - super.onDestroy(); - if(mWXSDKInstance!=null){ - mWXSDKInstance.onActivityDestroy(); - } - } -} -``` - -### Dependence on source code (IDE Android Studio) -1.Download source code. git clone https://github.com/alibaba/weex. -2.Create an android project. -3.Import the SDK Module through the following path: -` File->New-Import Module-> chose WEEX SDK Module(weex/android/sdk) -> Finish` -4.Add the following dependencies: compile project (': weex_sdk') to build.gradle file. -5.Other settings please refer to the above "Quick to use". - -Appendix: [WXSample address](https://github.com/xkli/WXSample.git) `https://github.com/xkli/WXSample.git` - - -## Integrated to iOS - -Through the cocoaPods integrated Weex iOS SDK to the project. -First assume that you have finished installing the [iOS development environment](https://developer.apple.com/library/ios/documentation/IDEs/Conceptual/AppStoreDistributionTutorial/Setup/Setup.html) and [CocoaPods](https://guides.cocoapods.org/using/getting-started.html). - -### Step 1: Add Dependencies -Import Weex iOS SDK to your existing project, if not, you can create a new project. -Before proceeding, make sure that the Podfile file is under the project file. If not, create one and open with text editor. - -+ Integration framework - -WeexSDK The latest version on cocoaPods can be obtained [here](https://cocoapods.org/pods/WeexSDK) . -Add the following to the Podfile file: - -```object-c -source 'g...@github.com:CocoaPods/Specs.git' -target 'YourTarget' do - platform :ios, '7.0' - pod 'WeexSDK', '0.9.5' ## Suggest using latest Weex SDK -end -``` - -+ Integrate with source code - -First copy the ios / sdk directory to your existing project directory (here to copy the root directory of your existing project as an example), and then add the Podfile file. - -```object-c -source 'g...@github.com:CocoaPods/Specs.git' -target 'YourTarget' do - platform :ios, '7.0' - pod 'WeexSDK', :path=>'./sdk/' -end -``` - -### Step 2: Install Dependencies - -Open the command line, switch to the directory of the Podfile file, and run the pod install command. If there are no errors, it means that the environment has been configured. - -### Step 3: Initialize the Weex environment -In the AppDelegate.m file to do the initialization operation, usually in the didFinishLaunchingWithOptions method as follows to add. - -```object-c -//business configuration -[WXAppConfiguration setAppGroup:@"AliApp"]; -[WXAppConfiguration setAppName:@"WeexDemo"]; -[WXAppConfiguration setAppVersion:@"1.0.0"]; -//init sdk environment -[WXSDKEngine initSDKEnvironment]; -//register custom module and componentï¼optional -[WXSDKEngine registerComponent:@"MyView" withClass:[MyViewComponent class]]; -[WXSDKEngine registerModule:@"event" withClass:[WXEventModule class]]; -//register the implementation of protocol, optional -[WXSDKEngine registerHandler:[WXNavigationDefaultImpl new] withProtocol:@protocol(WXNavigationProtocol)]; -//set the log level -[WXLog setLogLevel: WXLogLevelAll]; -``` - -### Step 4: Render weex Instance - -Weex supports both full page rendering and partial rendering. What you need to do is render Weex's view with the specified URL and add it to its parent container. The parent container is generally a viewController. - -```object-c -#import <WeexSDK/WXSDKInstance.h> -- (void)viewDidLoad -{ - [super viewDidLoad]; - _instance = [[WXSDKInstance alloc] init]; - _instance.viewController = self; - _instance.frame = self.view.frame; - __weak typeof(self) weakSelf = self; - _instance.onCreate = ^(UIView *view) { - [weakSelf.weexView removeFromSuperview]; - weakSelf.weexView = view; - [weakSelf.view addSubview:weakSelf.weexView]; - }; - _instance.onFailed = ^(NSError *error) { - //process failure - }; - _instance.renderFinish = ^ (UIView *view) { - //process renderFinish - }; - NSURL *url = [[NSBundle mainBundle] URLForResource:@"main" withExtension:@"js"]; - [_instance renderWithURL:url options:@{@"bundleUrl":[self.url absoluteString]} data:nil]; -} -``` - -WXSDKInstance is a very important class that provides a basic method and some callbacks, such as renderWithURL, onCreate, onFailed, etc., can be found in WXSDKInstance.h. - -### Step 5: Destroy Weex Instance -In the dealloc phase of the viewController destroyed Weex instance, can play a role in avoiding memory leaks. - -```object-c -- (void)dealloc -{ - [_instance destroyInstance]; -} -``` - -#### Import the Weex SDK framework to the project. -The Weex SDK can be compiled from the source code. You can try the latest feature in the new feature or bugfix branch. -Refer to [here](https://open.taobao.com/doc2/detail?spm=a219a.7629140.0.0.tFddsV&&docType=1&articleId=104829) for direct import of weexSDK. http://git-wip-us.apache.org/repos/asf/incubator-weex/blob/8162f8c2/doc/source/guide/intro/app-architecture.md ---------------------------------------------------------------------- diff --git a/doc/source/guide/intro/app-architecture.md b/doc/source/guide/intro/app-architecture.md deleted file mode 100644 index d7b3bc6..0000000 --- a/doc/source/guide/intro/app-architecture.md +++ /dev/null @@ -1,61 +0,0 @@ ---- -title: Mobile App Architecture -type: guide -order: 4.5 -version: 2.1 ---- - -# Mobile App Architecture - -## Today's Mobile App - -Let's talk about what we think a mobile app should be. - -### Mobile App Needs Parallel Development - -Nowadays, all mobile app teams requires the ability to develop in parallel. When a mobile app keeps growing, supporting large-scale parallel development must become a very important key thing. Otherwise it's really easy to become a bottleneck. - -### Mobile App Needs to be Dynamic - -Today the development of mobile apps is very heavy. And it's really slow in iteration, release, distribution and online bugfix. The size of the package of an app is growing fast too. All of this is not suitable for this mobile internet age. Mobile app needs to be dynaimic which is out of the cumbersome process of version deployment and distribution. - -### Mobile App Needs Open Interconnection - -Today in your phone, things are hard to connect and share between different apps. They needs some container with common standard and specs to be shared with each other. - -## Our Thinking of Mobile App - -We think a dynamic, parallel development supported, standardized mobile app should be like this: - -``` -|------|------|------|------| |-----| -| page | page | page | page | | api | -|------|------|------|------| | api | -| page | page | page | page | | api | -|------|------|------|------| | api | -| page | page | page | page | | api | -|---------------------------| | api | -| router | | api | -|---------------------------| |-----| -``` - -* Pages: A whole mobile app should be divided into several mobile pages. Each mobile page has its own "URL". -* Router: All the mobile pages above will be connected with router. And navigators or tab bars are just doing this job. -* Features: All kinds of APIs or services provided from the device. Every mobile page could use these features as they like. - -So before you build your mobile app, make sure how many mobile pages your mobile app has and what are they. How do they connect each other. Give each mobile page a URL. And sort out all the APIs and services your mobile app needs. - -Then create the pages and develop, debug and deploy them using Weex. - -**Links** - -* [Mobile page architecture](./page-architecture.html) - -If you have built a complete mobile app already and just want to using Weex to rebuild part of these pages, that's absolutely no problem. Because Weex is just a SDK to build mobile pages which can coexist very well with other native views or hybrid pages. - -If the feature of WeexSDK is limited to your mobile app. You can extend your own components and modules. It requires some native development knowledge. But with our efforts on delivering more and more features, we believe this part of job will be getting smaller and smaller. - -**Links** - -* [Extend to iOS](../../references/advanced/extend-to-ios.html) -* [Extend to Android](../../references/advanced/extend-to-android.html) http://git-wip-us.apache.org/repos/asf/incubator-weex/blob/8162f8c2/doc/source/guide/intro/how-it-works.md ---------------------------------------------------------------------- diff --git a/doc/source/guide/intro/how-it-works.md b/doc/source/guide/intro/how-it-works.md deleted file mode 100644 index f67f8b4..0000000 --- a/doc/source/guide/intro/how-it-works.md +++ /dev/null @@ -1,72 +0,0 @@ ---- -title: How it works -type: guide -order: 4.1 -has_chapter_content: false -chapter_title: Intro -version: 2.1 ---- - -# How it works - -## Overall Structure - -Weex is a client-side technology on the surface, but in fact it connects the whole way from the local development environment to the cloud deployment and distribution. - -Developers can first write an app page just like writing a web page, and then compile the app page into a piece of JavaScript which is called Weex JS bundle. - -In the cloud, developers can deploy the generated JS bundle. And then it can be requested or pre-fetched from a mobile app with WeexSDK. - -The WeexSDK would prepare a JavaScript engine to run corresponding JS bundle when user opens a Weex page anytime. Usually the JS bundle will make some calls to native-side through Weex JS bridge. They let native-side render the user interface or handle user interactions, storage data, make network communications, call device powers and so on. - -Even if a user does not install the App, he can still open a same web page in the browser, using the same source code. - - - -## Local Development Environment - -The design of local development environment of Weex is based on the web development experience. It help web developers writing mobile app UI with their familiar HTML / CSS / JavaScript. At the same time Weex also do the official support to [Vue.js](https://vuejs.org/), a very great front-end framework. - -In addition, the management of a Weex project is also very familiar with a web project. First, web developers can use npm packages to manage dependencies. Second, web developers can refer to all best practices from every process of a web project such as scaffolding, development, preview, debugging, test etc. - -Also same as the best practice of web development, each Weex page will be built into a JS bundle. In the browser, we put JS bundle into the web page as a `<script>` tag. In the client, we put JS bundle into the local, and execute it in WeexSDK. - -**Links** - -* [Platform differences between Weex and web](../../references/platform-difference.html) -* [Differences of using Vue between Weex with web](../../references/vue/difference-with-web.html) -* [Get Started](../index.html) -* [Using Devtools](./devtools.html) - -## Cloud Deployment & Distribution - -Weex JS bundle can be deployed and distributed as a static resource. Almost all current web development system and best practice can be applied to Weex directly such as generating JS bundle through CMS system or deploying JS bundle to static CDN, monitoring JS bundle traffic through server log, caching or pre-fetching JS bundle to reduce networking cost etc. - -## Client-side JavaScript Engine - -Both iOS and Android client-side of Weex run a JavaScript engine to execute JS bundles and send well defined instructions to the native render layers. We choose JavaScriptCore in iOS and v8 in Android which provide strong performance and stability. - -In order to make the mobile resources better utilized, we just run only one instance of JavaScript for all Weex pages. That is, all JS bundles share the same JavaScript instance, but each JS bundle context also isolated well by default in the runtime. We also put Vue 2.0 as a built-in JS Framework, developers do not have to pack it in each JS bundle, which save the size and time of networking. - -## Client Rendering Layer - -Weex offers both iOS and Android native rendering layers. Each of them are based on the Native DOM model and exposed to JavaScript APIs. At the same time we provide a set of native components and modules to use. Also Weex has high performance especially on first-screen loading time, memory cost and re-reuse of long list, etc. - -Although Weex has provided a group of most commonly used components and modules officially. But we definitely know they couldn't satisfy everyone. So we design our native render as extendable as possible. You can extend more components and modules on your own. We can build and share an Weex eco-system together. - -**Links** - -* [Differences between Weex and web standard](../../references/web-standards.html) -* [Using Weex in iOS](../../references/ios-apis.html) -* [Using Weex in Android](../../references/android-apis.html) -* [Extend to iOS](../../references/advanced/extend-to-ios.html) -* [Extend to Android](../../references/advanced/extend-to-android.html) - -## In the Browser - -Besides iOS and Android client, Weex also has a web version based on Vue 2.0. Developers can just use Vue 2.0 to build the same page in browsers. - -**Links** - -* [Using Weex in HTML5](../../references/html5-apis.html) -* [Extend to HTML5](../../references/advanced/extend-to-html5.html) http://git-wip-us.apache.org/repos/asf/incubator-weex/blob/8162f8c2/doc/source/guide/intro/index.md ---------------------------------------------------------------------- diff --git a/doc/source/guide/intro/index.md b/doc/source/guide/intro/index.md deleted file mode 100644 index 24c8236..0000000 --- a/doc/source/guide/intro/index.md +++ /dev/null @@ -1,17 +0,0 @@ ---- -title: Intro -type: guide -order: 4 -has_chapter_content: false -chapter_title: Intro -version: 2.1 ---- - -# Intro - -- [How it works](./how-it-works.html) -- [Web Dev Experience](./web-dev-experience.html) -- [Using Vue](./using-vue.html) -- [Write once, Run Everywhere](./write-once.html) -- [App Architecture](./app-architecture.html) -- [Weex Page Architecture](./page-architecture.html) http://git-wip-us.apache.org/repos/asf/incubator-weex/blob/8162f8c2/doc/source/guide/intro/page-architecture.md ---------------------------------------------------------------------- diff --git a/doc/source/guide/intro/page-architecture.md b/doc/source/guide/intro/page-architecture.md deleted file mode 100644 index a9d8014..0000000 --- a/doc/source/guide/intro/page-architecture.md +++ /dev/null @@ -1,48 +0,0 @@ ---- -title: Weex Page Architecture -type: guide -order: 4.6 -version: 2.1 ---- - -# Weex Page Architecture - -A Weex page is a independent mobile page which includes UI, interaction logic, device power, lifecycle management etc. - -## UI - -### Native DOM Model - -Weex page has its HTML-like DOM model to manage UI. It will be decomposed into a DOM tree which consists of some DOM nodes. - -**Links** - -* [Weex Native DOM APIs](../../references/native-dom-api.html) - -### Components - -Weex supports many kinds of components. Some of them are content components such as text, image and videos. Some of them are container components such as div, list, scroller. Also there are some special components like slider, input, textarea, and switch. - -**Links** - -* [All components Weex supports](../../references/components/index.html) - -### Layout System - -Weex use some CSS properties to layout every nodes in the DOM tree together. It includes: - -* Box model: Describe the `width`, `height`, `padding`, `margin` and `border` of a component node. -* Flexbox: Describe the relations between different nodes with CSS Flexbox Spec. -* Supportting `absolute`, `relative`, `fixed` and `sticky` value of CSS `position` property. - -### Features - -Weex supports lots of device features through modules such as storage, navigation, modals etc. Each of them exposes some JS APIs. - -**Links** - -* [All modules Weex supports](../../references/modules/index.html) - -### Lifecycle - -Every Weex page has its lifecycle which is defined and implemented in WeexSDK. All Weex pages will go through the whole process, from being created and last to being destroyed. http://git-wip-us.apache.org/repos/asf/incubator-weex/blob/8162f8c2/doc/source/guide/intro/using-vue.md ---------------------------------------------------------------------- diff --git a/doc/source/guide/intro/using-vue.md b/doc/source/guide/intro/using-vue.md deleted file mode 100644 index 56c1ca4..0000000 --- a/doc/source/guide/intro/using-vue.md +++ /dev/null @@ -1,58 +0,0 @@ ---- -title: Using Vue -type: guide -order: 4.3 -version: 2.1 ---- - -# Using Vue - -## Vue in Weex - -[Vue.js](https://vuejs.org/) is an excellent progressive JavaScript framework written by [Evan You](https://twitter.com/youyuxi) which is very easy and flexible to use. Developers can write `*.vue` files with friendly `<template>`, `<style>`, `<script>` tags to build componentized web apps. - - - -In Oct 2016 Vue.js launched 2.0, which includes the virtual-DOM and pre-compiler for HTML templates. This means Vue.js can run in a JS-only environment without HTML / CSS parsers. The virtual-DOM layer also makes Vue 2.x able to render native UIs through JavaScript. - -Weex and Vue now support each other officially. Now that Weex includes Vue 2.x as its built-in JS Framework, Vue can be used to develop native mobile apps. - -**Links** - -* [Weex tutorial](../index.html) -* [Vue Introduction](https://vuejs.org/v2/guide/) -* [How Weex works](./index.html) - -## New Features of Vue 2.x in Weex - -### Stream Rendering - -In Weex, developers can use `<foo append="tree|node">` to customize the rendering granularity to balance different UI complexity and business logic in order to get the best first-paint performance. `append=tree` means that the entire node, including all its child nodes, will be one-time rendered to native UI after all of the nodes generated completely. And `append=node` means just render the current node itself first and its child nodes will be futher rendered later. - -<!-- dotwe demo --> - -### Two-way Data Binding in Form Controls - -In Weex, we provide the same `v-model` directive as web dev exprience for both `<input>` and `<textarea>` components. Developers can write `<input v-model="message">` or `<textarea v-model="message">` to bind data `message` and show it on the text box automatically. When user modifies the text box, the value of data `message` will be automatically updated. - -<!-- dotwe demo --> - -### Isolate Each Page Contexts - -As described in [how Weex works](./index.html), all Weex's JS bundles share a JavaScript instance. So how can we make Vue 2.x used in multiple JS bundles completely isolated, and that one page which extends or rewrites Vue does not affect other pages becomes a problem. Through the collaboration between Weex and Vue. The problem has been solved. - -<!-- html5 apis --> - -### `<transition>` - -Weex supports the awesome `<transition>` syntax in Vue 2.x. Developers can easily define the transition of an interface in both states with `<transition>` tag. - -## Notice - -Web development and native development, after all, there are some differences in functionality and development experience, which are essentially the differences between the native development platform and the Web platform, and Weex is trying to narrow the scope of this difference. See [differences of Vue 2.x between Weex and web](../../references/vue/index.html) - -## Using Vue-related Libs - -Vue.js also has more cool related libs. For example [Vuex](https://github.com/vuejs/vuex) and [vue-router](https://github.com/vuejs/vue-router). They all work well in Weex. For using Vuex and vue-router, see [Using Vuex and vue-router in Weex](../../references/vue/difference-of-vuex.html)ã - -> We developed a complete project based on Weex and Vue 2.x which named [weex-hackernews](https://github.com/weepteam/web-ehackernews). It includes WeexSDK with Vue 2.x in iOS, Android and web. Also we use Vuex and vue-router. The whole project uses the same source code for three different platforms. http://git-wip-us.apache.org/repos/asf/incubator-weex/blob/8162f8c2/doc/source/guide/intro/web-dev-experience.md ---------------------------------------------------------------------- diff --git a/doc/source/guide/intro/web-dev-experience.md b/doc/source/guide/intro/web-dev-experience.md deleted file mode 100644 index 81d0ff2..0000000 --- a/doc/source/guide/intro/web-dev-experience.md +++ /dev/null @@ -1,36 +0,0 @@ ---- -title: Web Dev Experience -type: guide -order: 4.2 -version: 2.1 ---- - -# Web Dev Experience - -## What is Web Dev Experience? - -Weex dev experience is very close to web dev experience. It describes the UI structure and content with HTML or HTML-based template, describes the UI style with CSS, and describes user behavior and business logic with JavaScript. And it has completed project mechanism. - -## Why We Choose Web Dev Experience? - -1. There are a huge number of web developers in the community today. Weex can give more web developers abilities to build high-performance and great-experienced mobile apps. -2. Web development itself has very high efficiency and flexibility. And Weex is committed to solve the dynamic requirement of mobile apps. They just match each other. -3. Web standards and web dev experience is built by a lot of outstanding technology companies together. It has very high quality assurance. -4. Standard itself is a force. Base on standards, respect for standards, close to the standard means that there are more possibilities. -5. The eco-system and community of web today are very prosperous. There are many mature tools, libraries, systems, best practices to be used. - -## How Does Weex Support Web Standard? - -We have the following aspects to sort out: - -* HTML tags: Weex currently supports basic container (div), text, image, video and other components. And almost all of HTML block-level tags can be simulated through the custom container components. Inline-level tags can be simulated through the custom text components. And Weex also supports some form components such as input / textarea. -* CSS: Weex supports some commonly used CSS properties, values and units. We will continue to support more based on user feedback and the usage frequency in web. -* JavaScript: Weex currently offers a simplified version of the DOM APIs for operating the native UI. And Weex will continue to support more W3C Device APIs. -* About frameworks, Weex officially build Vue 2.0 in. and support its related libs such as vuex, vue-router, etc. At the same time developers can directly use all kinds of third-party JavaScript libs. -* About engineering, we recommend using npm to pack and manage deps. And we recommend webpack for the JS bundle package. Also we provide weex-devtool, which make developers debug native app just like in Chrome devtools. Weex also is friendly to current mainstream web page publishing system, caching mechanism and other best practices. - -**Links** - -* [Differences between Weex and web standard](../../references/web-standards.html) -* [Using Vue.js](./using-vue.html) -* [Using Devtools](./devtools.html) http://git-wip-us.apache.org/repos/asf/incubator-weex/blob/8162f8c2/doc/source/guide/intro/write-once.md ---------------------------------------------------------------------- diff --git a/doc/source/guide/intro/write-once.md b/doc/source/guide/intro/write-once.md deleted file mode 100644 index 673b302..0000000 --- a/doc/source/guide/intro/write-once.md +++ /dev/null @@ -1,23 +0,0 @@ ---- -title: Write once, Run Everywhere -type: guide -order: 4.4 -version: 2.1 ---- - -# Write Once, Run Everywhere - -Weex is a "Write Once, Run Everywhere" solution. - -* First, Weex is based on web dev experience, which includes syntax and project management. -* Second, all components & modules in Weex are discussed by iOS, Android, web developers together to ensure it's common enough to satisfy every platforms. -* You only need write the same Weex code for each platforms. - -We think about it in these aspects below: - -1. Today for almost all mobile apps, one app solves the same problem in different platforms. Weex hope to supply a lightweight way to describe your business logic which works well in all platforms you need. -2. For the differences of all mobile platforms, we are willing to fill the gap in 3 points: - 1. Design the same APIs for all platforms to ensure different platforms have the same business logic description. - 2. Implement the APIs with different style or behaviors to ensure the implementation and user experience matches different platforms. - 3. Platforms obviously differ among each other. We also have some environment variables to help developers in certain situations. -3. We trust (web) standard is the best for all features in all platforms. http://git-wip-us.apache.org/repos/asf/incubator-weex/blob/8162f8c2/doc/source/guide/set-up-env.md ---------------------------------------------------------------------- diff --git a/doc/source/guide/set-up-env.md b/doc/source/guide/set-up-env.md deleted file mode 100644 index ac52367..0000000 --- a/doc/source/guide/set-up-env.md +++ /dev/null @@ -1,99 +0,0 @@ ---- -title: Setup Development Environment -type: guide -order: 1.1 -version: 2.1 -has_chapter_content: true ---- - -# Setup Development Environment - -Using [dotWe](http://dotwe.org/vue) is a good choice, but if you want to develop locally on your own machine, you will need to set up your development environment. - -You will need Node.js and the [Weex CLI](https://github.com/weexteam/weex-toolkit). - -Install Node.js using [nvm](https://github.com/creationix/nvm) (Simple bash script to manage multiple active Node.js versions). Run the following commands in a terminal after installing nvm: - -```bash -$ nvm install 6.10.0 -$ nvm use 6.10.0 -``` - -And `npm` comes with Node.js, with witch you can install the Weex command line tools. - -**NOTE: ** After upgrading the `weex-toolkit` to v1.0.8, the `npm-shrinkwrap.json` npm 5 specification has been added to lock the package dependencies, it is needed to upgrade your npm version to 5 above by command: `npm install npm @latest -g` if your version is lower than this, please check your npm version before using it. - -Run the following commands in a terminal: - -```bash -$ npm install -g weex-toolkit -$ weex -v -``` -You can use 'weex update <component>@x.x.x' to update weex-devtool, weex-previewer, weex-builder and weexpack to a specific version. -``` -weex update weex-devtool@latest // Here latest means to install the latest version -``` - -**NOTE: ** If you receive an error like "permission error", try another time with `sudo`. - -Then you can use the Weex command to verify if the installation is successful: - -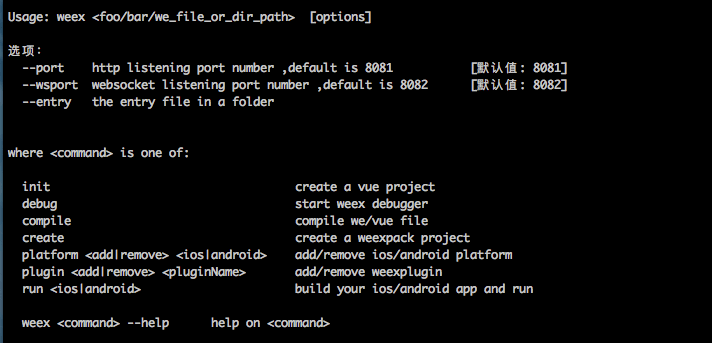 - -### Generate a new Weex project - -Use the command line tool to generate a Weex project called "awesome-project". Run the following command in a terminal: - -```bash -$ weex create awesome-project -``` - -Then enter the awesome-project folder, you will see a standard project skeleton has been generated. - -### Usage - -In the awesome-project folder, install dependencies with the following command: - -```bash -npm install -``` - -Then run `npm run serve` in root directory to start watching mode and static server. - -Finally, you can access the Weex page in `http://localhost:8080/index.html`. - -This page can be modified in `src/index.vue`. The codes are shown below: - -```html -<template> - <div class="wrapper" @click="update"> - <image :src="logoUrl" class="logo"></image> - <text class="title">Hello {{target}}</text> - <text class="desc">Now, let's use vue to build your weex app.</text> - </div> -</template> - -<style> - .wrapper { align-items: center; margin-top: 120px; } - .title { padding-top:40px; padding-bottom: 40px; font-size: 48px; } - .logo { width: 360px; height: 156px; } - .desc { padding-top: 20px; color:#888; font-size: 24px;} -</style> - -<script> - export default { - data: { - logoUrl: 'http://img1.vued.vanthink.cn/vued08aa73a9ab65dcbd360ec54659ada97c.png', - target: 'World' - }, - methods: { - update: function (e) { - this.target = 'Weex' - console.log('target:', this.target) - } - } - } -</script> -``` - -For more technical details, please continue to read the next section. And don't forget to write and preview your codes at [dotWe](http://dotwe.org/vue). http://git-wip-us.apache.org/repos/asf/incubator-weex/blob/8162f8c2/doc/source/guide/tools/index.md ---------------------------------------------------------------------- diff --git a/doc/source/guide/tools/index.md b/doc/source/guide/tools/index.md deleted file mode 100644 index 356bf98..0000000 --- a/doc/source/guide/tools/index.md +++ /dev/null @@ -1,11 +0,0 @@ ---- -title: Tools -type: guide -order: 5 -version: 2.1 ---- - -# Tools - -- [weex-toolkit](./toolkit.html) -- [IDEA / WebStorm Plugin](./plugin.html) http://git-wip-us.apache.org/repos/asf/incubator-weex/blob/8162f8c2/doc/source/guide/tools/plugin.md ---------------------------------------------------------------------- diff --git a/doc/source/guide/tools/plugin.md b/doc/source/guide/tools/plugin.md deleted file mode 100644 index a74d866..0000000 --- a/doc/source/guide/tools/plugin.md +++ /dev/null @@ -1,68 +0,0 @@ ---- -title: Weex Language Support Plugin -type: guide -order: 5.1 -version: 2.1 ---- - -# Weex Language Support Plugin - -[Weex Language Support](https://plugins.jetbrains.com/plugin/9189-weex-language-support) is a official tools to code highlight, automatic completionï¼lint and other functions in IDEA, WebStorm or the others IDEs. - -### Supported IDEs -You can install and use this plugin on the following IDEs on any operating system: -**IntelliJ IDEA Ultimate, PhpStorm, WebStorm, PyCharm, RubyMine, AppCode, CLion, Gogland, Rider** - -### Install -Just searching the `Weex Language Support` in plugin repo to install, next you need restart IDE to enable it. -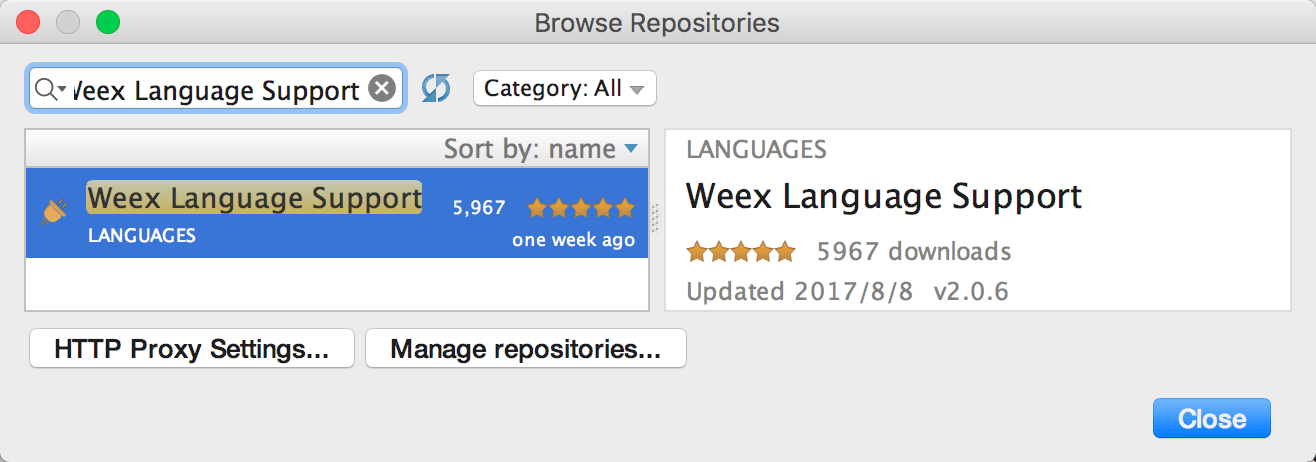 - -### Configurations -Open `Preferences -> Other Settings -> Weex language support` to configuration plugin -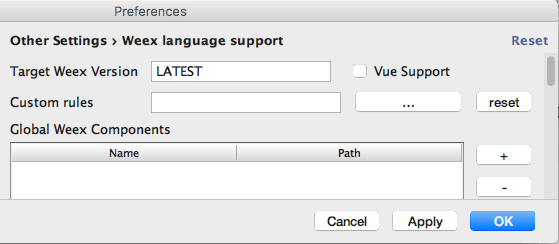 -- Target Weex Version: Config the version of Weex that your current project in use, default is `LATEST`, it means always using the latest version -- Vue Support: Config whether to support Vue, you need to restart IDE after turning on or off the set to take effect -- Custom Rules: Import the custom Weex DSL rules, The format of the custom rules will be listed later -- Global Weex Components: Sets the location of the module that is applied in the project, in particular, the `node_modules` directory in current project and npm root will be automatically included, you do not need to add them here - - -### Format of Custom DSL Rules -Custom rules are included in a json file, the root node of the json file is an array, each element in the array corresponds to a label in the DSL. -Let's take the example of the `loading>` tag: -```js -{ - "tag": "loading", //tag name, not null - "attrs": [ //attributes of tag, can be null - { - "name": "display", //attribute name, not null - "valuePattern": null, //pattern expression to check the attribute value, can be null - "valueEnum": [ //attribute value enumeration, can be null - "show", - "hide" - ], - "valueType": "var", //type of attribute value, must be var or function - "since": 0, //which version the attribute is added to sdk, such as 0.11 - "weexOnly": false //whether the attribute is available only in 1.0 syntax, default is false - } - ], - "events": [ //events list, can be null - { - "name": "loading", //event name, not null - "since": 0 //which version the event is added to sdk - } - ], - "parents": [ //The tag is allowed to be a child of which tags, null means no restrictions - "list", - "scroller" - ], - "childes": [ //which tags are allowed as their own child tags, null means no restrictions - "text", - "image", - "loading-indicator" - ], - "document": "/references/components/loading.html" //document link - } -``` - -### Contribution -Please commiting Issues and Pull Requests into the [weex-language-support](https://github.com/misakuo/weex-language-support) project \ No newline at end of file http://git-wip-us.apache.org/repos/asf/incubator-weex/blob/8162f8c2/doc/source/guide/tools/toolkit.md ---------------------------------------------------------------------- diff --git a/doc/source/guide/tools/toolkit.md b/doc/source/guide/tools/toolkit.md deleted file mode 100644 index a325923..0000000 --- a/doc/source/guide/tools/toolkit.md +++ /dev/null @@ -1,197 +0,0 @@ ---- -title: use weex-toolkit -type: guide -order: 5.1 -version: 2.1 ---- - -# weex-toolkit - -[weex-toolkit](https://github.com/weexteam/weex-toolkit) is an official command line tool to help developers to create, debug and build their Weex project. - -### Install -use npm to install weex-toolkit: - -``` bash -$ npm install -g weex-toolkit -``` -if you make it, you can input "weex" in your command line terminal to test it. The right output: - - - - -if you have never installed node.js, you should go [node.js.org]( https://nodejs.org/en/) to download and install it. -* node engine version >= 6. You can try [n](https://github.com/tj/n) to manage your node versions* -If you meet some errors when installing like `permission error`, please go [weex-toolkit issues](https://github.com/weexteam/weex-toolkit/issues) to find some solution or have a discuss with us. - - -### initialize Weex project -```bash -$ weex init awesome-project -``` -After command running, you can find `awesome-project` directory and there are some Weex templates in it. -There are some useful npm scripts you will use in the future: - -- `build`: build the source code and generate the JS bundle -- `dev`: run webpack watch configuration -- `serve`: start a web server -- `debug`: open the debug mode - -Then we run `npm run dev & npm run serve` in root directory to start watch mode and static server. - -Finally, we can see the Weex page in `http://localhost:8080/index.html`. - -### preview Weex page in time - -weex-toolkit supports previewing your Weex file(`.we` or `.vue`) in a watch mode. You only need specify your file path. - -``` bash -$ weex src/foo.vue -``` -The browser will auto open the location and you could see the layout and effects of your Weex page. If you have a [Playground](https://weex.apache.org/cn/playground.html) app in your mobile devices, you can scan the QR code at the opened page. -Try the command below, youâll preview the whole directory files. - -``` bash -$ weex src --entry src/foo.vue -``` -You need to specify the directory path and the entry file(`--entry`). -### build Weex project -Use ` weex compile ` to build your single weex file or the whole project. -``` bash -weex compile src/foo.vue dist -``` -There are two arguments. One is your code source path (a single file or a directory) and another is your destination path you want to build - -### debug - -weex-toolkit has the ability to extend third party script. And **[Weex devtools](https://github.com/weexteam/weex-devtool)** is a custom devtools for Weex that implements [Chrome Debugging Protocol](https://developer.chrome.com/devtools/docs/debugger-protocol), it is designed to help you quickly inspect your app and debug your JS bundle source in a Chrome web page, both android and iOS platform are supported. So you can use weex-devtools feature by weex-toolkit. - -#### usage - -``` bash -weex debug [options] [we_file|bundles_dir] - - Options: - - -h, --help output usage information - -V, --verbose display logs of debugger server - -v, --version display version - -p, --port [port] set debugger server port - -e, --entry [entry] set the entry bundlejs path when you specific the bundle server root path - -m, --mode [mode] set build mode [transformer|loader] - -w, --watch watch we file changes auto build them and refresh debugger page![default enabled] -``` -#### start debugger - -``` -$ weex debug -``` - - -this command will start debug server and launch a chrome opening `DeviceList` page. -this page will display a qrcode ,you can use `Playground App` scan it for starting debug. - -#### debug `.we` | `.vue` file - -``` -$ weex debug your_weex.vue -``` - -this command will compile `your_weex.we` to `your_weex.js` and start the debug server as upon command. -`your_weex.js` will deploy on the server and displayed in `DeviceList` page as another qrcode contain the url of your_weex.js. - -. -#### start debugger with a directory of we files - - -``` -$weex debug your/we/path -e index.we -``` - -this command will build every file in `your/we/path `and deploy them on the bundle server. your directory will mapping to http://localhost:port/weex/ -use `-e` to set the entry of these bundles. and the url of `index.we` will display on device list page as another qrcode. - - -#### Features - -##### Connect devices - -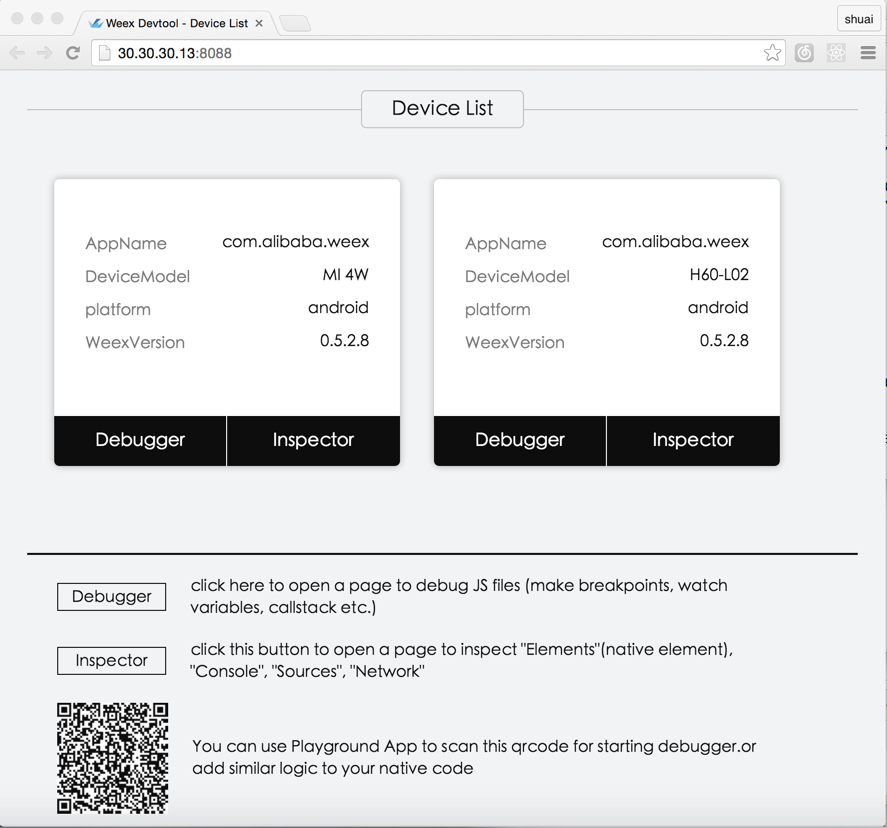 - -##### Inspector - - Inspector can be used to show your `Element` \ `Network` \ `Console log` \ `ScreenCast` \ `BoxModel` \ `Native View` and so on. - -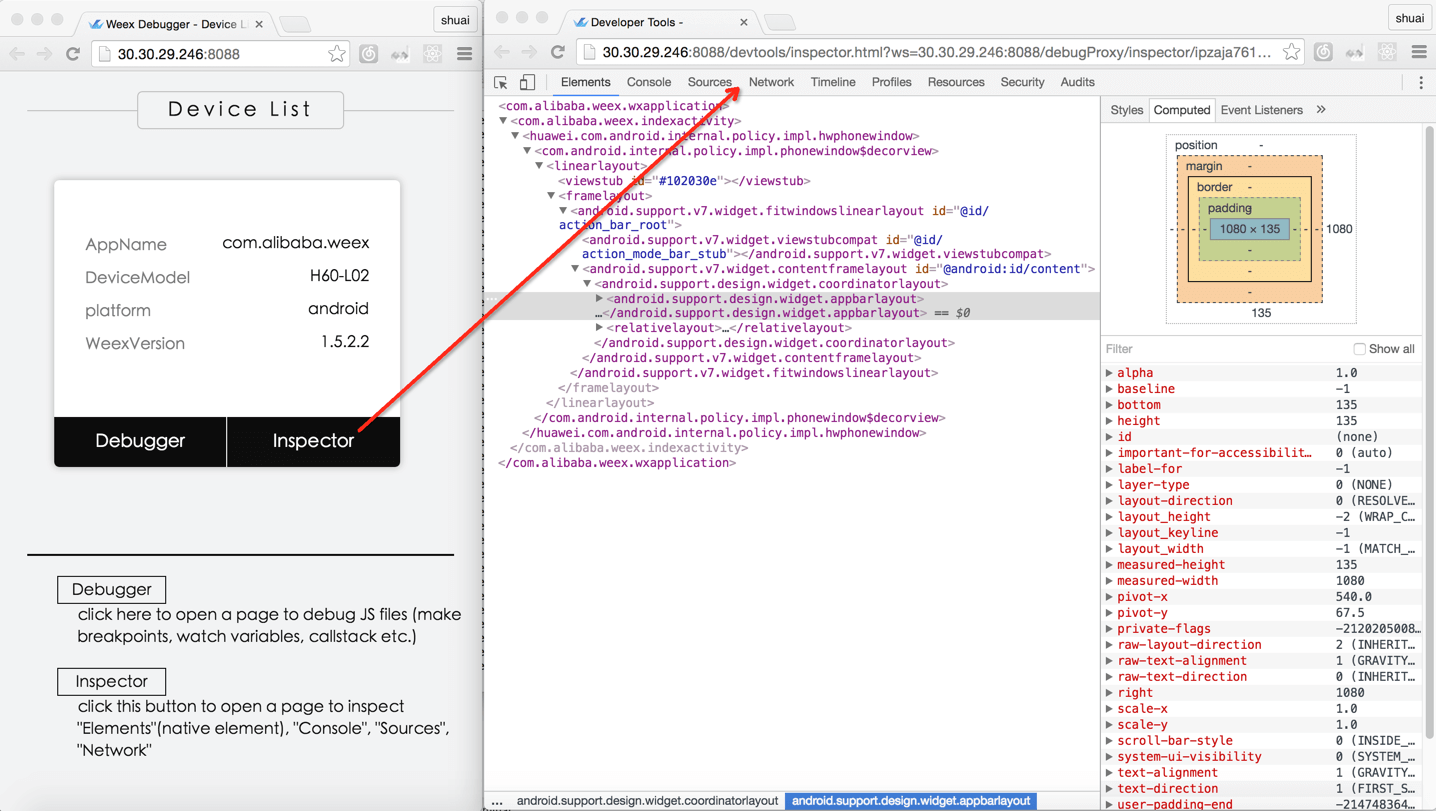 -##### Element - -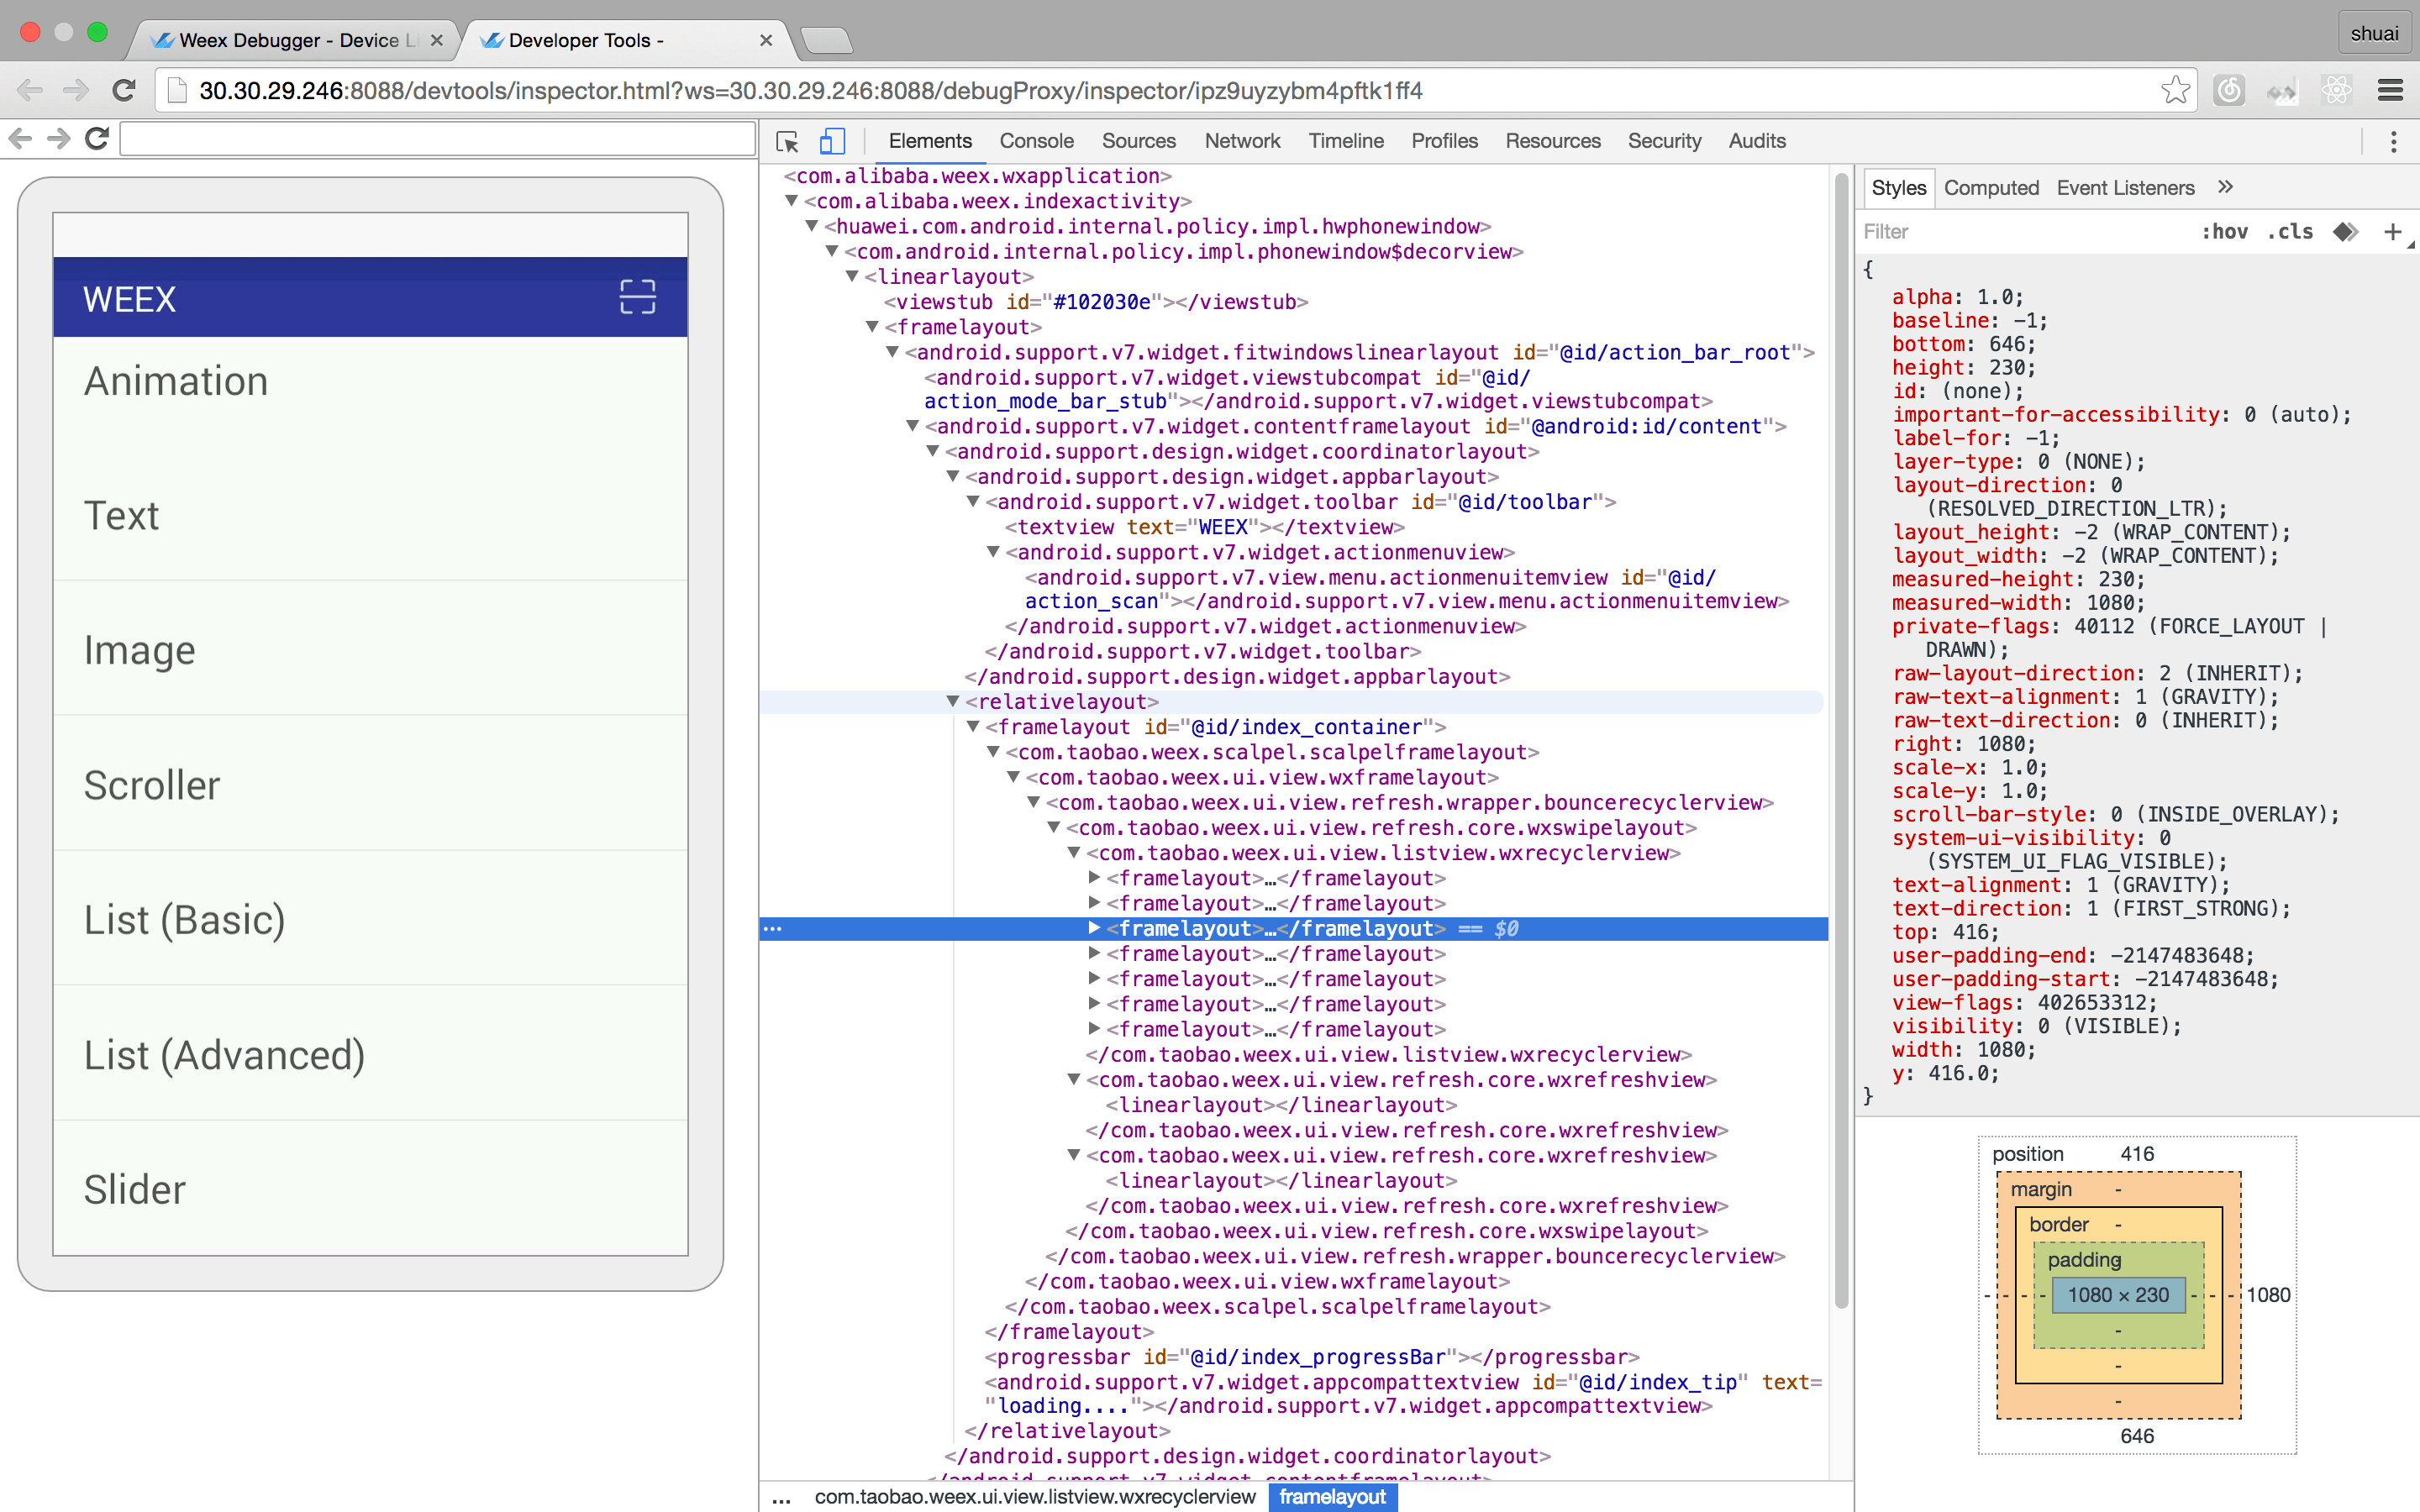 -##### NetWork -##### show the total time and latency - -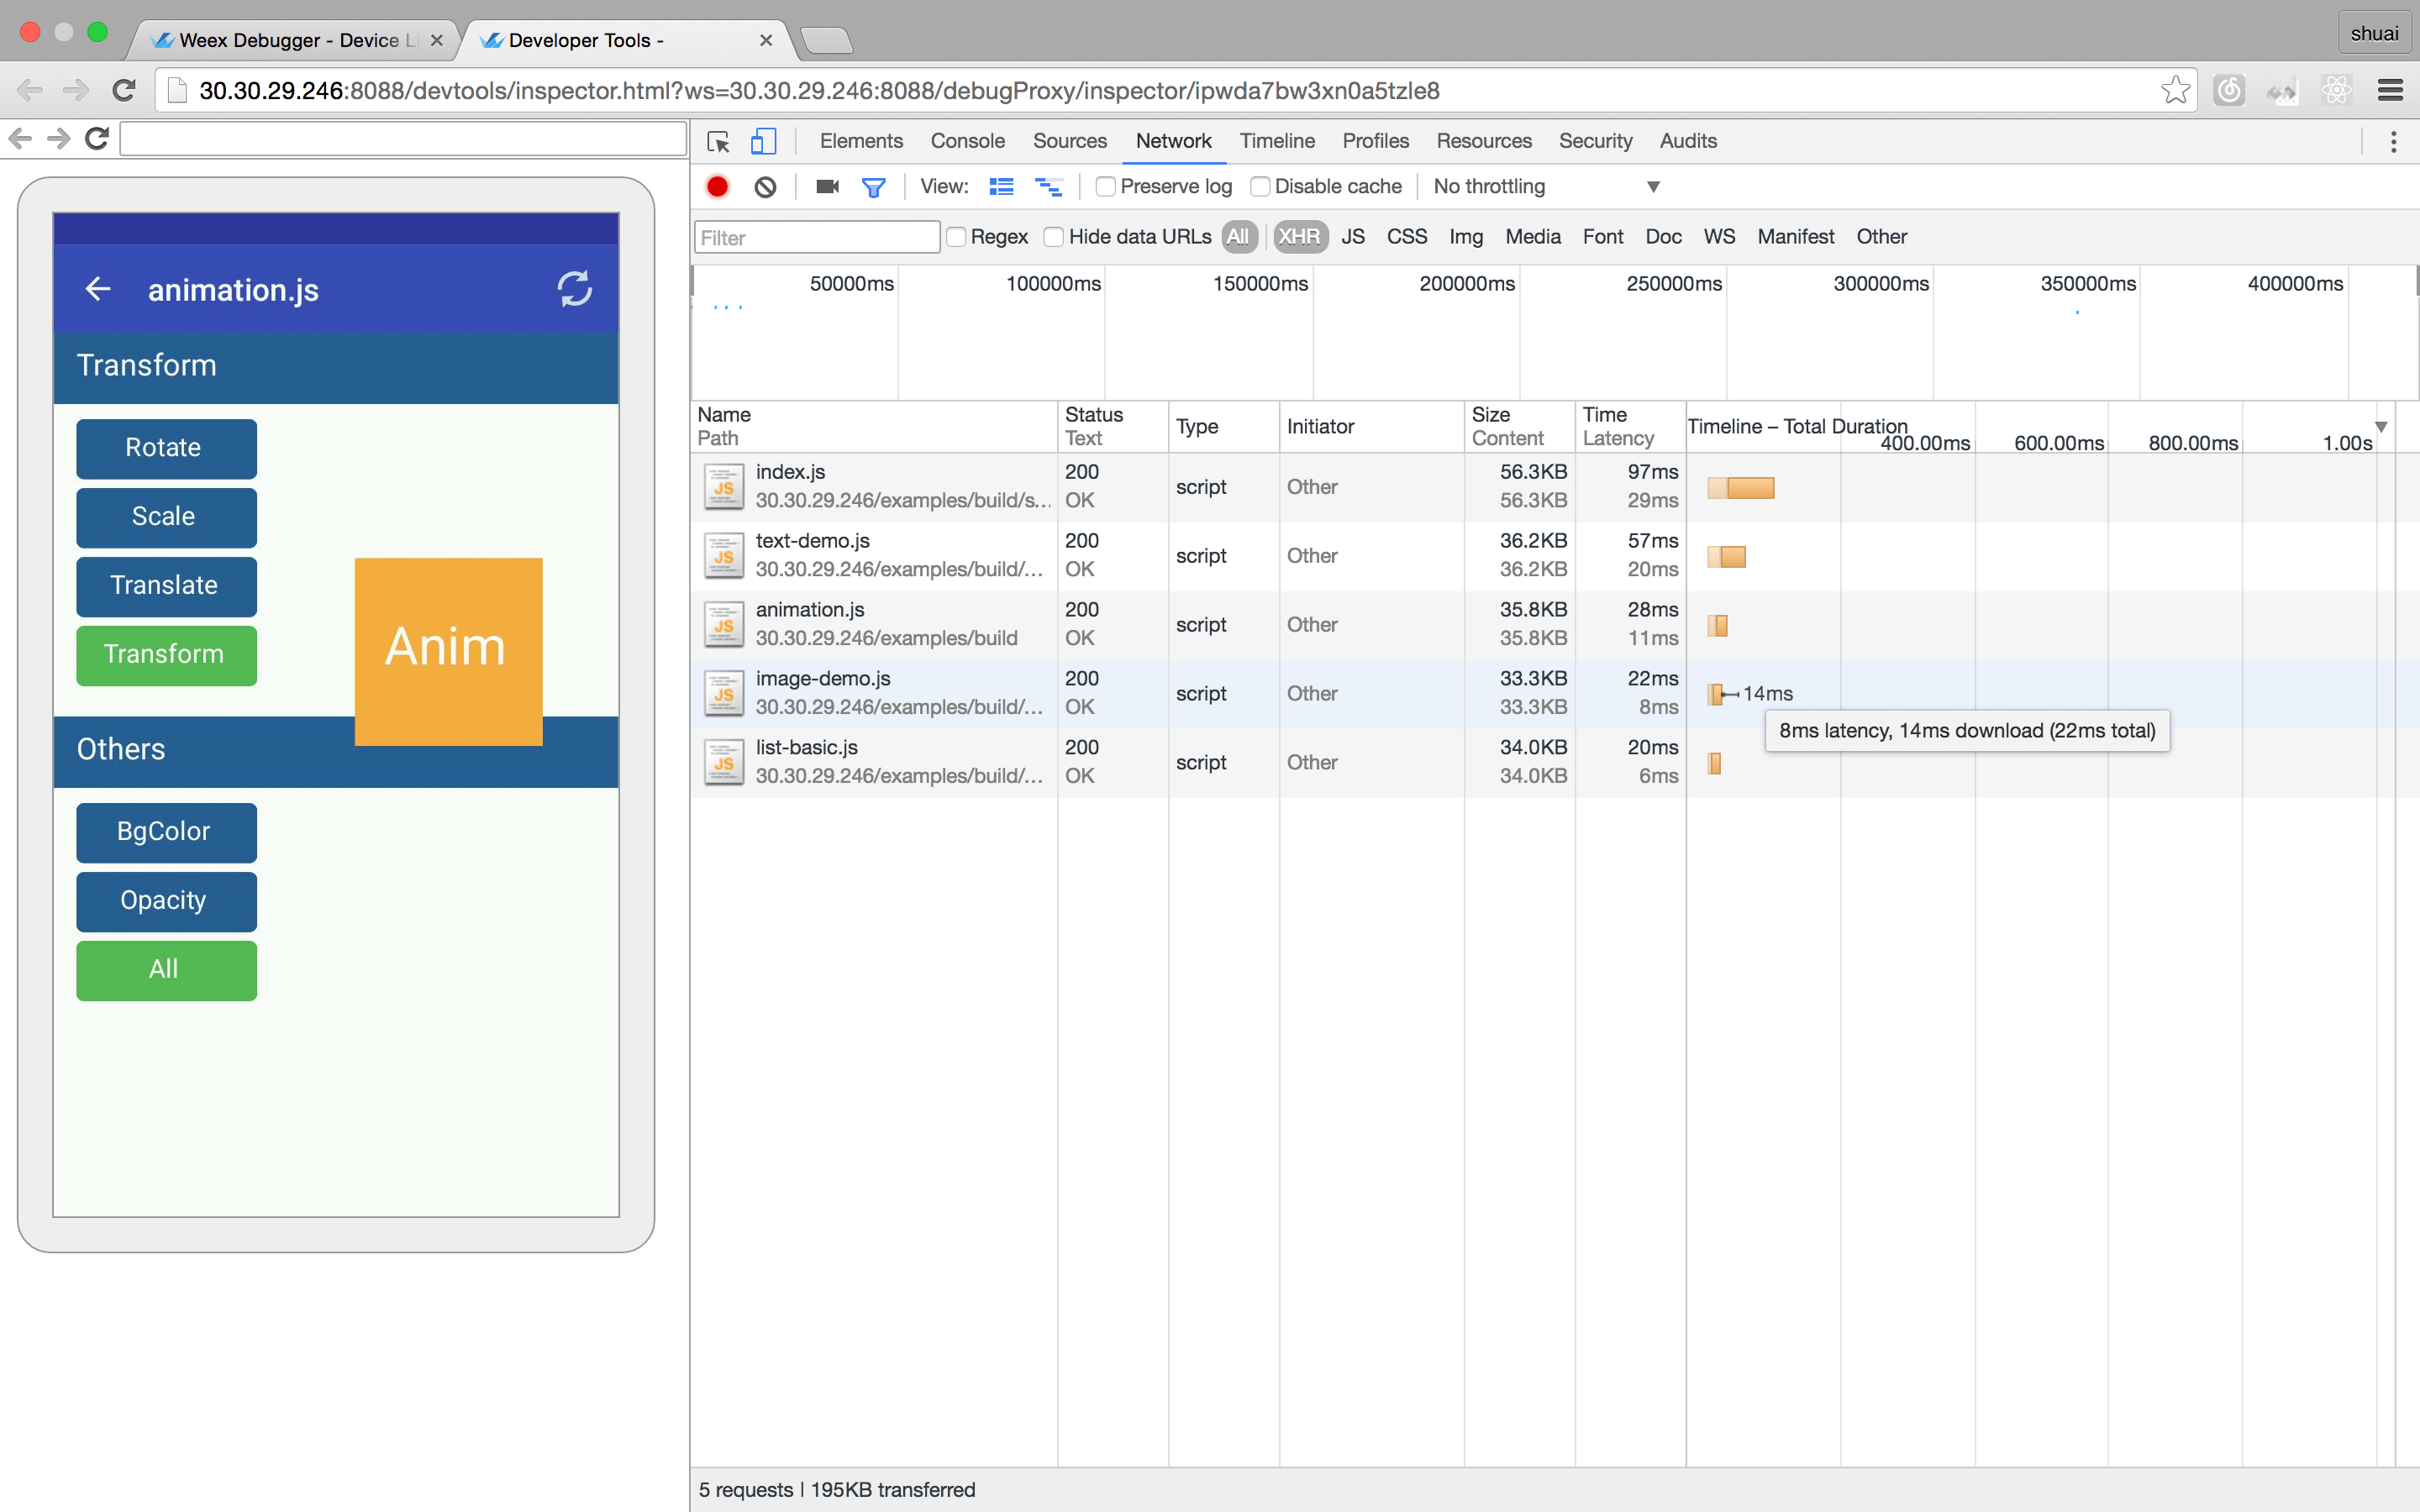 -##### show the header and response - -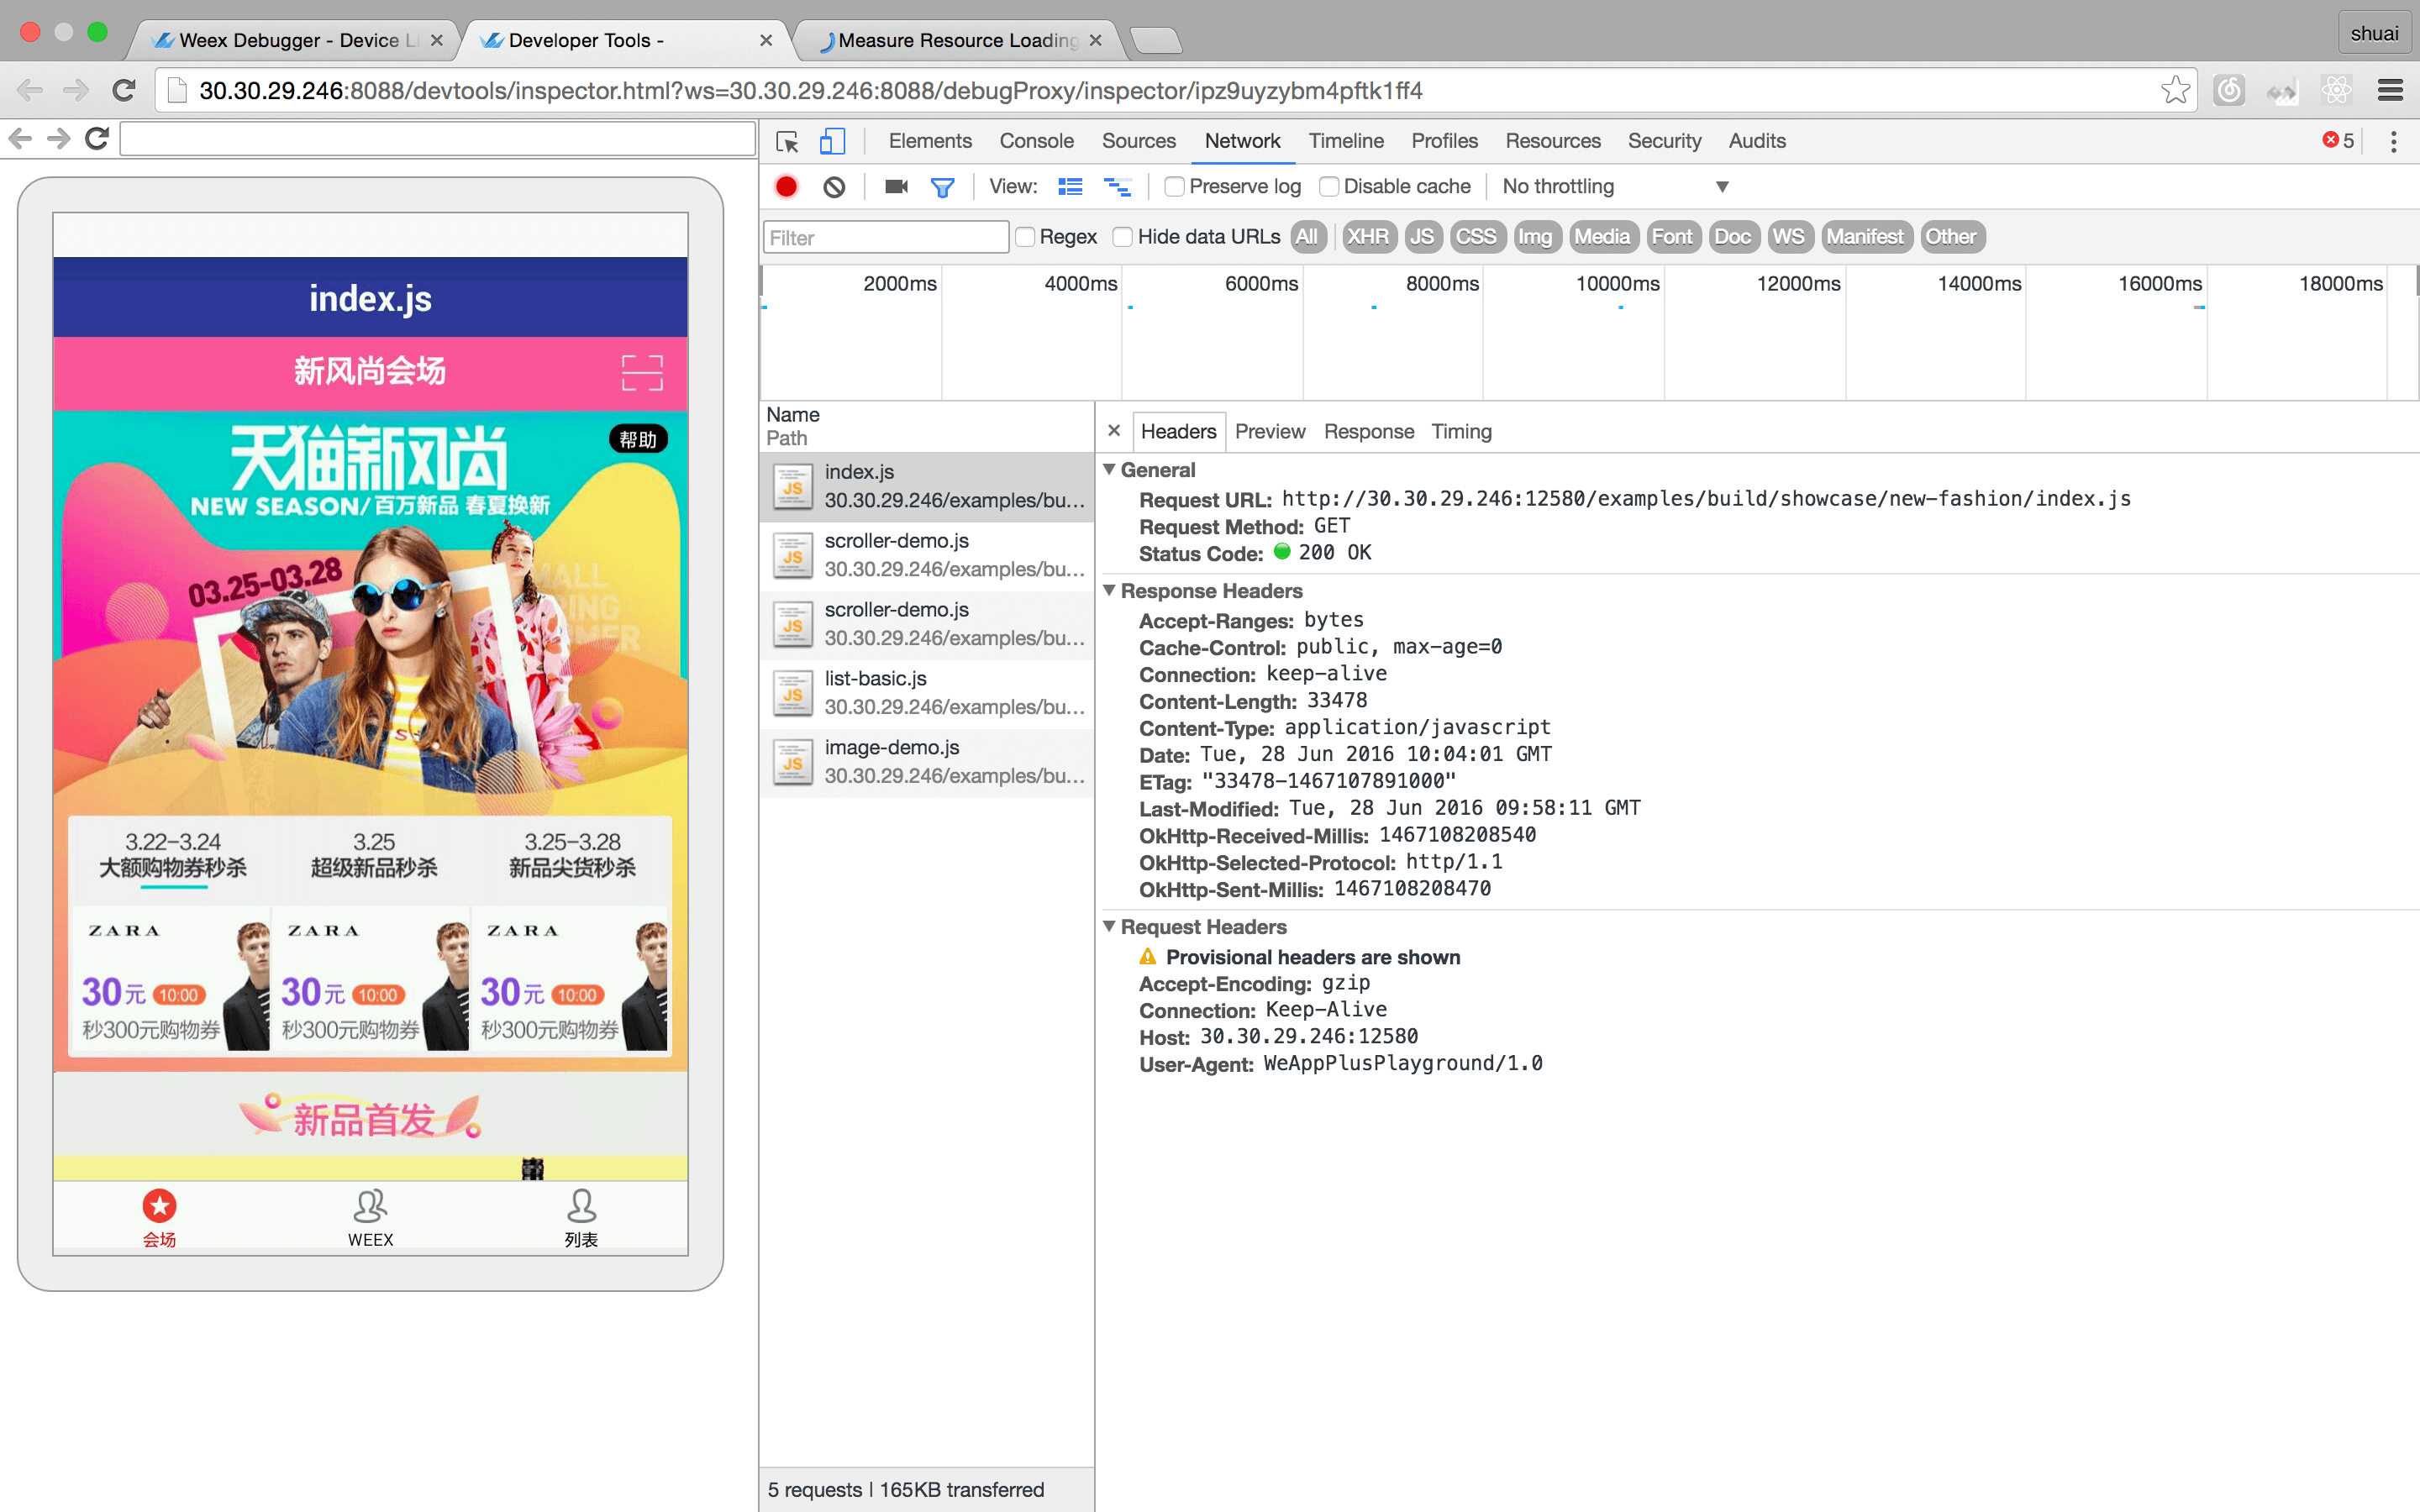 -##### Console - -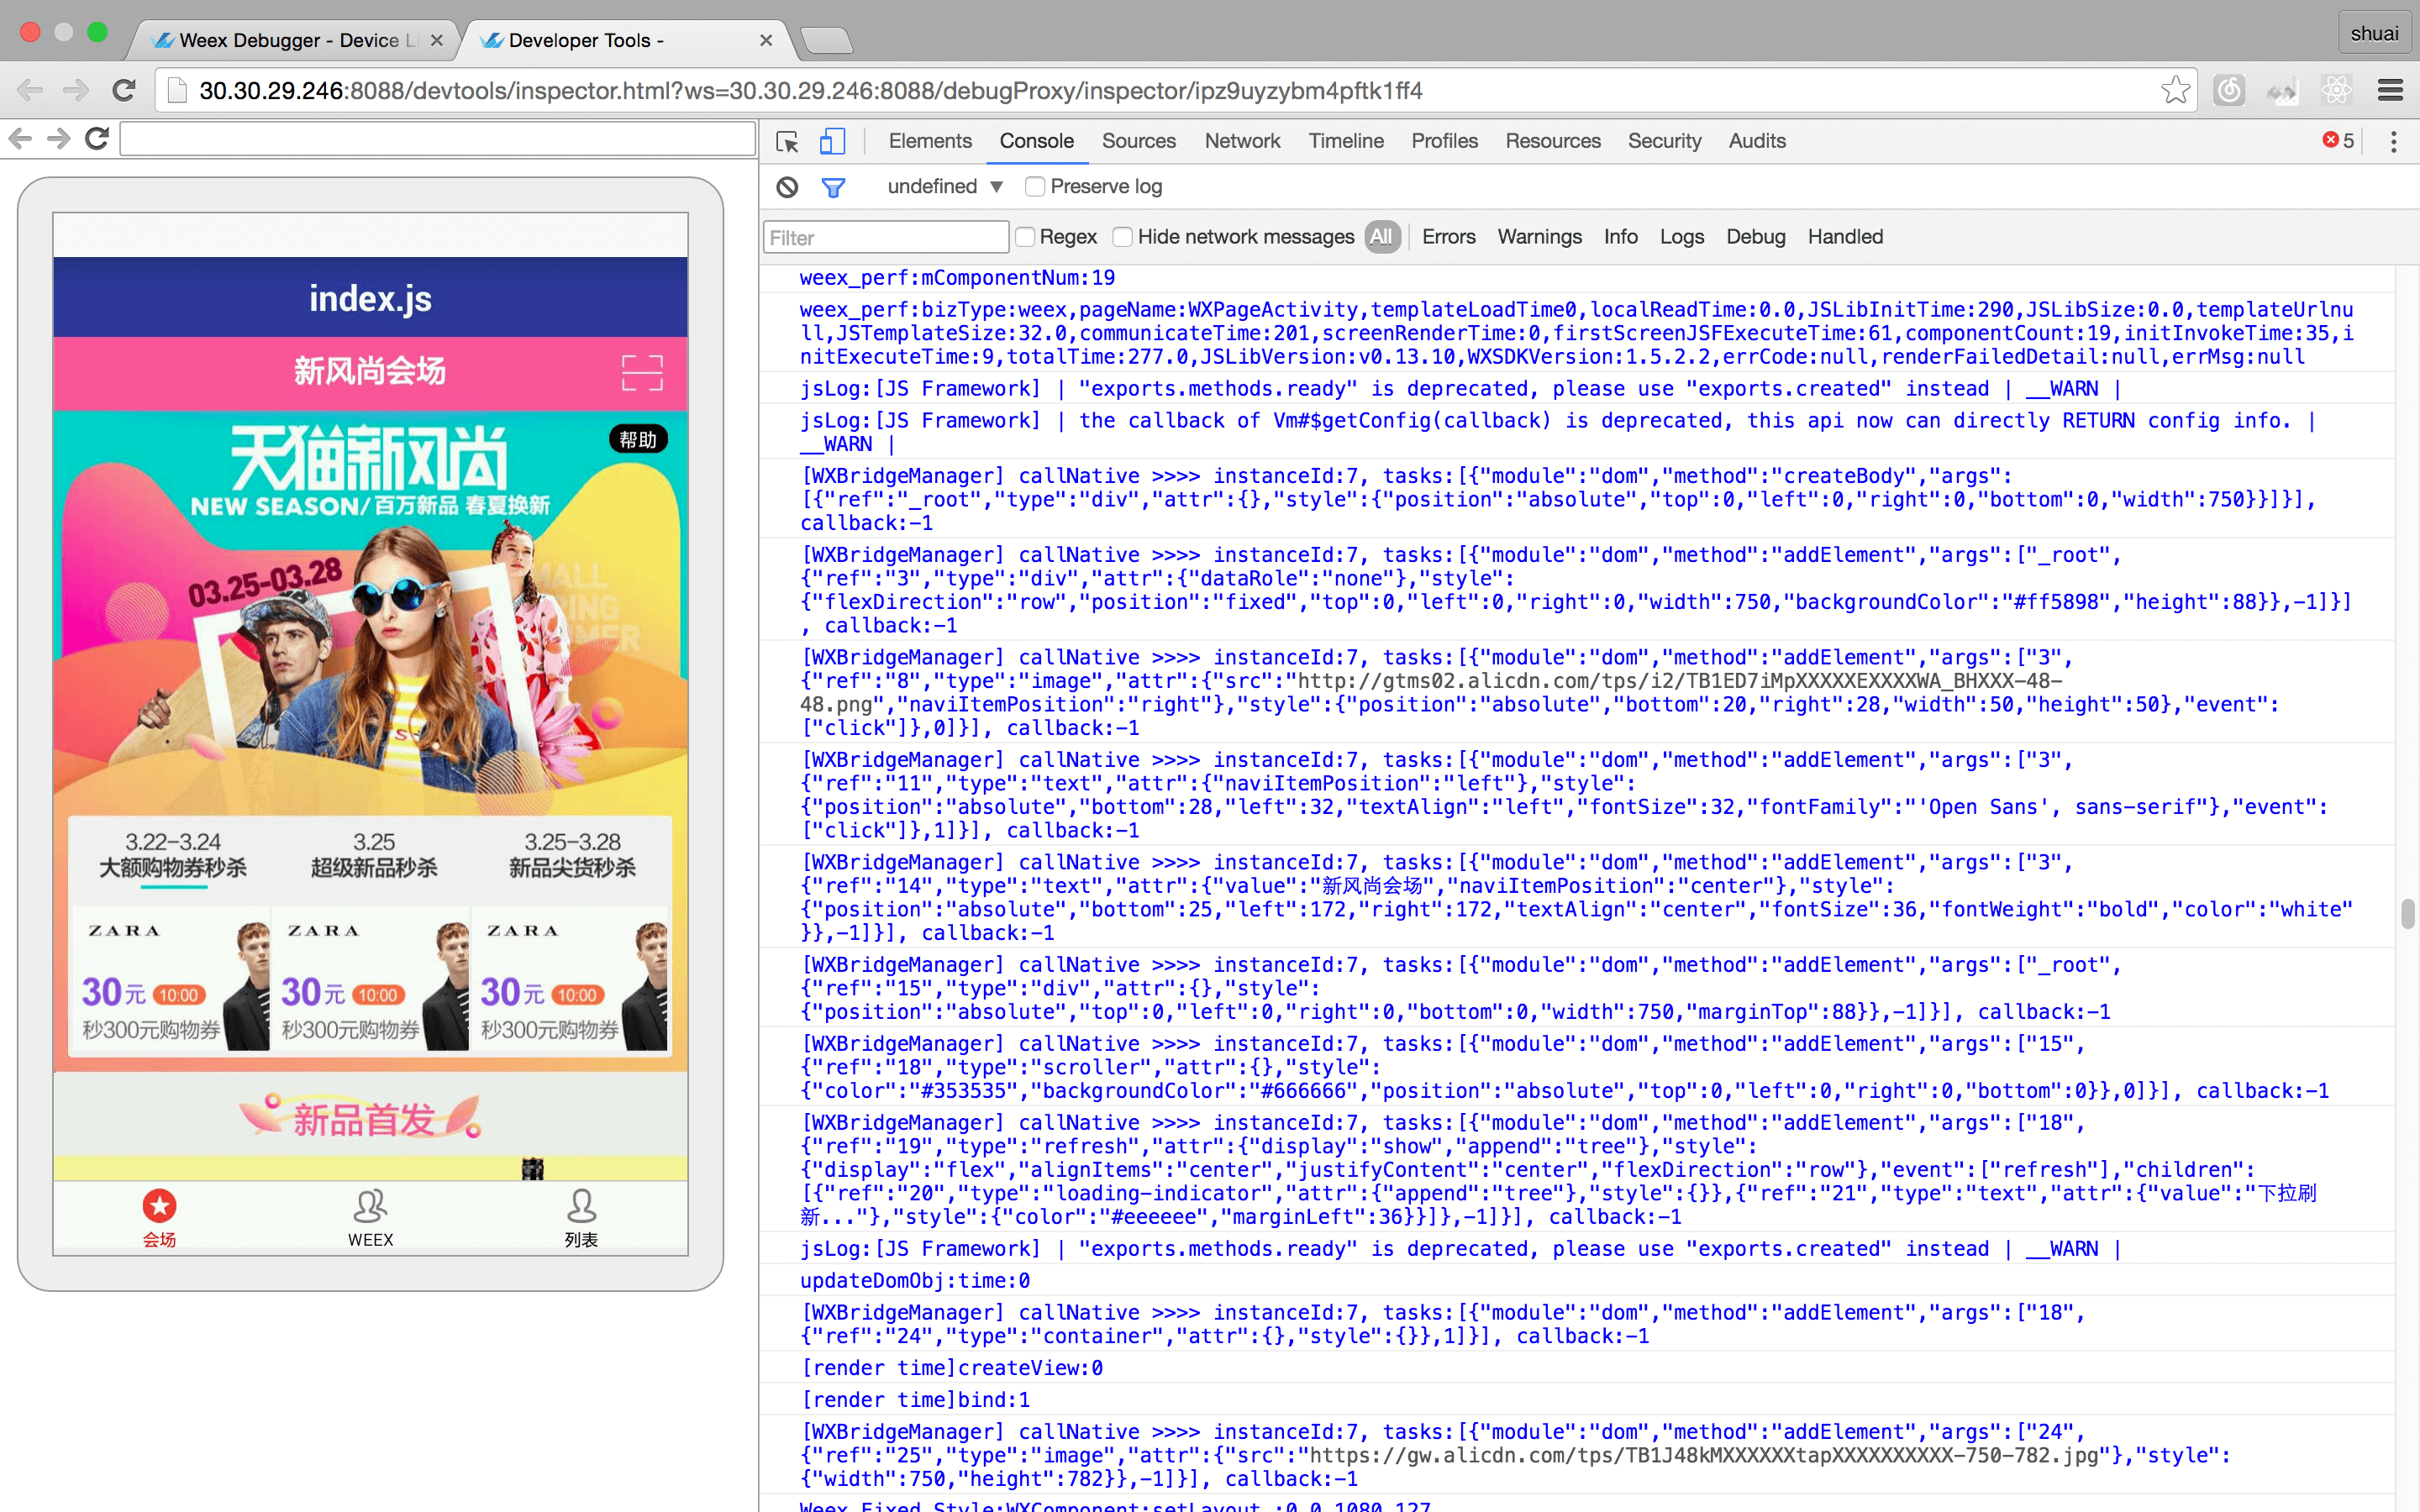 -##### Resource - -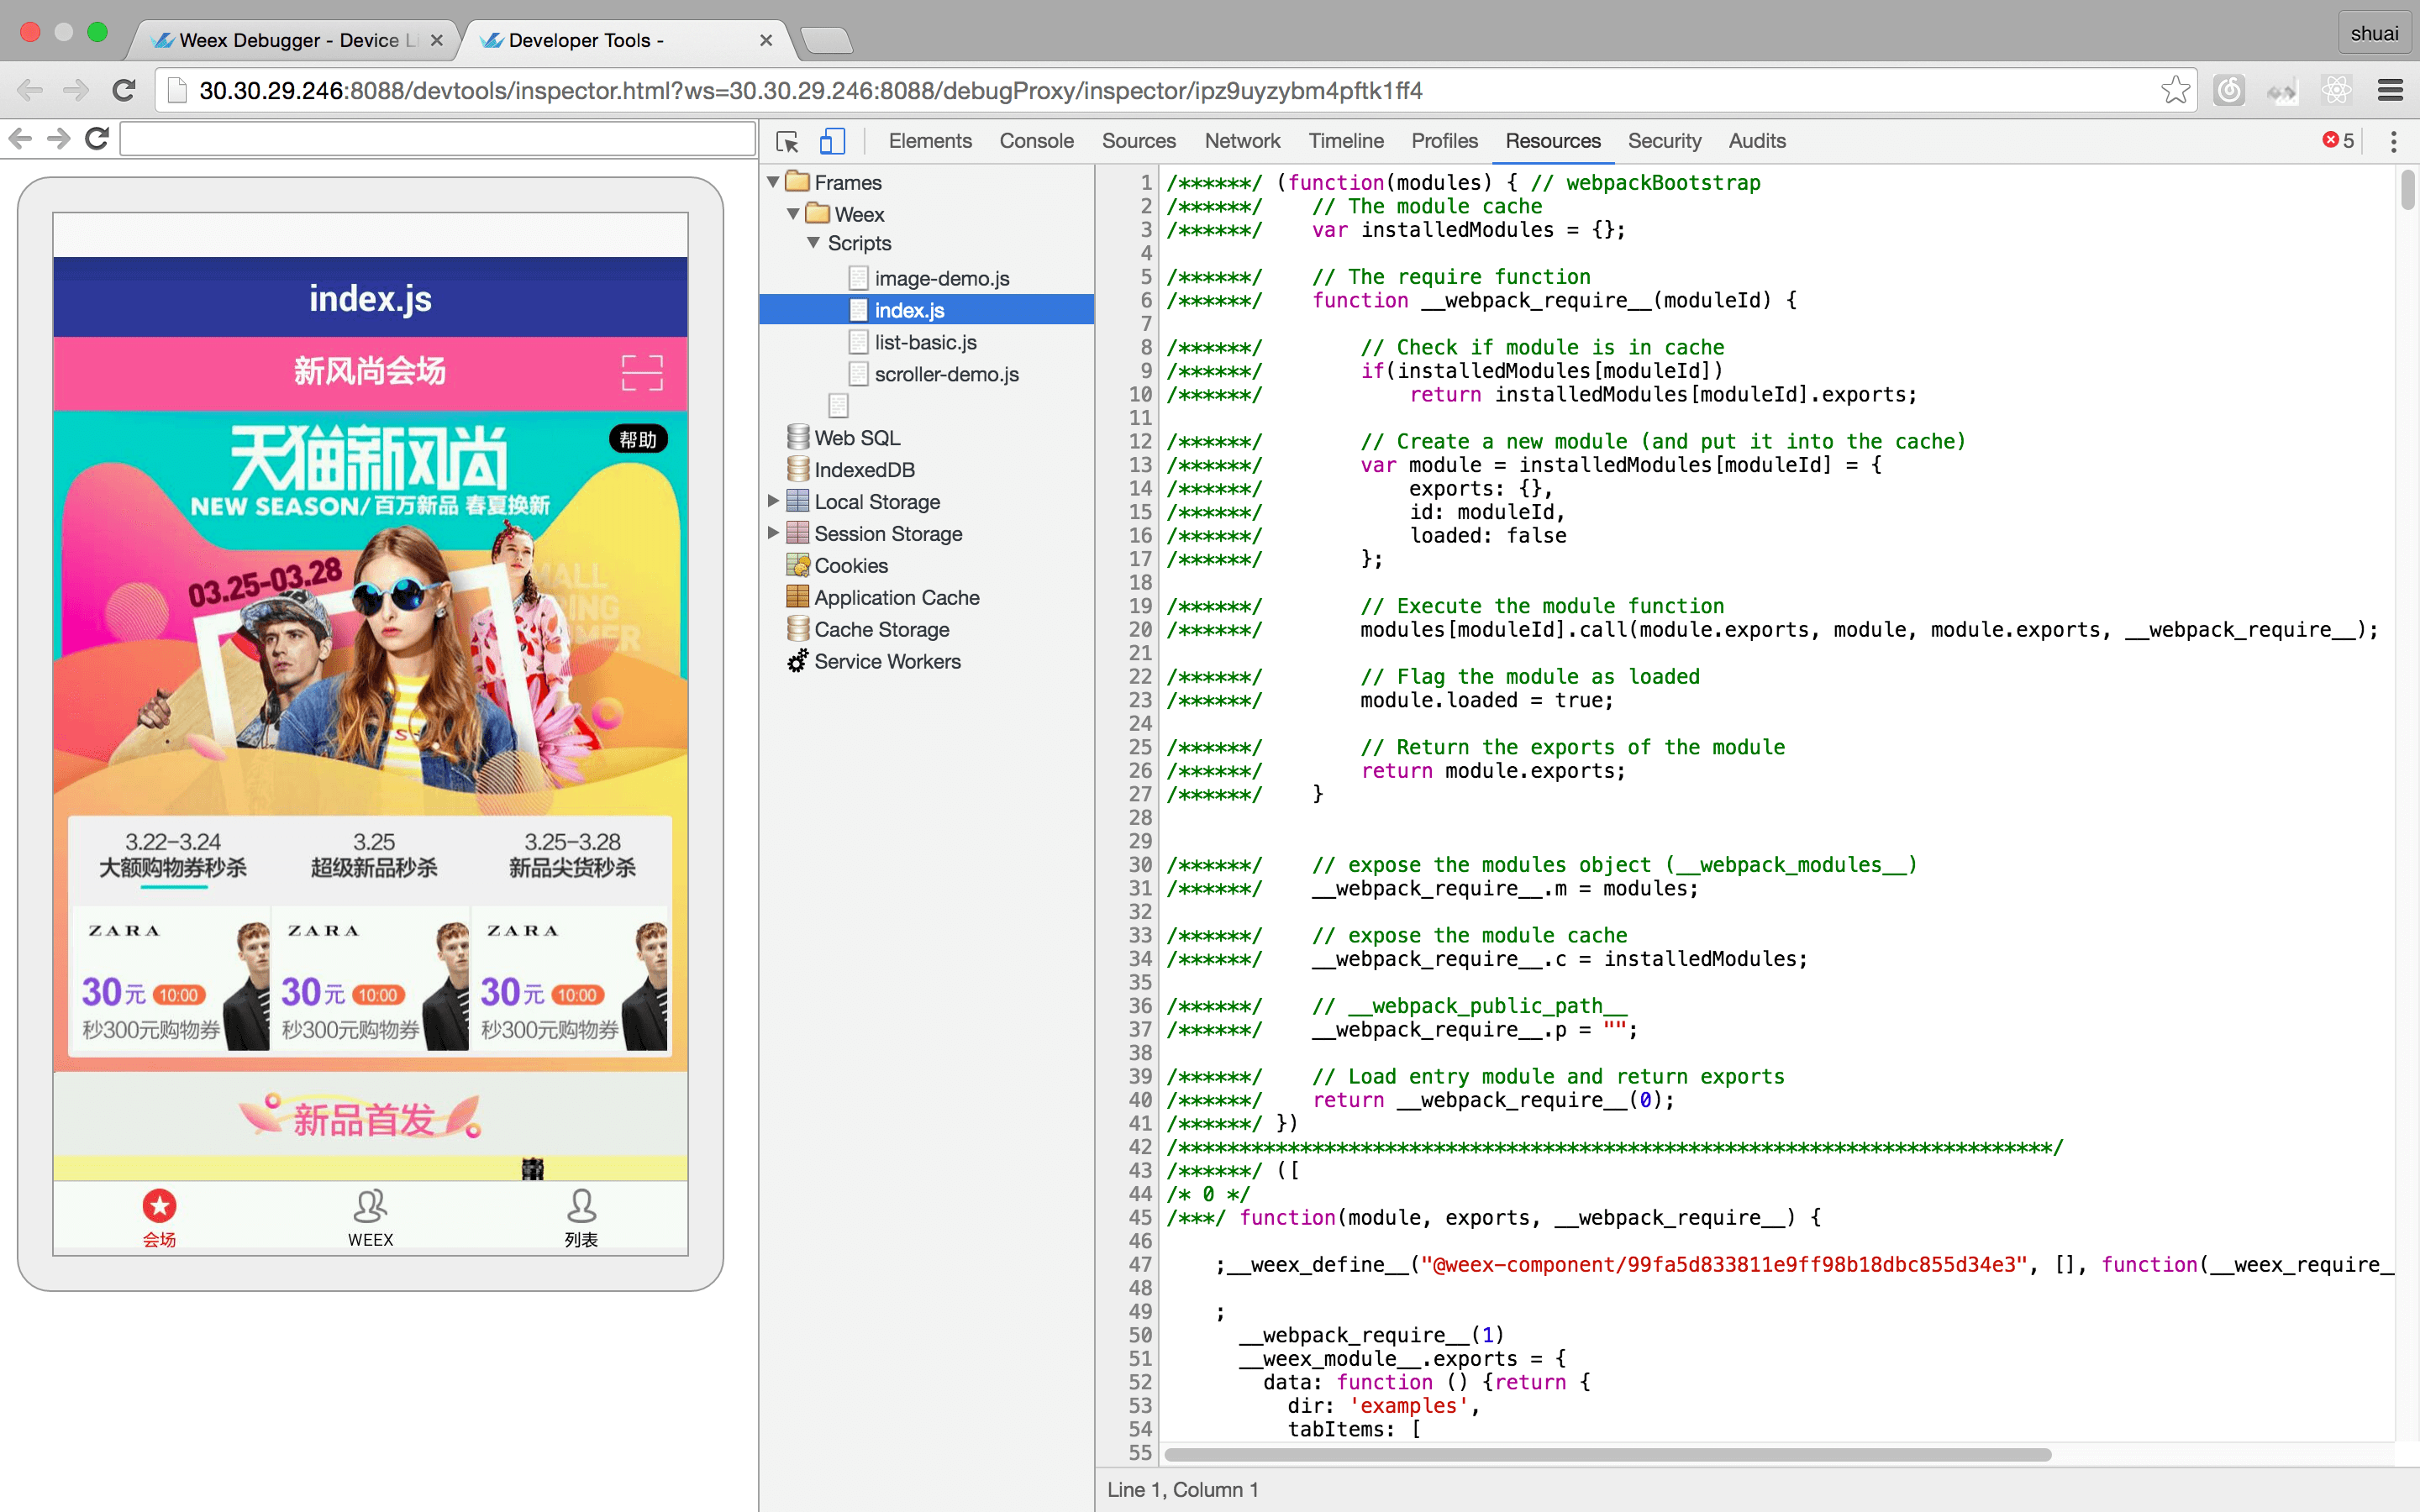 -#### Debugger - -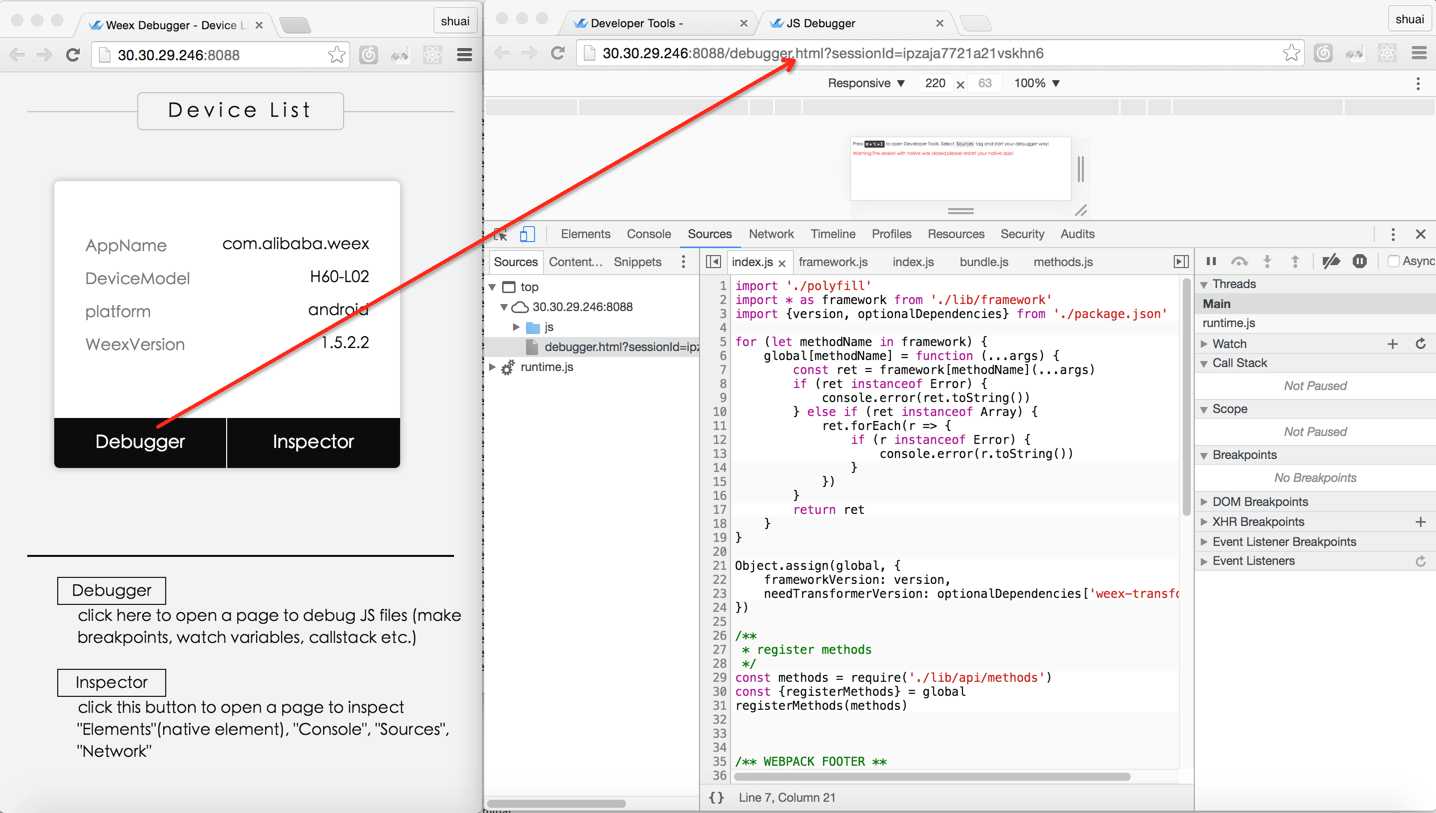 -##### Breakpoint and CallStack - -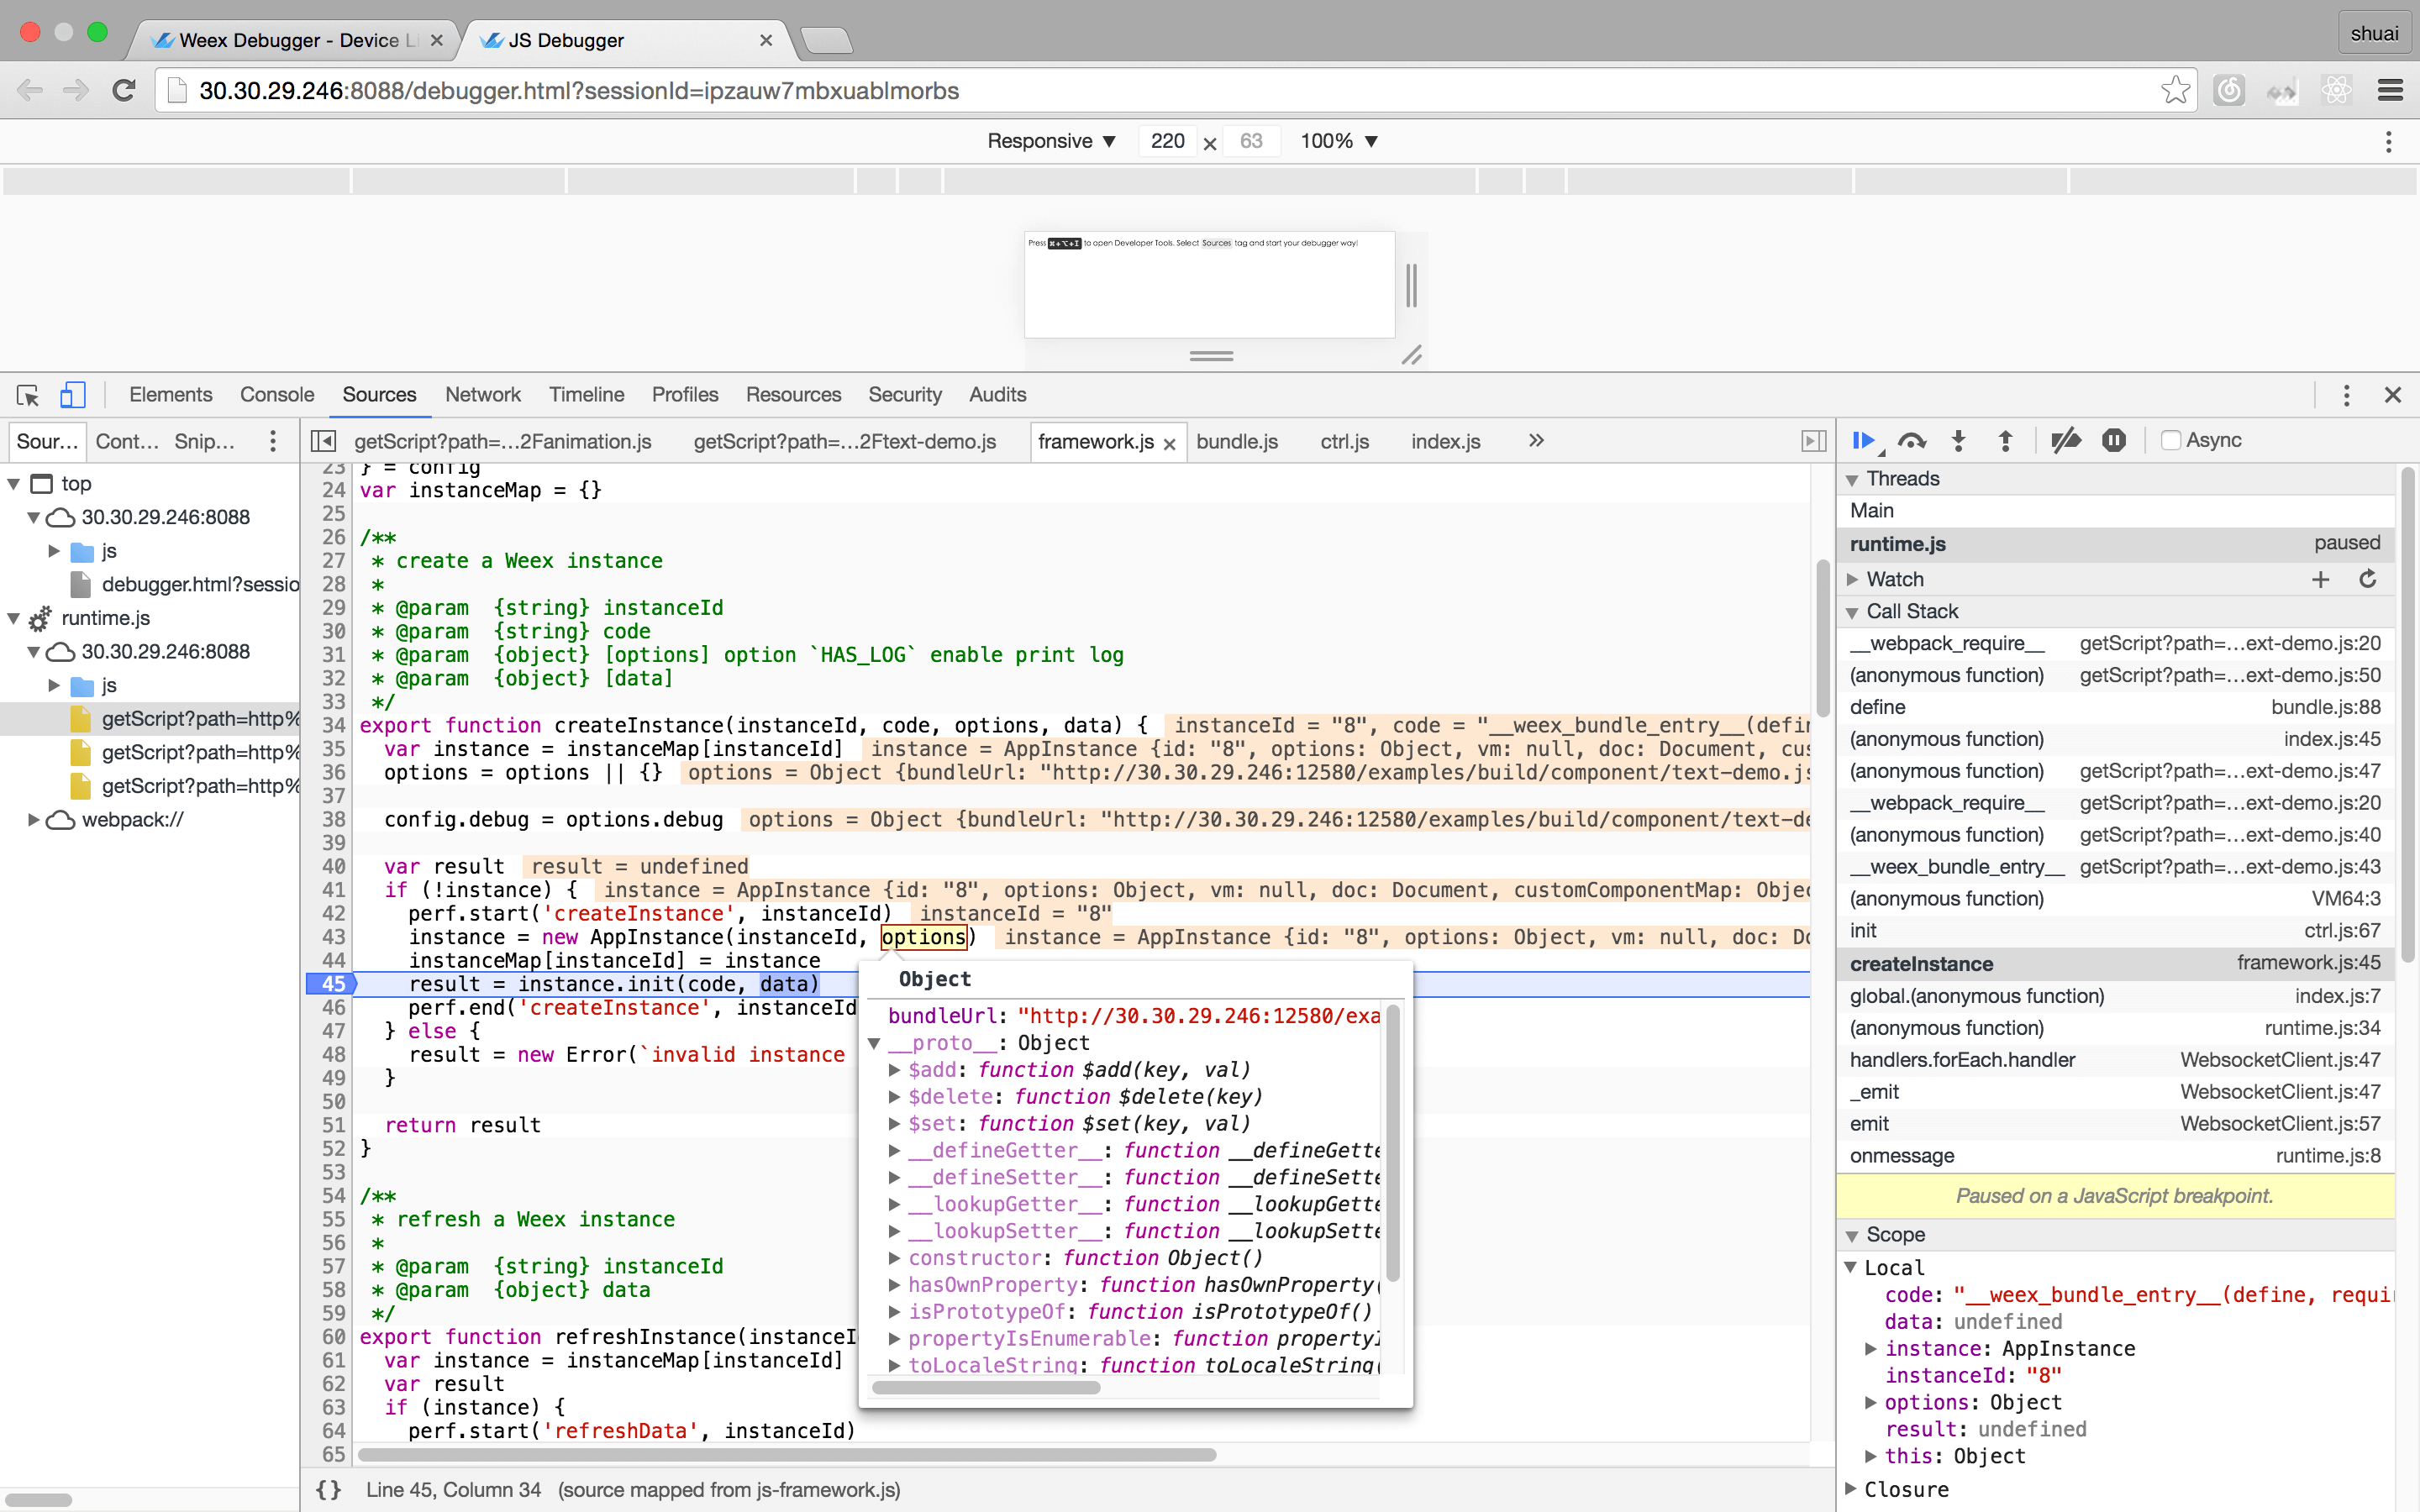 -#### Integrate devtools -* Android - * See the doc [Weex devtools (Android)](../../references/advanced/integrate-devtool-to-android.html), it will lead you to config and use it step by step. -* IOS - * See the doc [Weex devtools (IOS)](../../references/advanced/integrate-devtool-to-ios.html), it will lead you to config and use it step by step. - -### weex-toolkit extends weexpack command - -[weexpack](https://github.com/weexteam/weex-pack) helps to setup Weex application from scratch quickly. With simple commands, developers could create a Weex project, add different platform template, could install plugins from local, GitHub or Weex market, could pack up his application project and run on mobile. For those who would like to share his own plugins, he could publish them to the Weex market. - -Now weex-toolkit can run the same commands of `weexpack` because of the new architecture. If your directory is generated by `weexpack`, you can build your iOS or android app. - -### weex platform and run commands - -Use `platform add|remove` to add or remove Weex app template and run it in your target devices. - -``` bash -$ weex platform add ios -``` -If you use these commands firstly, you might see the prompt. Just enter Y. - - - -Then run platform, you will see an iPhone simulator. - -``` bash -$ weex run ios -``` - - -### weex plugin commands - -If you want to use some plugins on the [weex market](https://market.dotwe.org), weex-toolkit is the right choice. - -```bash -$ weex plugin add plugin_name -``` -You need to specify the plugin name from market like "weex-chart": - -``` bash -$ weex plugin add weex-chart -``` - -Remove some plugins(eg: weex-chart): - -``` bash -$ weex plugin remove weex-chart -``` - -Learn more about [weexpack](https://github.com/weexteam/weex-pack) . \ No newline at end of file http://git-wip-us.apache.org/repos/asf/incubator-weex/blob/8162f8c2/doc/source/index.md ---------------------------------------------------------------------- diff --git a/doc/source/index.md b/doc/source/index.md deleted file mode 100644 index ee7bdcd..0000000 --- a/doc/source/index.md +++ /dev/null @@ -1,4 +0,0 @@ -layout: index -type: index -subtitle: å¿«éãç®æ´ä¸é«æ ---- \ No newline at end of file http://git-wip-us.apache.org/repos/asf/incubator-weex/blob/8162f8c2/doc/source/playground.ejs ---------------------------------------------------------------------- diff --git a/doc/source/playground.ejs b/doc/source/playground.ejs deleted file mode 100644 index 7f3b070..0000000 --- a/doc/source/playground.ejs +++ /dev/null @@ -1,3 +0,0 @@ -layout: playground -type: playground ---- \ No newline at end of file http://git-wip-us.apache.org/repos/asf/incubator-weex/blob/8162f8c2/doc/source/references/advanced/extend-jsfm.md ---------------------------------------------------------------------- diff --git a/doc/source/references/advanced/extend-jsfm.md b/doc/source/references/advanced/extend-jsfm.md deleted file mode 100644 index fc0fd79..0000000 --- a/doc/source/references/advanced/extend-jsfm.md +++ /dev/null @@ -1,167 +0,0 @@ ---- -title: Extend JS framework -type: references -order: 11.4 -version: 2.1 ---- - -# Extend JS framework - -This part of the extension of JS framework is still in the discussion, may be adjusted at any time, please pay attention. - -Weex wants to be able to respect as many developer development habits as possible.So, in addition to Weex official support Vue 2.0, the developer can also customize and horizontally extension their own or their favorite JS Framework.The steps to customize the JS Framework are as follows: - -+ First you have a complete set of JS Framework. -+ Learn about Weex's JS engine feature support. -+ Adapting Weex's native DOM APIs. -+ Adapting Weex's initialization portal and multi-instance management mechanism. -+ Add your own JS Framework to the framework configuration of the Weex JS runtime. Then pack it. -+ Build JS bundles based on the JS Framework. You need to add a specific prefix comment so that the Weex JS runtime can recognize it. - -## Weex JS engine features support - -+ Under iOS, Weex uses the JavaScriptCore that comes with the system, so the ES support depends on the version of the operating system. -The current conservative judgments, ES5 features on the market mainstream iOS devices are perfectly supported, but some of the features of ES6 + is not supported. - -+ Under Android, Weex uses the v8 kernel provided by UC. For performance and stability considerations, we are not using the latest version of the v8 kernel.The same conservative judgment, the ES5 feature can all support, including strict mode `Object.freeze` and so on. - -+ The Weex JS engine does not support HTML DOM APIs and HTML5 JS APIs, including `document`, `set`Timeout`, and so on. - -+ We added `Promise`'s polyfill, as well as the `console`'s polyfill. - -+ In addition, in order to ensure that the JS engine can manage memory as much as possible, we have a generic global object for the `Object.freeze ()` freeze operation, which includes: - - - `Object` - - `Object.prototype` - - `Array` - - `Array.prototype` - - `String.prototype` - - `Number.prototype` - - `Boolean.prototype` - - `Error.prototype` - - `Date.prototype` - - `RegExp.prototype` - -## Adapt to Weex's initial entry and multi-instance management mechanism - -The JS Framework provided by the developer needs to be packaged as a **CommonJS** package, and the package needs to be extension to the following methods: - -### Framework initialization - -+ `init(config)` - - `config` - - `Document` - - `Element` - - `Comment` - - `TaskSender` - - `CallbackManager` - -This method places the Native DOM class and two auxiliary classes provided by Weex in the `config` parameter and allows the framework itself to be initialized. - -Tip: At the same time, the author can pass in a different `config` in the framework of the initialization time. This allows for framework testing or environmental simulation. - -#### Introduction to parameter format - -+ `TaskSender`: wip⦠-+ `CallbackManager`: wip⦠- -### Register available native components and modules - -+ `registerComponents(components)` -+ `registerModules(modules)` - -These two methods are called immediately after the frame is initialized. This framework will be able to know which components and modules the current client supports. - -#### Introduction to parameter format - -+ `components: Array`: Describe the array of components, each of which includes: - + `type: string`: Component name, for example `div`ã - + `methods: string[]`: Optional, a list of method names supported by this component. These methods can follow the native DOM APIs call. -+ `modules: Object`: Describe the hash table of a series of modules. Key is the module name, the value is an array. The elements of the array describe a method in the module. The information of the method includes: - + `name: string`: Method name - + `args: string[]`: Parameter number and type description - -**E.g:** - -```javascript -registerComponents([ - { type: 'web', methods: ['goBack', 'goForward', 'refresh']} -]) -registerModules({ - event: [ - {name: 'openURL', args: ['string']} - ] -}) -``` - -### Multi - instance lifecycle management - -+ `createInstance(instanceId, code, config, data, env)` -+ `refreshInstance(instanceId, data)` -+ `destroyInstance(instanceId)` - -Each Weex page has two stages: created and destroyed. At the same time in the Weex page running process, native can send messages to the Weex page. Different frameworks can follow their own ideas to achieve the message. - -#### Introduction to parameter format - -+ `instanceId: string`: The unique id of the Weex page is generated by native. -+ `code: string`:The Wex page's JS bundle's code is passed through native. -+ `config: Object?`: The configuration information for the Wex page, such as the bundleUrl representing the bundle address, is generated by the native configuration. It has nothing to do with the contents of the JS bundle itself. -+ `data: Object?`: Native can import an external data when creating a Weex page. The JS framework can also generate different page content for the same JS bundle with different data. -+ `env: Object?`:The current environment information about the Weex page, the meaning of each field: - - `info: Object`: Framework information, see the "JS Bundle format requirements" later. - - `config: Object`:Equivalent to the third parameter of the method `config` - - `callbacks: CallbackManager`: only `CallbackManager`instance of Weex page. - - `created: number`:The number of seconds that the Wex page was created. - - `framework: string`:The name of the framework used by the Wex page. Equivalent to `info.framework`. - -### Native communication - -+ `receiveTasks(instanceId, tasks)` - -Native can use the `refreshInstance` method to send a message to the JS framework layer. But in many cases will use `receiveTasks` to send user events or methods callback to the JS framework. - -For example, if the user clicks on a button, native will send a `fireEvent` type of task to the JS framework, and then the JS framework will handle the corresponding event logic. This part of the working mechanism is related to the design of the `addEvent` in the native DOM interface. - -Another example is the user using fetch to send network requests. When the request is done at the native end, it will be sent to the JS framework with a callback type of task. Since native can not pass the function in JavaScript, it actually only sends a callbackId to the JS framework. This part of the working mechanism is related to the design of CallbackManager. - -#### Auxiliary method - -+ `getRoot(instanceId): JSON` - -This method returns the full JSON description of the document body node. Developers can view the full native DOM tree as a result. The format of the specific return value is the same as the return method of the toJSON () method in the native DOM interface. This feature is used extensively as a developer tool extension. - -## Configure the JS Framework in WeexSDK -### Prepare your JS Framework code - -```javascript -// your-own-js-framework.js -export function init (config) { ... } -export function registerComponents (components) { ... } -export function registerModules (modules) { ... } -export function createInstance (id, code, config, data, env) { ... } -export function destroyInstance (id) { ... } -export function refreshInstance (id, data) { ... } -export function recieveTasks (id, tasks) { ... } -export function getRoot (id) { ... } -``` - -### Register a JS Framework - -```javascript -import * as Vue from '...' -import * as React from '...' -import * as Angular from '...' -export default { Vue, React, Angular }; -``` -And then packaged JS runtime, integrated into WeexSDK. - -#### JS Bundle format requirements - -**Framework info** -The note(alias framework info) at the beginning of the JS Bundle file is very important. The format is as follows: - -```javascript -// { "framework": "Vue" } -``` -So that the Weex JS engine will know that the JS bundle needs to use the Vue framework to resolve.Similarly, Weex supports multiple frameworks.It will be based on js bundle notes to select the corresponding framework resolution. http://git-wip-us.apache.org/repos/asf/incubator-weex/blob/8162f8c2/doc/source/references/advanced/extend-to-android.md ---------------------------------------------------------------------- diff --git a/doc/source/references/advanced/extend-to-android.md b/doc/source/references/advanced/extend-to-android.md deleted file mode 100644 index 2ec4bc5..0000000 --- a/doc/source/references/advanced/extend-to-android.md +++ /dev/null @@ -1,219 +0,0 @@ ---- -title: Extend to Android -type: references -order: 11.2 -version: 2.1 ---- - -# Extend to Android - -## Module extend - -weex sdk support Module extend, Weex SDK provides only rendering capabilities, rather than have other capabilities, such as network, picture, and URL redirection. If you want the these features, you need to implement it. - -For example: If you want to implement an address jumping function, you can achieve a Module Follow the steps below. - -### Step to customize a module - -- Customize module must extend WXModule -- @WXModuleAnno annotation must be added, as it is the only the way to recognized by Weex -- The access levels of mehtod must be **public** -- The module class also can not be an inner class -- Customize can not be obfuscated by tools like ProGuard -- Module methods will be invoked in UI thread, do not put time consuming operation there -- Weex params can be int, double, float, String, Map, List - -Refer to the following example: - -```java -public class WXEventModule extends WXModule{ - - private static final String WEEX_CATEGORY="com.taobao.android.intent.category.WEEX"; - - @WXModuleAnno - public void openURL(String url){ - //implement your module logic here - } -} -``` - -#### Support synchronous/asynchronous callback - -You can add `@JSMethod (uiThread = false or true)` annotation to choose the callback mode of moudle. See the follow example. - -```java - // as sync-callback mode -@JSMethod (uiThread = false) -public void testSyncCall(){ - WXLogUtils.d("WXComponentSyncTest : Thread.currentThread().getName()); -} - -// as async-callback mode -@JSMethod (uiThread = true) -public void testAsyncCall(){ - WXLogUtils.e("WXComponentASynTest : Thread.currentThread().getName() ); -} -``` - -### Register the moulde - -```java -WXSDKEngine.registerModule("event", WXEventModule.class); -``` - -### Use this module in weex DSL -Now `event` moudle is avaiable in weex, use the module like this: - -```javascript -var event = weex.requireModule('event'); -event.openURL("http://www.github.com";); -``` - -### Javascript callback - -If the module need implement a callback to javascript, you just add `JSCallback` argument to the method you want expose to javascript: - -```java -@WXModuleAnno -public void openURL(String url,JSCallback callback){ - //implement your module logic here - Map<String,Object> resp = new HashMap(); - resp.put("result","ok"); - callback.invoke(resp); -} -``` - -At the javascript side, call the module with javascript function to receive callback data: - -```javascript -event.openURL("http://www.github.com",function(resp){ console.log(resp.result); }); -``` - -### Component extend - -There are label, image, div, scroll, ect. components in weex, you can also customize your own components. - -#### Step to customize a component - -1. Customize components must extend WXComponent or WXContainer -2. @WXComponentProp(name=value(value is attr or style of dsl)) for it be recognized by weex SDK. -3. The access levels of mehtod must be **public** -4. The component class can not be an inner class -5. Customize can not be obfuscated by tools like ProGuard -6. Component methods will be invoked in UI thread, do not put time consuming operation there. -7. Weex params can be int, double, float, String, Map, List, Array - - -Refer to the following example - -```java -public class MyViewComponent extends WXComponent{ - public MyViewComponent(WXSDKInstance instance, WXDomObject dom, - WXVContainer parent, String instanceId, boolean isLazy) - { - public MyViewComponent(WXSDKInstance instance, WXDomObject dom, - WXVContainer parent, String instanceId, boolean isLazy) { - super(instance, dom, parent, instanceId, isLazy); - } - - @Override - protected void initView() { - mHost = new TextView(mContext); - } - @WXComponentProp(name=WXDomPropConstant.WX_ATTR_VALUE) - public void setMyViewValue(String value) { - ((TextView)mHost).setText(value); - } -} -``` - -#### Register the Component - - -```java -WXSDKEngine.registerComponent("MyView", MyViewComponent.class); -``` - -### Adapter extend - -#### ImagedownloadAdapter - -Weex SDK has no image download capability, you need to implement `IWXImgLoaderAdapter`. Refer to the following examples. - -```java -public class ImageAdapter implements IWXImgLoaderAdapter { - - private Activity mContext; - - public ImageAdapter(Activity activity) { - mContext = activity; - } - - @Override - public void setImage(final String url, final ImageView view, - WXImageQuality quality, WXImageStrategy strategy) { - mContext.runOnUiThread(new Runnable() { - - @Override - public void run() { - if (TextUtils.isEmpty(url)) { - view.setImageBitmap(null); - return; - } - String temp = url; - if (url.startsWith("//")){ - temp = "http:" + url; - } - if (view.getLayoutParams().width<=0 || view.getLayoutParams().height<=0) { - return; - } - Picasso.with(WXEnvironment.getApplication()) - .load(temp) - .resize(view.getLayoutParams().width, - view.getLayoutParams().height).into(view); - } - }); - } -} -``` - -#### Component Method - from WeexSDK `0.9.5`, you can define your component method - - for example, define a method in component: - - ```java - @JSMethod - public void focus(){ - //method implementation - } - ``` - - after your registration for your own custom component, now you can call it in your js file. - - ```html -<template> - <mycomponent id='mycomponent'></mycomponent> -</template> -<script> - module.exports = { - created: function() { - this.$el('mycomponent').focus(); - } - } -</script> -``` - -#### Proguard Rules - -If you want to using proguard to protect your source code, please add the following rules to your profile: - -```java --keep class com.taobao.weex.WXDebugTool{*;} --keep class com.taobao.weex.devtools.common.LogUtil{*;} --keep public class * extends com.taobao.weex.ui.component.WXComponent{*;} --keep public class * extends com.taobao.weex.common.WXModule{*;} --keepclassmembers class ** { - @com.taobao.weex.ui.component.WXComponentProp public *; -} -``` http://git-wip-us.apache.org/repos/asf/incubator-weex/blob/8162f8c2/doc/source/references/advanced/extend-to-html5.md ---------------------------------------------------------------------- diff --git a/doc/source/references/advanced/extend-to-html5.md b/doc/source/references/advanced/extend-to-html5.md deleted file mode 100644 index cc9acf3..0000000 --- a/doc/source/references/advanced/extend-to-html5.md +++ /dev/null @@ -1,96 +0,0 @@ ---- -title: Extend to HTML5 -type: references -order: 11.3 -version: 2.1 ---- - -# Extend to HTML5 - -Weex itself offers a lot of built-in components and modules, but also has the ability to expand horizontally. It allows developers to expand and customize themselves. But it is important to note that Weex is a cross-platform solution. When extending its built-in components or modules, you need to implement it on the three ends (Android, iOS, Web). - - -After Weex switches the kernel to Vue 2.x, it will be easier to extend the Vue component on the Web side. - -## Extend Web components - -Vue.js is an independent front-end framework. In the browser, you can not use the Weex container for page rendering. So, the two things are the same: (1) for the Weex platform to expand Vue.js Web components. (2) directly using Vue.js to develop a Web component. The development of components can refer to its documentation: [component](https://vuejs.org/v2/guide/components.html). It is also recommended to use the ```.vue``` file to write components. How to use it: [Single file component](https://vuejs.org/v2/guide/single-file-components.html). - -### Example of component extension -To extend ```<sidebar>``` as an example, you should first write the logic of the component itself: - -```html -<!-- sidebar.vue --> -<template> - <div class="sidebar"> - <slot></slot> - </div> -</template> -<style scoped> - .sidebar { - /* ... */ - } -</style> -<script> - export default { - props: [], - data () { - return {} - } - } -</script> -``` - -And then register the ```<sidebar>``` component globally before using it: - -```javascript -import Vue from 'vue' -import Sidebar from './path/to/sidebar.vue' -// register the ```<sidebar>``` component globally -Vue.component('sidebar', Sidebar) -``` - -When you extend the Weex component, if you only use the built-in components provided by Weex and use the styles that Weex supports, it is no different from the normal custom component and does not need to be implemented at the Native side. - -If you find a component that does not support labels and styles that are not supported by Weex, you will need to really extend the Weex component. At the same time, you also need to extend in the Android side and the iOS side, or will lead to rendering exception. - -## Extend the Web module - -In addition to the common components, Weex also provides a common module, you can easily call the native API. In general, the registered Weex module requires three ends to be implemented, otherwise it will affect its normal use. - -### Register the module -If we import the ```weex-vue-render``` library, we can get the weex variable globally. You can register the module using the ```registerModule```method. - -#### API format -+ `registerModule` - - 1.```name```: {String} Required, module name. - 2.```define```: {Object} Required, module definition. - -#### The example of register module -The following code registers a module called guide: - -```javascript -weex.registerModule('guide', { - greeting () { - console.log('Hello, nice to meet you. I am your guide.') - }, - farewell () { - console.log('Goodbye, I am always at your service.') - } -}) -``` - -### Use the module - -Weex provides the require method for getting registered modules. You only need to pass the module name directly: - -```javascript -//import module -const guide = weex.requireModule('guide') -// use the methods of module -guide.greeting() -guide.farewell() -``` - -The above wording is as useful as the native end, except that the methods in the module are provided by Native. \ No newline at end of file http://git-wip-us.apache.org/repos/asf/incubator-weex/blob/8162f8c2/doc/source/references/advanced/extend-to-ios.md ---------------------------------------------------------------------- diff --git a/doc/source/references/advanced/extend-to-ios.md b/doc/source/references/advanced/extend-to-ios.md deleted file mode 100644 index 02dc037..0000000 --- a/doc/source/references/advanced/extend-to-ios.md +++ /dev/null @@ -1,341 +0,0 @@ ---- -title: Extend to iOS -type: references -order: 11.1 -version: 2.1 ---- - -# Extend to iOS - -#### Notice - -**All of the exported APIs in Weex are controllable and safe, they can not access private APIs or do any system hacks at runtime, neither can they change the primary purpose of the Application**. - -**If you are extending your custom modules/components, be sure NOT to export the ability of Objective-C runtime, be sure NOT to export dynamic and uncontrolled methods such as `dlopen()`, `dlsym()`, `respondsToSelector:`, `performSelector:`, `method_exchangeImplementations()`, be sure NOT to export any private methods. ** - -### Module extend - -Weex SDK provides only rendering capabilities, rather than have other capabilities, such as network, picture, and URL redirection. If you want these features, you need to implement it. - -For example: If you want to implement an address jumping function, you can achieve a Module following the steps below. - -#### Step to customize a module - -1. Module - customized must implement WXModuleProtocol -2. A macro named `WX_EXPORT_METHOD` must be added, as it is the only way to export methods to JavaScript. -3. The weexInstance should be synthesized. Each module object is bind to a specific instance. -4. Module methods will be invoked in UI thread, so do not put time consuming operation there. If you want to execute the whole module methods in other thread, please implement the method `- (NSThread *)targetExecuteThread` in protocol. In the way, tasks distributed to this module will be executed in targetExecuteThread. -5. Weex params can be String or Map. -6. Module supports to return results to Javascript in callback. This callback is type of `WXModuleCallback`, the params of which can be String or Map. - -```objective-c -@implementation WXEventModule - -@synthesize weexInstance; -WX_EXPORT_METHOD(@selector(openURL:callback:)) - -- (void)openURL:(NSString *)url callback:(WXModuleCallback)callback -{ - NSString *newURL = url; - if ([url hasPrefix:@"//"]) { - newURL = [NSString stringWithFormat:@"http:%@", url]; - } else if (![url hasPrefix:@"http"]) { - newURL = [NSURL URLWithString:url relativeToURL:weexInstance.scriptURL].absoluteString; - } - - UIViewController *controller = [[WXDemoViewController alloc] init]; - ((WXDemoViewController *)controller).url = [NSURL URLWithString:newURL]; - - [[weexInstance.viewController navigationController] pushViewController:controller animated:YES]; - callback(@{@"result":@"success"}); -} - -@end -``` - -#### export synchronous methods <span class="api-version">v0.10+</span> - -If you want to export synchronous methods which could make Javascript receive return values from natvie, you can use `WX_EXPORT_METHOD_SYNC` macro. - -native code: - -```objective-c -@implementation WXEventModule - -WX_EXPORT_METHOD_SYNC(@selector(getString)) - -- (NSString *)getString -{ - return @"testString"; -} - -@end -``` - -js code: - -```javascript -const eventModule = weex.requireModule('event') -const returnString = syncTest.getString() // return "testString" -``` - -You can alse return number/array/dictionary except string. - -`notice:` the exported synchronous native method **can only be called on JS thread**. **Do not** do heavy work which will block js execution. - -`notice:` Vue 2.0 has not supported this feature yet. It will be supported in version 0.12 at the soonest. - -#### Register the module - -You can register the customized module by calling the method `registerModule:withClass` in WXSDKEngine. - -```objective-c -WXSDKEngine.h -/** -* @abstract Registers a module for a given name -* @param name The module name to register -* @param clazz The module class to register -**/ -+ (void)registerModule:(NSString *)name withClass:(Class)clazz; - -[WXSDKEngine registerModule:@"event" withClass:[WXEventModule class]]; -``` - -### Handler extend - -Weex SDK doesn't have capabilitis, such as image download ãnavigator operationï¼please implement these protocols by yourself. - -#### WXImgLoaderProtocol -<font color="gray"> -Weex SDK has no image download capability, you need to implement `WXImgLoaderProtocol`. Refer to the following examples. - -```objective-c -WXImageLoaderProtocol.h -@protocol WXImgLoaderProtocol <WXModuleProtocol> - -/** - * @abstract Creates a image download handler with a given URL - * @param imageUrl The URL of the image to download - * @param imageFrame The frame of the image you want to set - * @param options : The options to be used for this download - * @param completedBlock : A block called once the download is completed. - image : the image which has been download to local. - error : the error which has happened in download. - finished : a Boolean value indicating whether download action has finished. - */ - -(id<WXImageOperationProtocol>)downloadImageWithURL:(NSString *)url imageFrame:(CGRect)imageFrame userInfo:(NSDictionary *)options completed:(void(^)(UIImage *image, NSError *error, BOOL finished))completedBlock; - @end -``` - -Implement above protocol as follows. - - -```objective-c -@implementation WXImgLoaderDefaultImpl -#pragma mark - -#pragma mark WXImgLoaderProtocol - -- (id<WXImageOperationProtocol>)downloadImageWithURL:(NSString *)url imageFrame:(CGRect)imageFrame userInfo:(NSDictionary *)userInfo completed:(void(^)(UIImage *image, NSError *error, BOOL finished))completedBlock -{ - if ([url hasPrefix:@"//"]) { - url = [@"http:" stringByAppendingString:url]; - } - return (id<WXImageOperationProtocol>)[[SDWebImageManager sharedManager] downloadImageWithURL:[NSURL URLWithString:url] options:0 progress:^(NSInteger receivedSize, NSInteger expectedSize) { - } completed:^(UIImage *image, NSError *error, SDImageCacheType cacheType, BOOL finished, NSURL *imageURL) { - if (completedBlock) { - completedBlock(image, error, finished); - } - }]; -} -@end -``` - -#### Register the handler - -You can register the handler which implements the protocol by calling `registerHandler:withProtocol` in WXSDKEngine. - -```objective-c -WXSDKEngine.h -/** -* @abstract Registers a handler for a given handler instance and specific protocol -* @param handler The handler instance to register -* @param protocol The protocol to confirm -*/ -+ (void)registerHandler:(id)handler withProtocol:(Protocol *)protocol; - -[WXSDKEngine registerHandler:[WXImgLoaderDefaultImpl new] withProtocol:@protocol(WXImgLoaderProtocol)]; -``` - -## Custom Native Components for iOS - -### Component extend - -There are a lot of native components ready to be used in the Weex SDK, but users always have their own use cases. You might have written an awesome native UI widget in your previous work and just want to wrap up it and export to Weex. So we provide a way to enable developers to create their own custom fully-native components. - -This guide will use the implementation of existing component `image` to show you how to build a native component. It will also assume that you are familiar with iOS programming. - -#### Registration - -Defining a custom native component is simple. Just call `[WXSDKEngine registerComponent:withClass:]` with the component's tag name as first argument. - -```objective-c -[WXSDKEngine registerComponent:@"image" withClass:[WXImageComponent class]]; -``` - -Then you can create a `WXImageComponent` class to represent the implementation of image component. - -Now you can use `<image>` wherever you want in the template. - -```html -<image></image> -``` - -#### Adding Properties - -The next thing we can do is to extend some native properties to make the component more powerful. As an image, let's say we should have a `src` attribute as image's remote source and a `resize` attribute as image's resize mode(contain/cover/stretch). - -```objective-c -@interface WXImageComponent () - -@property (nonatomic, strong) NSString *imageSrc; -@property (nonatomic, assign) UIViewContentMode resizeMode; - -@end -``` - -All of the styles, attributes and events will be passed to the component's initialization method, so here you can store the properties which you are interested in. - -```objective-c -@implementation WXImageComponent - -- (instancetype)initWithRef:(NSString *)ref type:(NSString *)type styles:(NSDictionary *)styles attributes:(NSDictionary *)attributes events:(NSArray *)events weexInstance:(WXSDKInstance *)weexInstance -{ - if (self = [super initWithRef:ref type:type styles:styles attributes:attributes events:events weexInstance:weexInstance]) { - _imageSrc = [WXConvert NSString:attributes[@"src"]]; - _resizeMode = [WXConvert UIViewContentMode:attributes[@"resize"]]; - } - - return self; -} - -@end -``` - -The properties getted in the attributes are of `id` type, so we have to convert them to the type we want using a conversion function. Basic conversion functions can be found in the `WXConvert` file, or you can just add your own conversion function. - - -#### Hooking Render Life Cycle - -A Native Component has a life cycle managed by Weex. Weex creates it, layout it, renders it and destroys it. - -Weex offers component life cycle hooks that give you visibility into these key moments and the ability to act when they occur. - -| method | description | -| :------------------: | ---------------------------------------- | -| initWithRef:type:... | Initializes a new component using the specified properties. | -| layoutDidFinish | Called when the component has just laid out. | -| loadView | Creates the view that the component manages. | -| viewWillLoad | Called before the load of component's view . | -| viewDidLoad | Called after the component's view is loaded and set. | -| viewWillUnload | Called just before releasing the component's view. | -| viewDidUnload | Called when the component's view is released. | -| updateStyles: | Called when component's style are updated. | -| updateAttributes: | Called when component's attributes are updated. | -| addEvent: | Called when adding an event to the component. | -| removeEvent: | Called when removing an event frome the component. | - - -As in the image component example, if we need to use our own image view, we can override the `loadView` method. - - -```objective-c -- (UIView *)loadView -{ - return [[WXImageView alloc] init]; -} -``` - -Now Weex will use `WXImageView` to render the `image` component. - -As an image component, we will need to fetch the remote image and set it to the image view. This can be done in `viewDidLoad` method when the view is created and loaded. `viewDidLoad` is also the best time to perform additional initialization for your viewï¼ such as content mode changing. - - -```objective-c -- (void)viewDidLoad -{ - UIImageView *imageView = (UIImageView *)self.view; - imageView.contentMode = _resizeMode; - imageView.userInteractionEnabled = YES; - imageView.clipsToBounds = YES; - imageView.exclusiveTouch = YES; - - // Do your image fetching and updating logic -} -``` - -If image's remote source can be changed, you can also hook the `updateAttributes:` method to perform your attributes changing logic. Component's view always has been loaded while `updateAttributes:` or `updateStyles:` is called. - - -```objective-c -- (void)updateAttributes:(NSDictionary *)attributes -{ - if (attributes[@"src"]) { - _imageSrc = [WXConvert NSString:attributes[@"src"]]; - // Do your image updating logic - } - - if (attributes[@"resize"]) { - _resizeMode = [WXConvert UIViewContentMode:attributes[@"resize"]]; - self.view.contentMode = _resizeMode; - } -} -``` - -Maybe there is even more life cycle hooks you might need to consider, such as `layoutDidFinish` while layout computing is finished. If you want to go deeper, check out the `WXComponent.h` file in the source code. - -Now you can use `<image>` and its attributes wherever you want in the template. - -```html -<image style="your-custom-style" src="image-remote-source" resize="contain/cover/stretch"></image> -``` - -#### Component Method -from WeexSDK `0.9.5`, you can define your component method by macro `WX_EXPORT_METHOD` -for example: - -``` -@implementation WXMyComponent - +WX_EXPORT_METHOD(@selector(focus)) - +- (instancetype)initWithRef:(NSString *)ref type:(NSString *)type styles:(NSDictionary *)styles attributes:(NSDictionary *)attributes events:(NSArray *)events weexInstance:(WXSDKInstance *)weexInstance - { - if (self = [super initWithRef:ref type:type styles:styles attributes:attributes events:events weexInstance:weexInstance]) { - // handle your attributes - // handle your styles - } - - return self; - } - - - - (void)focus - { - NSLog(@"you got it"); - } -@end -``` - -after your registration for your own custom component, now you can call it in your js file. - -```html -<template> - <mycomponent ref='mycomponent'></mycomponent> -</template> -<script> - module.exports = { - created: function() { - this.$refs.mycomponent.focus(); - } - } -</script> -``` http://git-wip-us.apache.org/repos/asf/incubator-weex/blob/8162f8c2/doc/source/references/advanced/index.md ---------------------------------------------------------------------- diff --git a/doc/source/references/advanced/index.md b/doc/source/references/advanced/index.md deleted file mode 100644 index c5c049d..0000000 --- a/doc/source/references/advanced/index.md +++ /dev/null @@ -1,15 +0,0 @@ ---- -title: Advanced -type: references -order: 11 -version: 2.1 ---- - -# Advanced - -- [Extend to iOS](./extend-to-ios.html) -- [Extend to Android](./extend-to-android.html) -- [Extend to HTML5](./extend-to-html5.html) -- [Extend JS framework](./extend-jsfm.html) -- [Integrate Devtool to Android](./integrate-devtool-to-android.html) -- [Integrate Devtool to iOS](./integrate-devtool-to-ios.html) \ No newline at end of file