Hanks10100 closed pull request #261: add blog zh content
URL: https://github.com/apache/incubator-weex-site/pull/261
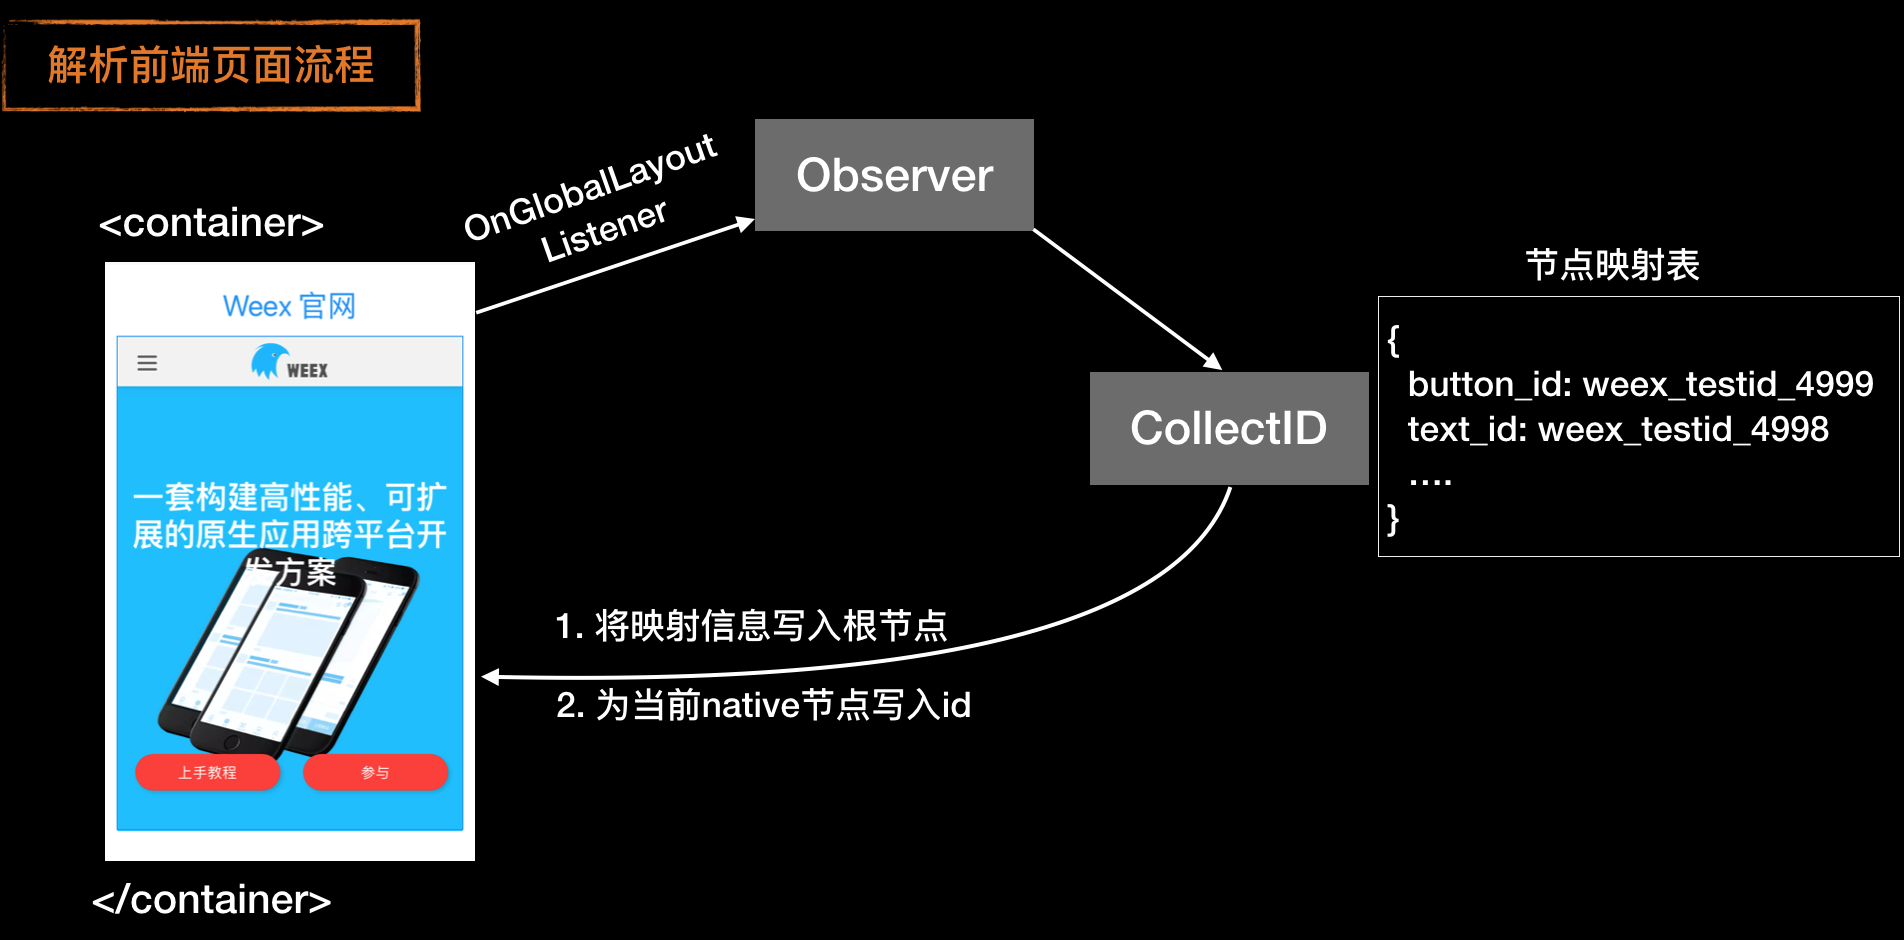
This is a PR merged from a forked repository. As GitHub hides the original diff on merge, it is displayed below for the sake of provenance: As this is a foreign pull request (from a fork), the diff is supplied below (as it won't show otherwise due to GitHub magic): diff --git a/docs/.vuepress/components/IPhoneImg.vue b/docs/.vuepress/components/IPhoneImg.vue deleted file mode 100644 index c815f2903..000000000 --- a/docs/.vuepress/components/IPhoneImg.vue +++ /dev/null @@ -1,32 +0,0 @@ -<template> - <div class="wrapper"> - <div class="iPhone-img"> - <img src="https://img.alicdn.com/tfs/TB1dZ.4nY2pK1RjSZFsXXaNlXXa-435-895.svg"; width="323"> - <img class="img" :src="$withBase(imgSrc)" width="284" height="505"> - </div> - </div> -</template> - -<script> -export default { - props: ['imgSrc'] -} -</script> - -<style> -.wrapper { - position: relative; - height: 644px; -} -.iPhone-img { - position: absolute; - left: 50%; - top: 0; - transform: translateX(-50%); -} -.img { - position: absolute; - left: 17px; - top: 81px; -} -</style> \ No newline at end of file diff --git a/docs/.vuepress/override.styl b/docs/.vuepress/override.styl index 5b1cb9624..3fd87461d 100644 --- a/docs/.vuepress/override.styl +++ b/docs/.vuepress/override.styl @@ -1 +1,2 @@ -#app .sidebar { width: 15rem; } \ No newline at end of file +#app .sidebar { width: 15rem; } +#app .page { padding-bottom: 0; } \ No newline at end of file diff --git a/docs/zh/blog/weex-auto-test-locating.md b/docs/zh/blog/weex-auto-test-locating.md index 895429a2e..625eed54b 100644 --- a/docs/zh/blog/weex-auto-test-locating.md +++ b/docs/zh/blog/weex-auto-test-locating.md @@ -1 +1,182 @@ -# 博客 \ No newline at end of file +## 背景介绍 +在WeexSDK的日常测试和自动化沉淀过程中,作为SDK的测试同学会遇到一下的问题: +1. 手淘Weex业务众多,并且业务逻辑复杂,人工回归成本高、效率低,并且在手工全覆盖的情况下,因为对业务逻辑的不了解,仍然会有“漏网”的bug。 +2. 对于Weex底层组件的自动化测试中,元素定位是一个比较麻烦的问题。由于Weex特殊的渲染逻辑,不会为每个元素分配一个唯一的id进行区分,在自动化脚本编写过程中,定位元素的成本和稳定性受到考验。 +3. 现有的测试框架,都无法彻底磨平Android、iOS两大平台的差异。作为一个跨平台的开发框架,配套的自动化测试,也能够从底层磨平两个平台的差异,做到一套代码,两端执行。 + +针对上述问题,我们在手淘中落地了一个方便快捷的元素定位方案,能够让Weex业务测试同学在前端配合下为指定元素分配一个唯一的ID,方便定位。 +## 解决方案 +在手淘上的元素定位问题,我们参考了@歪木在weex playground中的一个实现方案,为Weex页面提供了一个新的test-id属性,可以方便UI自动化脚本唯一性的快速定位指定元素。具体方案和使用方法如下: +### Android +--- +**实现原理** + + + +如上图所示,我们首先在weex页面的根部,创建了一个container节点,用于存储当前页面所有添加test-id属性的节点其test-id值与实际节点ID的映射关系;其次,在页面的layout发生变化时,触发收集新的携带test-id节点的信息,并为其分配一个新的ID;最后,我们将该节点的test-id属性和对应的ID写入到container节点中,方便自动化脚本查询指定节点时,能够获取其真实ID的信息; + +**主要代码** +- 由于Android不支持动态的创建节点ID,只能动态的将view与ID绑定,因此我们预先注册了5000个备用的ID,来作为与weex页面view绑定而使用的ID。 +- 客户端中通过监听页面Layout变化,触发遍历查找testId属性的逻辑。 +```java +//Weex页面onCreateView回调时触发,监听当前页面Layout变化,触发执行collectIdTask() +@Override +public View onCreateView(WXSDKInstance instance, View view) { + View wrappedView = null; + observer = view.getViewTreeObserver(); + mInstance = instance; + if (WXEnvironment.isApkDebugable()) { + if (instance.getContext() instanceof WXActivity) { + listener = new ViewTreeObserver.OnGlobalLayoutListener() { + @Override + public void onGlobalLayout() { + if(layoutChangeSignal == false) { + return; + } + else { + layoutChangeSignal = false; + new collectIdTask().execute(); + } + } + }; + observer.addOnGlobalLayoutListener(listener); + } + } + if (mAnalyzerDelegate != null) { + wrappedView = mAnalyzerDelegate.onWeexViewCreated(instance, view); + } + if (wrappedView == null) { + return view; + } + return wrappedView; +} + ``` + - 对于一个携带testId属性的节点,为其分配一个nativeId。将testId属性值与nativeId的映射关系写到页面的根节点处。将nativeId动态的赋值到当前节点中。 + ```java + private static void collectId(WXComponent comp, Map<String, String> map) { + if (comp == null) { + return; + } + String id; + View view ; + if ((id = (String) comp.getAttrs().get("testId")) != null && (view = comp.getHostView()) != null + && !map.containsKey(id)) { + Pair<String, Integer> pair = Utility.nextID(); + view.setId(pair.second); + map.put(id, pair.first); + } + if (comp instanceof WXVContainer) { + WXVContainer container = (WXVContainer) comp; + for (int i = container.getChildCount() - 1; i >= 0; i--) { + collectId(container.getChild(i), map); + } + } + } + +private void collectIDMap() { + if (mInstance.getContext() instanceof WXActivity) { + WXActivity appCompatActivity = (WXActivity) mInstance.getContext(); + View container = appCompatActivity.findViewById(R.id.container_test_id); + collectId(mInstance.getRootComponent(), mIDMap); + container.setContentDescription(JSON.toJSONString(mIDMap)); + } + } + ``` + +### iOS +相对于android,weex实现iOS的ById方式就简单多了。做过iOS自动化的同学应该听说过 iOS Accessibility,苹果为障碍人群提供的友好交互功能;iOS UI自动化正好可以与accessibility结合起来进行元素定位,参见:[User Interface Testing](https://developer.apple.com/library/content/documentation/DeveloperTools/Conceptual/testing_with_xcode/chapters/09-ui_testing.html) +[accessibilityidentifer](https://developer.apple.com/documentation/uikit/uiaccessibilityidentification) 是Accessibility的一种方式,用来唯一地标识一个元素使用UI自动化脚本编写的接口。 +``` +An identifier can be used to uniquely identify an element in the scripts you write using the UI Automation interfaces. +Using an identifier allows you to avoid inappropriately setting or accessing an element’s accessibility label. +``` +所以我们只需要在创建view的同时,将test-id作为identifier设置给对应的节点,UI自动化测试时就可以通过ById的方式获得对应的节点了。 + +此处代码已经在weexsdk中实现,不需要业务方做任何额外实现。 +代码如下: +``` +// 前端的test-id传输到native端会默认转化成testId +if (attributes[@"testId"]) { + [self.view setAccessibilityIdentifier:[WXConvert NSString:attributes[@"testId"]]]; +} +``` + + --- +### 前端实践案例 +下面给出Weex最常见的Vue页面中的使用demo + +对于Vue来说,由于在其内部,会将“XXX-XXX”格式的属性转为驼峰形式命名方式。因此,为了遵从http的命名方式,我们建议在节点属性命名时,使用“test-id”作为元素定位的属性。 +``` +<template> + <div style="align-items:center"> + <text test-id='text' class="title">Weex 官网</text> + <div class="wrapper"> + <web class="webview" src="http://weex-project.io/";></web> + </div> + </div> +</template> + +<style scoped> + .title { + font-size: 60px; + margin-top: 40px; + margin-bottom: 20px; + color: #1B90F7; + } + .wrapper { + width: 704px; + height: 884px; + border-width: 2px; + border-style: solid; + border-color: #1B90F7; + } + .webview { + width: 700px; + height: 880px; + } +</style> +``` + +### 测试脚本 +由于iOS下,只需要获取“testID”属性即可,此处我们不在赘述在iOS下定位带元素的方法。下面,我们将给出Android下查找test-id的测试代码。而业务方在实际使用过程当中,可以在自己的自动化框架中,封装统一的FindByTestID方法,来达到一套代码双端执行的效果。后续,我们也会对外推出一个基于Appium的测试框架,提供一个功能较为丰富的weex自动化执行框架给外部开发者。 + +**原理示意图** + + +针对本方案,我们基于Appium测试框架,实现了对应查找元素的方法。代码逻辑如下: +```java +public static WebElement waitForElementByTestID(String testId, int waitTime) { + long startTime = System.currentTimeMillis(); + + while((System.currentTimeMillis() - startTime) < waitTime) { + WebElement container = waitForVisible(By.id("com.taobao.taobao:id/container_test_id"), 5000); + if (container != null) { + JSONObject idMap = (JSONObject) JSON.parse(container.getAttribute("name")); + if(idMap.get(testId) == null) { + continue; + } + WebElement element = waitForVisible(By.id("com.taobao.taobao:id/" + idMap.get(testId)), 3000); + if(element != null) { + logger.info("native id found!"); + return element; + } + } + } + return null; + } + +public static WebElement waitForVisible(By by, int waitTime) { + WebElement el = null; + WebDriverWait wait = new WebDriverWait(driver, waitTime); + for (int attempt = 0; attempt < waitTime; attempt++) { + try { + el = getDriver().findElement(by); + break; + } catch (Exception e) { + getDriver().manage().timeouts().implicitlyWait(1, TimeUnit.SECONDS); + } + } + wait.until(ExpectedConditions.visibilityOfElementLocated(by)); + return el; +} +``` ---------------------------------------------------------------- This is an automated message from the Apache Git Service. To respond to the message, please log on GitHub and use the URL above to go to the specific comment. For queries about this service, please contact Infrastructure at: us...@infra.apache.org With regards, Apache Git Services
