This is an automated email from the ASF dual-hosted git repository.

juzhiyuan pushed a commit to branch juzhiyuan-patch-1
in repository https://gitbox.apache.org/repos/asf/apisix.git
commit 1bf465759f8fb2bebcd2da302bbdf79b068ba5f7
Author: 琚致远 / Zhiyuan Ju <juzhiy...@apache.org>
AuthorDate: Mon Mar 13 09:40:53 2023 +0800
docs: remove unnecessary getting-started.md
This PR (https://github.com/apache/apisix/pull/9046) misses the extra
getting-started.md
---
docs/en/latest/getting-started.md | 262 --------------------------------------
1 file changed, 262 deletions(-)
diff --git a/docs/en/latest/getting-started.md
b/docs/en/latest/getting-started.md
deleted file mode 100644
index f5c5d92ef..000000000
--- a/docs/en/latest/getting-started.md
+++ /dev/null
@@ -1,262 +0,0 @@
----
-title: Getting started
-keywords:
- - Apache APISIX
- - API Gateway
- - Getting Started
-description: This document walks you through how you can get started with
Apache APISIX.
----
-
-<!--
-#
-# Licensed to the Apache Software Foundation (ASF) under one or more
-# contributor license agreements. See the NOTICE file distributed with
-# this work for additional information regarding copyright ownership.
-# The ASF licenses this file to You under the Apache License, Version 2.0
-# (the "License"); you may not use this file except in compliance with
-# the License. You may obtain a copy of the License at
-#
-# http://www.apache.org/licenses/LICENSE-2.0
-#
-# Unless required by applicable law or agreed to in writing, software
-# distributed under the License is distributed on an "AS IS" BASIS,
-# WITHOUT WARRANTIES OR CONDITIONS OF ANY KIND, either express or implied.
-# See the License for the specific language governing permissions and
-# limitations under the License.
-#
--->
-
-import Tabs from '@theme/Tabs';
-import TabItem from '@theme/TabItem';
-
-The guide walks you through the concepts, features and how you can get started
with Apache APISIX.
-
-You will learn:
-
-- What Apache APISIX is.
-- Architecture and key concepts of APISIX.
-- How to install and run APISIX in Docker.
-- How to create your first Route and configure an Upstream using Admin API.
-- How to use APISIX dashboard.
-- Where you can reach out for help.
-
-## What is Apache APISIX?
-
-Apache APISIX is an open source, dynamic, scalable, and high-performance cloud
native API gateway for all your APIs and microservices.
-
-APISIX facilitates interface traffic handling for websites, mobile and IoT
applications by providing services such as load balancing, dynamic upstream,
canary release, fine-grained routing, rate limiting, and many more.
-
-### Features
-
-- Multi-platform support: APISIX can run from bare-metal machines to
Kubernetes providing a vendor neutral, multi-platform solution. It also
provides integration to cloud services like AWS Lambda, Azure Function, Lua
functions and Apache OpenWhisk.
-- Fully dynamic: APISIX supports hot-reloading, meaning you don't need to
restart the service to reflect changes in the configuration.
-- Fine-grained routing: APISIX supports using all [built-in NGINX
variables](https://nginx.org/en/docs/varindex.html) for routing. You can define
custom matching functions to filter requests and match Route.
-- Ops-friendly: APISIX is renowned for its ops-friendliness by DevOps teams.
It integrates with tools and platforms like [HashiCorp
Vault](./terminology/secret.md#use-vault-to-manage-secrets),
[Zipkin](./plugins/zipkin.md), [Apache SkyWalking](./plugins/skywalking.md),
[Consul](./discovery/consul_kv.md), [Nacos](./discovery/nacos.md) and
[Eureka](./discovery.md). With [APISIX
Dashboard](https://github.com/apache/apisix-dashboard), operators can configure
APISIX through an easy-to-use and [...]
-- Multi-language Plugin support: APISIX supports multiple programming
languages for Plugin development. Developers can choose a language-specific SDK
to write custom Plugins.
-
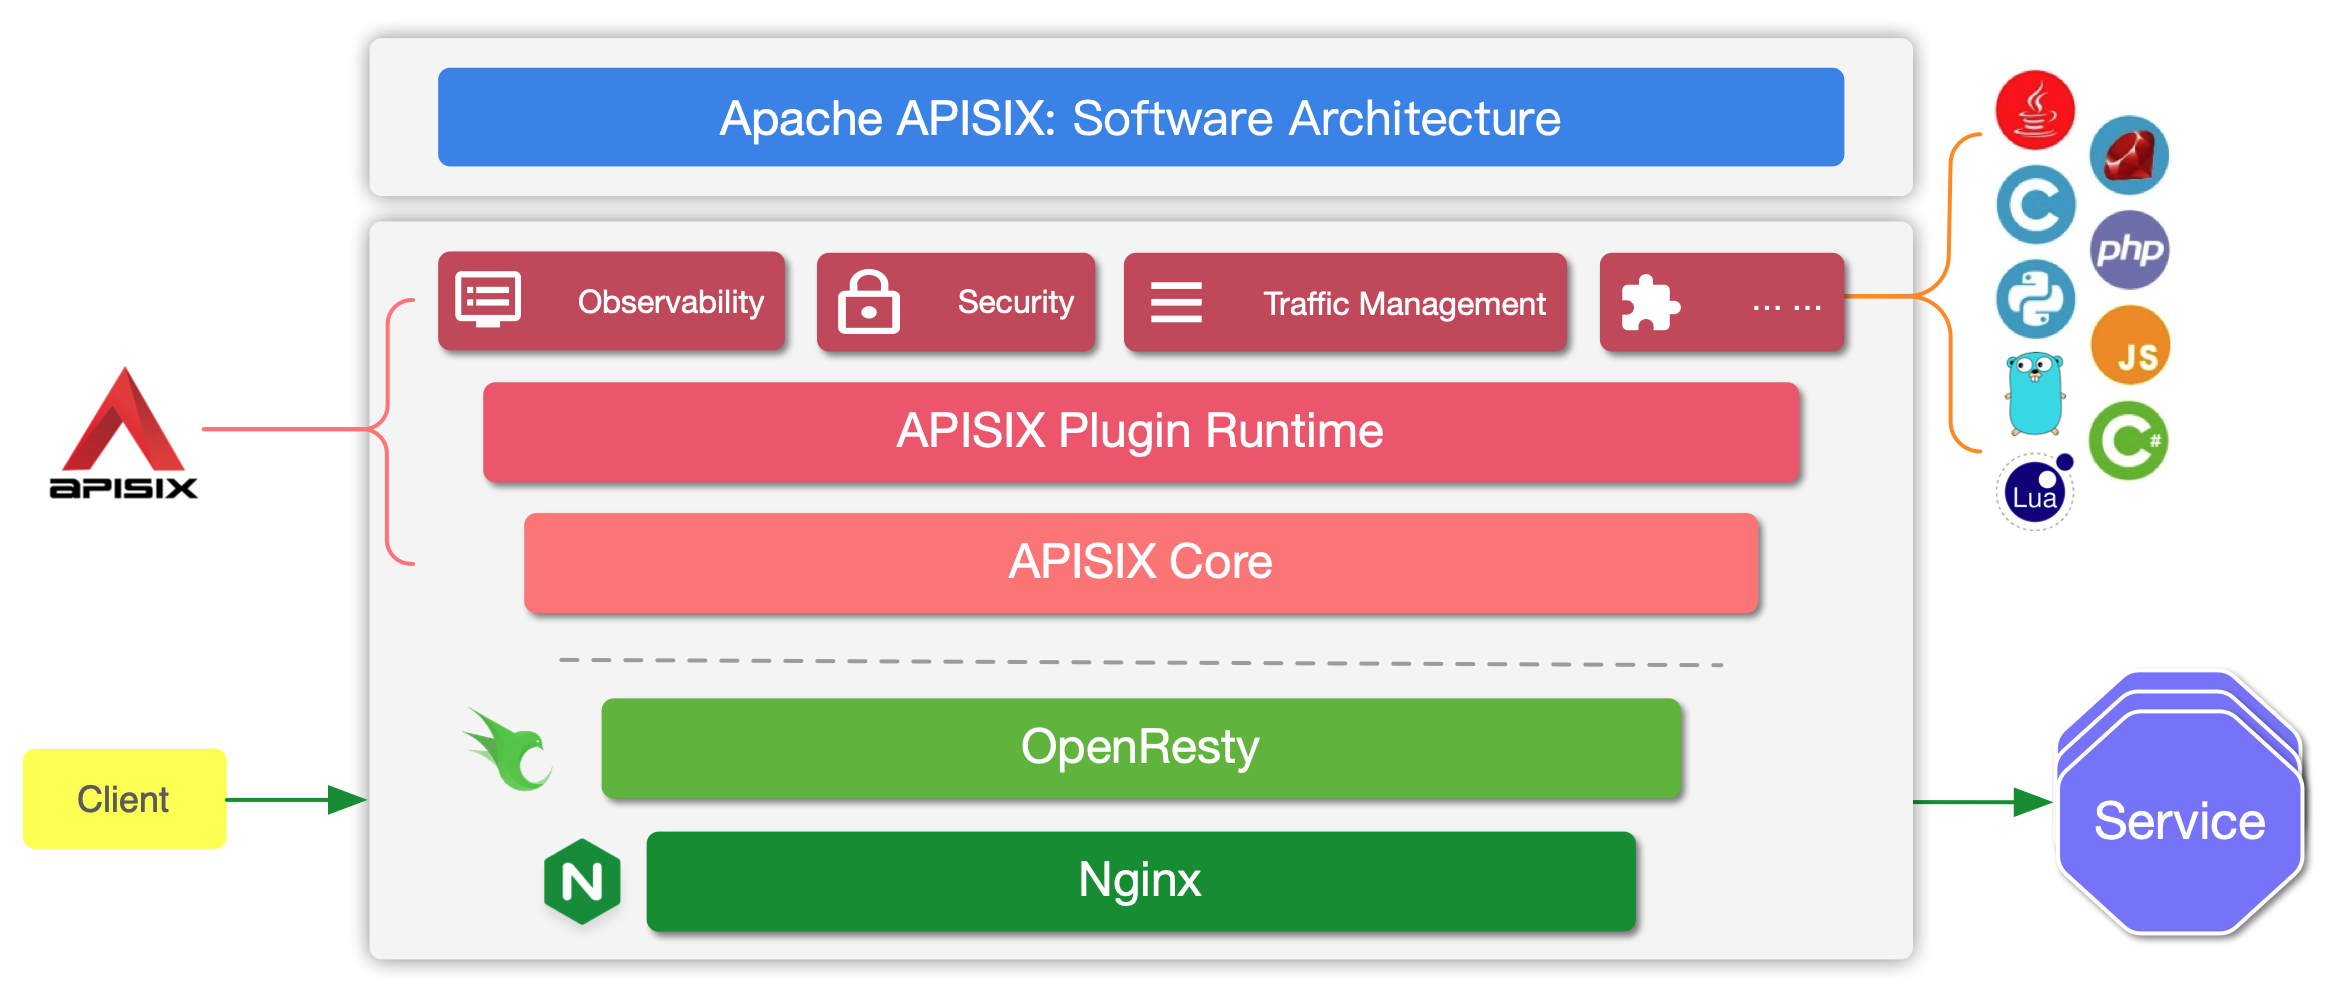
-## Key concepts
-
-Here is a high-level overview of APISIX's software architecture:
-
-
-
-The table below defines the key concepts and components of APISIX referenced
in this guide:
-
-| Concept/Component | Description
|
-|-------------------|--------------------------------------------------------------------------------------------------------------------------------------------------------------------------|
-| Route | Routes specify how requests to APISIX are forwarded to
the Upstream. They match a client's request based on defined rules and loads
and executes the configured Plugins. |
-| Upstream | Upstream is the service to forward your requests to.
They can be configured to a Route or abstracted out to an Upstream object.
|
-| Admin API | API that lets users control their deployed APISIX
instance.
|
-
-## Before you begin
-
-Before you start with APISIX, make sure you have the following tools installed:
-
-- [Docker](https://www.docker.com/) and [Docker
Compose](https://docs.docker.com/compose/).
-- [curl](https://curl.se/docs/manpage.html) for testing the API.
Alternatively, you can use tools like [Hoppscotch](https://hoppscotch.io/).
-
-The example Upstream service used here is [httpbin.org](https://httpbin.org)
and you can use it for your testing.
-
-This is an echo service, meaning it will return back the parameters we pass in
the request.
-
-**Request**
-
-The components of the request URL are shown and explained below:
-
-
-
-- Protocol: The network transport protocol. `HTTP` protocol is used for this
example.
-- Port: The port. `80` is used for this example.
-- Host: The host. `httpbin.org` is used for this example.
-- Path: The path. `/get` is used for this example.
-- Query Parameters: The query string. Two strings `foo1` and `foo2` are used
for this example.
-
-We can use the `curl` command to send the request:
-
-```bash
-curl --location --request GET "http://httpbin.org/get?foo1=bar1&foo2=bar2";
-```
-
-**Response**
-
-We receive a JSON response when we send the request:
-
-```json
-{
- "args": {
- "foo1": "bar1",
- "foo2": "bar2"
- },
- "headers": {
- "Accept": "*/*",
- "Host": "httpbin.org",
- "User-Agent": "curl/7.29.0",
- "X-Amzn-Trace-Id": "Root=1-6088fe84-24f39487166cce1f0e41efc9"
- },
- "origin": "58.152.81.42",
- "url": "http://httpbin.org/get?foo1=bar1&foo2=bar2";
-}
-```
-
-## Install Apache APISIX
-
-APISIX can be easily installed and started with the quickstart script.
-
-```sh
-curl -sL https://run.api7.ai/apisix/quickstart | sh
-```
-
-This command runs APISIX and etcd locally with Docker. APISIX uses etcd to
save and synchronize configuration. Both etcd and APISIX use the
[**host**](https://docs.docker.com/network/host/) Docker network mode. That is,
APISIX can be accessed locally.
-
-If everything is ok, you will see the following message.
-
-```text
-✔ APISIX is ready!
-```
-
-:::note
-
-You can check out [Installing Apache APISIX](./installation-guide.md) for
different installation methods.
-
-:::
-
-:::info IMPORTANT
-
-Make sure that all the required ports (default: 9080, 9180, 9443 and 2379) are
available and not used by other system processes.
-
-:::
-
-Once APISIX is running, you can use curl to access it. Send a simple HTTP
request to validate if APISIX is working properly or not.
-
-```sh
-curl "http://127.0.0.1:9080"; --head | grep Server
-```
-
-If everything is ok, you will get the following response.
-
-```text
-Server: APISIX/3.1.0
-```
-
-You now have APISIX installed and running successfully!
-
-## Create a Route
-
-From the previous step, we have a running instance of APISIX in Docker. Now
let's create a Route.
-
-APISIX provides a powerful [Admin API](./admin-api.md) and [APISIX
Dashboard](https://github.com/apache/apisix-dashboard). Here, we will use the
Admin API to create a Route and connect it to an
[Upstream](./terminology/upstream.md) service. When a request arrives, APISIX
will forward the request to the specified Upstream service.
-
-We will configure the Route so that APISIX can forward the request to the
corresponding Upstream service:
-
-```bash
-curl "http://127.0.0.1:9180/apisix/admin/routes/1"; -X PUT -d '
-{
- "methods": ["GET"],
- "host": "example.com",
- "uri": "/anything/*",
- "upstream": {
- "type": "roundrobin",
- "nodes": {
- "httpbin.org:80": 1
- }
- }
-}'
-```
-
-This configuration means that it will forward all matching inbound requests to
the Upstream service (`httpbin.org:80`) if they meet these specified criterion:
-
-- The HTTP method of the request is `GET`.
-- The request header contains the `host` field, and its value is `example.com`.
-- The request path matches `/anything/*`. `*` means any sub path. For example
`/anything/foo?arg=10`.
-
-With the Route has created, we can access the Upstream service from the
address exposed by APISIX:
-
-```bash
-curl -i -X GET "http://127.0.0.1:9080/anything/foo?arg=10"; -H "Host:
example.com"
-```
-
-This request will be forwarded to `http://httpbin.org:80/anything/foo?arg=10`
by APISIX.
-
-## Abstracting to Upstream
-
-Instead of configuring the Upstream directly to the Route, you can create an
Upstream object and use it in the Route.
-
-To create an Upstream object:
-
-```bash
-curl "http://127.0.0.1:9180/apisix/admin/upstreams/1"; -X PUT -d '
-{
- "type": "roundrobin",
- "nodes": {
- "httpbin.org:80": 1
- }
-}'
-```
-
-This is the same as the Upstream service we configured directly into the Route
on the previous section.
-
-To bind this Upstream to the Route, we can use the `upstream_id` as `1`:
-
-```bash
-curl "http://127.0.0.1:9180/apisix/admin/routes/1"; -X PUT -d '
-{
- "methods": ["GET"],
- "host": "example.com",
- "uri": "/anything/*",
- "upstream_id": "1"
-}'
-```
-
-With the Route has created, we can access the Upstream service from the
address exposed by APISIX:
-
-```bash
-curl -i -X GET "http://127.0.0.1:9080/anything/foo?arg=10"; -H "Host:
example.com"
-```
-
-This request will be forwarded to `http://httpbin.org:80/anything/foo?arg=10`
by APISIX.
-
-## Using the APISIX Dashboard
-
-You can also use the APISIX Dashboard to create and configure Routes similar
to the Admin API.
-
-If you have followed the steps above, you would be able to access the
dashboard at [localhost:9000](http://localhost:9000/).
-
-Click on [Route](http://localhost:9000/routes/list) from the sidebar to view a
list of configured Routes. You would be able to see the Routes you created
using the Admin API as well.
-
-You can create a new Route through the dashboard by clicking the
[Create](http://localhost:9000/routes/create) button and following the
instructions:
-
-
-
-The newly created Route is added to the list of Routes:
-
-
-
-Check out the [APISIX Dashboard documentation](/docs/dashboard/USER_GUIDE) to
learn more.
-
-## Where to go next?
-
-If you have followed the steps above, you should have APISIX running and you
would have configured a Route.
-
-You can now look into adding Plugins to provide features like authentication,
security, traffic control and observability. See the [Plugin Hub](/plugins) to
learn more.
-
-If you ever get stuck, you can ask for help in the [APISIX community
channels](/docs/general/join) or [open an issue](/docs/general/submit-issue) on
GitHub.