This is an automated email from the ASF dual-hosted git repository.

traky pushed a commit to branch master
in repository https://gitbox.apache.org/repos/asf/apisix.git
The following commit(s) were added to refs/heads/master by this push:
new c2f59f83c docs: improve `skywalking-logger` plugin docs (#11947)
c2f59f83c is described below
commit c2f59f83cda2e844171b64acee421a7b77367354
Author: Traky Deng <[email protected]>
AuthorDate: Fri Mar 28 15:27:15 2025 +0800
docs: improve `skywalking-logger` plugin docs (#11947)
---
docs/en/latest/plugins/skywalking-logger.md | 363 +++++++++++++++++++--------
docs/zh/latest/plugins/skywalking-logger.md | 375 +++++++++++++++++++---------
2 files changed, 509 insertions(+), 229 deletions(-)
diff --git a/docs/en/latest/plugins/skywalking-logger.md
b/docs/en/latest/plugins/skywalking-logger.md
index d1890eb4d..bb0532a2a 100644
--- a/docs/en/latest/plugins/skywalking-logger.md
+++ b/docs/en/latest/plugins/skywalking-logger.md
@@ -6,8 +6,9 @@ keywords:
- Plugin
- SkyWalking Logger
- skywalking-logger
-description: This document contains information about the Apache APISIX
skywalking-logger Plugin.
+description: The skywalking-logger pushes request and response logs as JSON
objects to SkyWalking OAP server in batches and supports the customization of
log formats.
---
+
<!--
#
# Licensed to the Apache Software Foundation (ASF) under one or more
@@ -27,11 +28,15 @@ description: This document contains information about the
Apache APISIX skywalki
#
-->
+<head>
+ <link rel="canonical" href="https://docs.api7.ai/hub/skywalking-logger"; />
+</head>
+
## Description
-The `skywalking-logger` Plugin can be used to push access log data to
SkyWalking OAP server of HTTP.
+The `skywalking-logger` Plugin pushes request and response logs as JSON
objects to SkyWalking OAP server in batches and supports the customization of
log formats.
-If there is an existing tracing context, it sets up the trace-log correlation
automatically and relies on [SkyWalking Cross Process Propagation Headers
Protocol](https://skywalking.apache.org/docs/main/next/en/api/x-process-propagation-headers-v3/).
This provides the ability to send access logs as JSON objects to the
SkyWalking OAP server.
+If there is an existing tracing context, it sets up the trace-log correlation
automatically and relies on [SkyWalking Cross Process Propagation Headers
Protocol](https://skywalking.apache.org/docs/main/next/en/api/x-process-propagation-headers-v3/).
## Attributes
@@ -40,90 +45,32 @@ If there is an existing tracing context, it sets up the
trace-log correlation au
| endpoint_addr | string | True | |
| URI of the SkyWalking OAP server.
|
| service_name | string | False | "APISIX" |
| Service name for the SkyWalking reporter.
|
| service_instance_name | string | False | "APISIX Instance Name" |
| Service instance name for the SkyWalking reporter. Set it to
`$hostname` to directly get the local hostname. |
-| log_format | object | False | | | Log format declared as key
value pairs in JSON format. Values only support strings.
[APISIX](../apisix-variable.md) or
[Nginx](http://nginx.org/en/docs/varindex.html) variables can be used by
prefixing the string with `$`. |
+| log_format | object | False | | Custom log
format in key-value pairs in JSON format. Support
[APISIX](../apisix-variable.md) or [Nginx
variables](http://nginx.org/en/docs/varindex.html) in values if the string
starts with `$`. |
| timeout | integer | False | 3 |
[1,...] | Time to keep the connection alive for after sending a request.
|
| name | string | False | "skywalking logger" |
| Unique identifier to identify the logger. If you use Prometheus to
monitor APISIX metrics, the name is exported in `apisix_batch_process_entries`.
|
-| include_req_body | boolean | False | false |
[false, true] | When set to `true` includes the request body in the log.
|
-| include_req_body_expr | array | False | |
| Filter for when the `include_req_body` attribute is set to `true`. Request
body is only logged when the expression set here evaluates to `true`. See
[lua-resty-expr](https://github.com/api7/lua-resty-expr) for more. |
-| include_resp_body | boolean | False | false | [false, true]
| When set to `true` includes the response body in the log.
|
-| include_resp_body_expr | array | False | |
| When the `include_resp_body` attribute is set to `true`, use this to filter
based on [lua-resty-expr](https://github.com/api7/lua-resty-expr). If present,
only logs the response if the expression evaluates to `true`. |
+| include_req_body | boolean | False | false | If true,
include the request body in the log. Note that if the request body is too big
to be kept in the memory, it can not be logged due to NGINX's limitations.
|
+| include_req_body_expr | array[array] | False | | An array of
one or more conditions in the form of
[lua-resty-expr](https://github.com/api7/lua-resty-expr). Used when the
`include_req_body` is true. Request body would only be logged when the
expressions configured here evaluate to true. |
+| include_resp_body | boolean | False | false | If true,
include the response body in the log. |
+| include_resp_body_expr | array[array] | False | | An array of
one or more conditions in the form of
[lua-resty-expr](https://github.com/api7/lua-resty-expr). Used when the
`include_resp_body` is true. Response body would only be logged when the
expressions configured here evaluate to true. |
This Plugin supports using batch processors to aggregate and process entries
(logs/data) in a batch. This avoids the need for frequently submitting the
data. The batch processor submits data every `5` seconds or when the data in
the queue reaches `1000`. See [Batch
Processor](../batch-processor.md#configuration) for more information or setting
your custom configuration.
-### Example of default log format
-
- ```json
- {
- "serviceInstance": "APISIX Instance Name",
- "body": {
- "json": {
- "json": "body-json"
- }
- },
- "endpoint": "/opentracing",
- "service": "APISIX"
- }
- ```
-
-For body-json data, it is an escaped json string
-
- ```json
- {
- "response": {
- "status": 200,
- "headers": {
- "server": "APISIX/3.7.0",
- "content-type": "text/plain",
- "transfer-encoding": "chunked",
- "connection": "close"
- },
- "size": 136
- },
- "route_id": "1",
- "upstream": "127.0.0.1:1982",
- "upstream_latency": 8,
- "apisix_latency": 101.00020599365,
- "client_ip": "127.0.0.1",
- "service_id": "",
- "server": {
- "hostname": "localhost",
- "version": "3.7.0"
- },
- "start_time": 1704429712768,
- "latency": 109.00020599365,
- "request": {
- "headers": {
- "content-length": "9",
- "host": "localhost",
- "connection": "close"
- },
- "method": "POST",
- "body": "body-data",
- "size": 94,
- "querystring": {},
- "url": "http://localhost:1984/opentracing";,
- "uri": "/opentracing"
- }
- }
- ```
-
## Metadata
You can also set the format of the logs by configuring the Plugin metadata.
The following configurations are available:
| Name | Type | Required | Default
| Description
|
| ---------- | ------ | -------- |
----------------------------------------------------------------------------- |
-------------------------------------------------------------------------------------------------------------------------------------------------------------------------------------------------------------------------------------------------------
|
-| log_format | object | False | | Log format declared as key value pairs
in JSON format. Values only support strings. [APISIX](../apisix-variable.md) or
[Nginx](http://nginx.org/en/docs/varindex.html) variables can be used by
prefixing the string with `$`. |
+| log_format | object | False | | Custom log format in key-value pairs in
JSON format. Support [APISIX](../apisix-variable.md) or [NGINX
variables](http://nginx.org/en/docs/varindex.html) in values. |
-:::info IMPORTANT
+## Examples
-Configuring the Plugin metadata is global in scope. This means that it will
take effect on all Routes and Services which use the `skywalking-logger` Plugin.
+The examples below demonstrate how you can configure `skywalking-logger`
Plugin for different scenarios.
-:::
-
-The example below shows how you can configure through the Admin API:
+To follow along the example, start a storage, OAP and Booster UI with Docker
Compose, following [Skywalking's
documentation](https://skywalking.apache.org/docs/main/next/en/setup/backend/backend-docker/).
Once set up, the OAP server should be listening on `12800` and you should be
able to access the UI at [http://localhost:8080](http://localhost:8080).
:::note
+
You can fetch the `admin_key` from `config.yaml` and save to an environment
variable with the following command:
```bash
@@ -132,68 +79,266 @@ admin_key=$(yq '.deployment.admin.admin_key[0].key'
conf/config.yaml | sed 's/"/
:::
+### Log Requests in Default Log Format
+
+The following example demonstrates how you can configure the
`skywalking-logger` Plugin on a Route to log information of requests hitting
the Route.
+
+Create a Route with the `skywalking-logger` Plugin and configure the Plugin
with your OAP server URI:
+
+```shell
+curl "http://127.0.0.1:9180/apisix/admin/routes"; -X PUT \
+ -H "X-API-KEY: ${admin_key}" \
+ -d '{
+ "id": "skywalking-logger-route",
+ "uri": "/anything",
+ "plugins": {
+ "skywalking-logger": {
+ "endpoint_addr": "http://192.168.2.103:12800";
+ }
+ },
+ "upstream": {
+ "nodes": {
+ "httpbin.org:80": 1
+ },
+ "type": "roundrobin"
+ }
+ }'
+```
+
+Send a request to the Route:
+
```shell
-curl http://127.0.0.1:9180/apisix/admin/plugin_metadata/skywalking-logger -H
"X-API-KEY: $admin_key" -X PUT -d '
+curl -i "http://127.0.0.1:9080/anything";
+```
+
+You should receive an `HTTP/1.1 200 OK` response.
+
+In [Skywalking UI](http://localhost:8080), navigate to __General Service__ >
__Services__. You should see a service called `APISIX` with a log entry
corresponding to your request:
+
+```json
{
+ "upstream_latency": 674,
+ "request": {
+ "method": "GET",
+ "headers": {
+ "user-agent": "curl/8.6.0",
+ "host": "127.0.0.1:9080",
+ "accept": "*/*"
+ },
+ "url": "http://127.0.0.1:9080/anything";,
+ "size": 85,
+ "querystring": {},
+ "uri": "/anything"
+ },
+ "client_ip": "192.168.65.1",
+ "route_id": "skywalking-logger-route",
+ "start_time": 1736945107345,
+ "upstream": "3.210.94.60:80",
+ "server": {
+ "version": "3.11.0",
+ "hostname": "7edbcebe8eb3"
+ },
+ "service_id": "",
+ "response": {
+ "size": 619,
+ "status": 200,
+ "headers": {
+ "content-type": "application/json",
+ "date": "Thu, 16 Jan 2025 12:45:08 GMT",
+ "server": "APISIX/3.11.0",
+ "access-control-allow-origin": "*",
+ "connection": "close",
+ "access-control-allow-credentials": "true",
+ "content-length": "391"
+ }
+ },
+ "latency": 764.9998664856,
+ "apisix_latency": 90.999866485596
+}
+```
+
+### Log Request and Response Headers With Plugin Metadata
+
+The following example demonstrates how you can customize log format using
Plugin metadata and built-in variables to log specific headers from request and
response.
+
+In APISIX, Plugin metadata is used to configure the common metadata fields of
all Plugin instances of the same Plugin. It is useful when a Plugin is enabled
across multiple resources and requires a universal update to their metadata
fields.
+
+First, create a Route with the `skywalking-logger` Plugin and configure the
Plugin with your OAP server URI:
+
+```shell
+curl "http://127.0.0.1:9180/apisix/admin/routes"; -X PUT \
+ -H "X-API-KEY: ${admin_key}" \
+ -d '{
+ "id": "skywalking-logger-route",
+ "uri": "/anything",
+ "plugins": {
+ "skywalking-logger": {
+ "endpoint_addr": "http://192.168.2.103:12800";
+ }
+ },
+ "upstream": {
+ "nodes": {
+ "httpbin.org:80": 1
+ },
+ "type": "roundrobin"
+ }
+ }'
+```
+
+Next, configure the Plugin metadata for `skywalking-logger` to log the custom
request header `env` and the response header `Content-Type`:
+
+```shell
+curl "http://127.0.0.1:9180/apisix/admin/plugin_metadata/skywalking-logger"; -X
PUT \
+ -H "X-API-KEY: ${admin_key}" \
+ -d '{
"log_format": {
- "host": "$host",
- "@timestamp": "$time_iso8601",
- "client_ip": "$remote_addr"
+ "host": "$host",
+ "@timestamp": "$time_iso8601",
+ "client_ip": "$remote_addr",
+ "env": "$http_env",
+ "resp_content_type": "$sent_http_Content_Type"
}
-}'
+ }'
```
-With this configuration, your logs would be formatted as shown below:
+Send a request to the Route with the `env` header:
```shell
-{"host":"localhost","@timestamp":"2020-09-23T19:05:05-04:00","client_ip":"127.0.0.1","route_id":"1"}
-{"host":"localhost","@timestamp":"2020-09-23T19:05:05-04:00","client_ip":"127.0.0.1","route_id":"1"}
+curl -i "http://127.0.0.1:9080/anything"; -H "env: dev"
+```
+
+You should receive an `HTTP/1.1 200 OK` response. In [Skywalking
UI](http://localhost:8080), navigate to __General Service__ > __Services__. You
should see a service called `APISIX` with a log entry corresponding to your
request:
+
+```json
+[
+ {
+ "route_id": "skywalking-logger-route",
+ "client_ip": "192.168.65.1",
+ "@timestamp": "2025-01-16T12:51:53+00:00",
+ "host": "127.0.0.1",
+ "env": "dev",
+ "resp_content_type": "application/json"
+ }
+]
```
-## Enable Plugin
+### Log Request Bodies Conditionally
+
+The following example demonstrates how you can conditionally log request body.
-Once you have set up your SkyWalking OAP server, you can enable the Plugin on
a specific Route as shown below:
+Create a Route with the `skywalking-logger` Plugin as such, to only include
request body if the URL query string `log_body` is `yes`:
```shell
-curl http://127.0.0.1:9180/apisix/admin/routes/1 -H "X-API-KEY: $admin_key" -X
PUT -d '
-{
- "plugins": {
- "skywalking-logger": {
- "endpoint_addr": "http://127.0.0.1:12800";
- }
- },
- "upstream": {
- "type": "roundrobin",
- "nodes": {
- "127.0.0.1:1980": 1
- }
+curl "http://127.0.0.1:9180/apisix/admin/routes"; -X PUT \
+ -H "X-API-KEY: ${admin_key}" \
+ -d '{
+ "id": "skywalking-logger-route",
+ "uri": "/anything",
+ "plugins": {
+ "skywalking-logger": {
+ "endpoint_addr": "http://192.168.2.103:12800";,
+ "include_req_body": true,
+ "include_req_body_expr": [["arg_log_body", "==", "yes"]]
+ }
+ },
+ "upstream": {
+ "nodes": {
+ "httpbin.org:80": 1
},
- "uri": "/hello"
-}'
+ "type": "roundrobin"
+ }
+ }'
```
-## Example usage
-
-Now, if you make a request to APISIX, it will be logged in your SkyWalking OAP
server:
+Send a request to the Route with a URL query string satisfying the condition:
```shell
-curl -i http://127.0.0.1:9080/hello
+curl -i "http://127.0.0.1:9080/anything?log_body=yes"; -X POST -d '{"env":
"dev"}'
```
-## Delete Plugin
+You should receive an `HTTP/1.1 200 OK` response. In [Skywalking
UI](http://localhost:8080), navigate to __General Service__ > __Services__. You
should see a service called `APISIX` with a log entry corresponding to your
request, with the request body logged:
+
+```json
+[
+ {
+ "request": {
+ "url": "http://127.0.0.1:9080/anything?log_body=yes";,
+ "querystring": {
+ "log_body": "yes"
+ },
+ "uri": "/anything?log_body=yes",
+ ...,
+ "body": "{\"env\": \"dev\"}",
+ },
+ ...
+ }
+]
+```
-To remove the `skywalking-logger` Plugin, you can delete the corresponding
JSON configuration from the Plugin configuration. APISIX will automatically
reload and you do not have to restart for this to take effect.
+Send a request to the Route without any URL query string:
```shell
-curl http://127.0.0.1:9180/apisix/admin/routes/1 -H "X-API-KEY: $admin_key"
-X PUT -d '
+curl -i "http://127.0.0.1:9080/anything"; -X POST -d '{"env": "dev"}'
+```
+
+You should not observe a log entry without the request body.
+
+:::info
+
+If you have customized the `log_format` in addition to setting
`include_req_body` or `include_resp_body` to `true`, the Plugin would not
include the bodies in the logs.
+
+As a workaround, you may be able to use the NGINX variable `$request_body` in
the log format, such as:
+
+```json
{
- "uri": "/hello",
- "plugins": {},
+ "skywalking-logger": {
+ ...,
+ "log_format": {"body": "$request_body"}
+ }
+}
+```
+
+:::
+
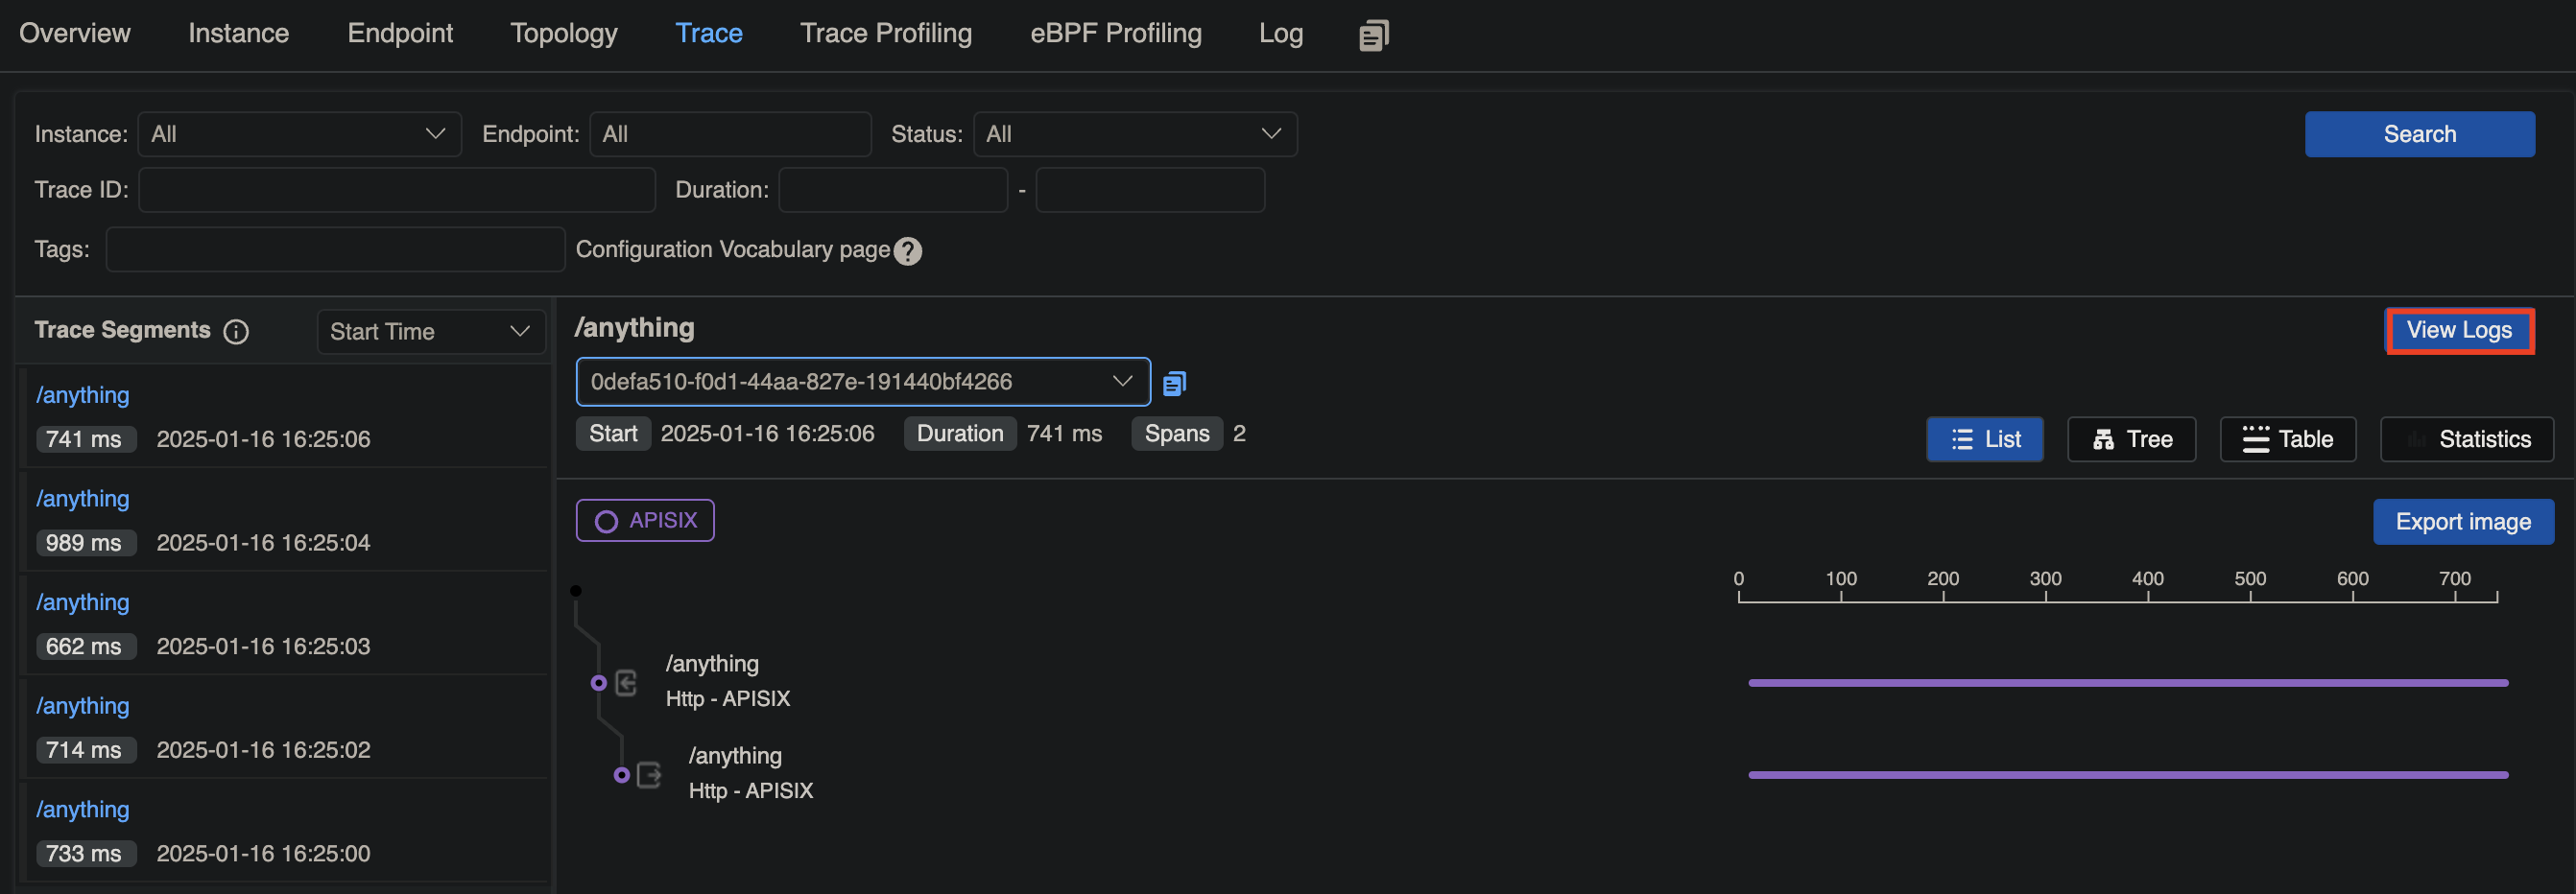
+### Associate Traces with Logs
+
+The following example demonstrates how you can configure the
`skywalking-logger` Plugin on a Route to log information of requests hitting
the route.
+
+Create a Route with the `skywalking-logger` Plugin and configure the Plugin
with your OAP server URI:
+
+```shell
+curl "http://127.0.0.1:9180/apisix/admin/routes"; -X PUT \
+ -H "X-API-KEY: ${admin_key}" \
+ -d '{
+ "id": "skywalking-logger-route",
+ "uri": "/anything",
+ "plugins": {
+ "skywalking": {
+ "sample_ratio": 1
+ },
+ "skywalking-logger": {
+ "endpoint_addr": "http://192.168.2.103:12800";
+ }
+ },
"upstream": {
- "type": "roundrobin",
- "nodes": {
- "127.0.0.1:1980": 1
- }
+ "nodes": {
+ "httpbin.org:80": 1
+ },
+ "type": "roundrobin"
}
-}'
+ }'
+```
+
+Generate a few requests to the Route:
+
+```shell
+curl -i "http://127.0.0.1:9080/anything";
```
+
+You should receive `HTTP/1.1 200 OK` responses.
+
+In [Skywalking UI](http://localhost:8080), navigate to __General Service__ >
__Services__. You should see a service called `APISIX` with a trace
corresponding to your request, where you can view the associated logs:
+
+
+
+
diff --git a/docs/zh/latest/plugins/skywalking-logger.md
b/docs/zh/latest/plugins/skywalking-logger.md
index 1bc16bd03..79eab655e 100644
--- a/docs/zh/latest/plugins/skywalking-logger.md
+++ b/docs/zh/latest/plugins/skywalking-logger.md
@@ -5,7 +5,7 @@ keywords:
- API 网关
- Plugin
- SkyWalking
-description: 本文将介绍 API 网关 Apache APISIX 如何通过 skywalking-logger 插件将日志数据推送到
SkyWalking OAP 服务器。
+description: skywalking-logger 将请求和响应日志作为 JSON 对象批量推送到 SkyWalking OAP
服务器,并支持日志格式的自定义。
---
<!--
@@ -27,13 +27,15 @@ description: 本文将介绍 API 网关 Apache APISIX 如何通过 skywalking-lo
#
-->
-## 描述
+<head>
+ <link rel="canonical" href="https://docs.api7.ai/hub/skywalking-logger"; />
+</head>
-`skywalking-logger` 插件可用于将 APISIX 的访问日志数据推送到 SkyWalking OAP 服务器。
+## 描述
-如果上下文中存在 `tracing context`,插件会自动建立 `trace` 与日志的关联,该功能依赖于 [SkyWalking Cross
Process Propagation Headers
Protocol](https://skywalking.apache.org/docs/main/next/en/api/x-process-propagation-headers-v3/)。
+`skywalking-logger` 插件将请求和响应日志作为 JSON 对象批量推送到 SkyWalking OAP 服务器,并支持日志格式的自定义。
-该插件也提供了将访问日志作为 JSON 对象发送到 SkyWalking OAP 服务器的能力。
+如果存在现有的跟踪上下文,它会自动设置跟踪日志关联并依赖于 [SkyWalking
跨进程传播标头协议](https://skywalking.apache.org/docs/main/next/en/api/x-process-propagation-headers-v3/)。
## 属性
@@ -41,89 +43,30 @@ description: 本文将介绍 API 网关 Apache APISIX 如何通过 skywalking-lo
| ---------------------- | ------- | ------ | -------------------- |
------------- |
---------------------------------------------------------------- |
| endpoint_addr | string | 是 | |
| SkyWalking OAP 服务器的 URI。 |
| service_name | string | 否 |"APISIX" |
| SkyWalking 服务名称。 |
-| service_instance_name | string | 否 |"APISIX Instance Name"|
| SkyWalking 服务的实例名称。当设置为 `$hostname`会直接获取本地主机名。 |
+| service_instance_name | string | 否 |"APISIX Instance Name"|
| SkyWalking 服务的实例名称。当设置为 `$hostname` 会直接获取本地主机名。 |
| log_format | object | 否 | | | 以 JSON
格式的键值对来声明日志格式。对于值部分,仅支持字符串。如果是以 `$` 开头,则表明是要获取 [APISIX
变量](../apisix-variable.md) 或 [NGINX
内置变量](http://nginx.org/en/docs/varindex.html)。 |
| timeout | integer | 否 | 3 | [1,...]
| 发送请求后保持连接活动的时间。 |
| name | string | 否 | "skywalking logger" |
| 标识 logger 的唯一标识符。如果您使用 Prometheus 监视 APISIX 指标,名称将以
`apisix_batch_process_entries` 导出。 |
-| include_req_body | boolean | 否 | false | [false,
true] | 当设置为 `true` 时,将请求正文包含在日志中。 |
-| include_req_body_expr | array | 否 | | | 当
`include_req_body` 属性设置为 `true` 时的过滤器。只有当此处设置的表达式求值为 `true`
时,才会记录请求体。有关更多信息,请参阅 [lua-resty-expr](https://github.com/api7/lua-resty-expr) 。
|
-| include_resp_body | boolean | 否 | false | [false, true] | 当设置为
`true` 时,包含响应体。
|
-| include_resp_body_expr | array | 否 | | | 当
`include_resp_body` 属性设置为 `true` 时进行过滤响应体,并且只有当此处设置的表达式计算结果为 `true`
时,才会记录响应体。更多信息,请参考 [lua-resty-expr](https://github.com/api7/lua-resty-expr)。 |
+| include_req_body | boolean | 否 | false |如果为
true,则将请求主体包含在日志中。请注意,如果请求主体太大而无法保存在内存中,则由于 NGINX 的限制而无法记录。|
+| include_req_body_expr | array[array] | 否 | | 一个或多个条件的数组,形式为
[lua-resty-expr](https://github.com/api7/lua-resty-expr)。在 `include_req_body` 为
true 时使用。仅当此处配置的表达式计算结果为 true 时,才会记录请求主体。|
+| include_resp_body | boolean | 否 | false | 如果为 true,则将响应主体包含在日志中。|
+| include_resp_body_expr | array[array] | 否 | | 一个或多个条件的数组,形式为
[lua-resty-expr](https://github.com/api7/lua-resty-expr)。在 `include_resp_body`
为 true 时使用。仅当此处配置的表达式计算结果为 true 时,才会记录响应主体。|
该插件支持使用批处理器来聚合并批量处理条目(日志/数据)。这样可以避免插件频繁地提交数据,默认设置情况下批处理器会每 `5` 秒钟或队列中的数据达到
`1000` 条时提交数据,如需了解批处理器相关参数设置,请参考 [Batch-Processor](../batch-processor.md#配置)。
-### 默认日志格式示例
-
- ```json
- {
- "serviceInstance": "APISIX Instance Name",
- "body": {
- "json": {
- "json": "body-json"
- }
- },
- "endpoint": "/opentracing",
- "service": "APISIX"
- }
- ```
-
-对于 body-json 数据,它是一个转义后的 json 字符串,格式化后如下:
-
- ```json
- {
- "response": {
- "status": 200,
- "headers": {
- "server": "APISIX/3.7.0",
- "content-type": "text/plain",
- "transfer-encoding": "chunked",
- "connection": "close"
- },
- "size": 136
- },
- "route_id": "1",
- "upstream": "127.0.0.1:1982",
- "upstream_latency": 8,
- "apisix_latency": 101.00020599365,
- "client_ip": "127.0.0.1",
- "service_id": "",
- "server": {
- "hostname": "localhost",
- "version": "3.7.0"
- },
- "start_time": 1704429712768,
- "latency": 109.00020599365,
- "request": {
- "headers": {
- "content-length": "9",
- "host": "localhost",
- "connection": "close"
- },
- "method": "POST",
- "body": "body-data",
- "size": 94,
- "querystring": {},
- "url": "http://localhost:1984/opentracing";,
- "uri": "/opentracing"
- }
- }
- ```
-
-## 配置插件元数据
+## 元数据
-`skywalking-logger` 也支持自定义日志格式,与 [http-logger](./http-logger.md) 插件类似。
+您还可以通过配置插件元数据来设置日志的格式。可用的配置如下:
-| 名称 | 类型 | 必选项 | 默认值 | 有效值 | 描述
|
-| ---------------- | ------- | ------ | ------------- | ------- |
------------------------------------------------ |
-| log_format | object | 否 | | | 以 JSON
格式的键值对来声明日志格式。对于值部分,仅支持字符串。如果是以 `$` 开头,则表明是要获取 [APISIX](../apisix-variable.md)
或 [NGINX](http://nginx.org/en/docs/varindex.html) 变量。|
+| 名称 | 类型 | 必选项 | 默认值 | 有效值 | 描述
|
+| ---------------------- | ------- | ------ | -------------------- |
------------- |
---------------------------------------------------------------- |
+| log_format | object | 否 | | 以 JSON 格式的键值对来声明日志格式。对于值部分,仅支持字符串。如果是以 `$`
开头,则表明是要获取 [APISIX 变量](../apisix-variable.md) 或 [NGINX
内置变量](http://nginx.org/en/docs/varindex.html)。 |
-:::info 重要
+## 示例
-该配置全局生效。如果你指定了 `log_format`,该配置就会对所有绑定 `skywalking-logger` 的路由或服务生效。
+以下示例演示了如何为不同场景配置 `skywalking-logger` 插件。
-:::
-
-以下示例展示了如何通过 Admin API 进行插件元数据配置:
+要按照示例操作,请按照 [Skywalking
的文档](https://skywalking.apache.org/docs/main/next/en/setup/backend/backend-docker/)
使用 Docker Compose 启动存储、OAP 和 Booster UI。设置完成后,OAP 服务器应在 `12800` 上监听,并且您应该能够通过
[http://localhost:8080](http://localhost:8080) 访问 UI。
:::note
@@ -135,74 +78,266 @@ admin_key=$(yq '.deployment.admin.admin_key[0].key'
conf/config.yaml | sed 's/"/
:::
+### 以默认日志格式记录请求
+
+以下示例演示了如何在路由上配置 `skywalking-logger` 插件,以记录到达路由的请求信息。
+
+使用 `skywalking-logger` 插件创建路由,并使用 OAP 服务器 URI 配置插件:
+
+```shell
+curl "http://127.0.0.1:9180/apisix/admin/routes"; -X PUT \
+ -H "X-API-KEY: ${admin_key}" \
+ -d '{
+ "id": "skywalking-logger-route",
+ "uri": "/anything",
+ "plugins": {
+ "skywalking-logger": {
+ "endpoint_addr": "http://192.168.2.103:12800";
+ }
+ },
+ "upstream": {
+ "nodes": {
+ "httpbin.org:80": 1
+ },
+ "type": "roundrobin"
+ }
+ }'
+```
+
+向路由发送请求:
+
```shell
-curl http://127.0.0.1:9180/apisix/admin/plugin_metadata/skywalking-logger \
--H "X-API-KEY: $admin_key" -X PUT -d '
+curl -i "http://127.0.0.1:9080/anything";
+```
+
+您应该会收到 `HTTP/1.1 200 OK` 响应。
+
+在 [Skywalking UI](http://localhost:8080) 中,导航至 __General Service__ >
__Services__。您应该会看到一个名为 `APISIX` 的服务,其中包含与您的请求相对应的日志条目:
+
+```json
{
+ "upstream_latency": 674,
+ "request": {
+ "method": "GET",
+ "headers": {
+ "user-agent": "curl/8.6.0",
+ "host": "127.0.0.1:9080",
+ "accept": "*/*"
+ },
+ "url": "http://127.0.0.1:9080/anything";,
+ "size": 85,
+ "querystring": {},
+ "uri": "/anything"
+ },
+ "client_ip": "192.168.65.1",
+ "route_id": "skywalking-logger-route",
+ "start_time": 1736945107345,
+ "upstream": "3.210.94.60:80",
+ "server": {
+ "version": "3.11.0",
+ "hostname": "7edbcebe8eb3"
+ },
+ "service_id": "",
+ "response": {
+ "size": 619,
+ "status": 200,
+ "headers": {
+ "content-type": "application/json",
+ "date": "Thu, 16 Jan 2025 12:45:08 GMT",
+ "server": "APISIX/3.11.0",
+ "access-control-allow-origin": "*",
+ "connection": "close",
+ "access-control-allow-credentials": "true",
+ "content-length": "391"
+ }
+ },
+ "latency": 764.9998664856,
+ "apisix_latency": 90.999866485596
+}
+```
+
+### 使用插件元数据记录请求和响应标头
+
+以下示例演示了如何使用插件元数据和内置变量自定义日志格式,以记录来自请求和响应的特定标头。
+
+在 APISIX 中,插件元数据用于配置同一插件的所有插件实例的通用元数据字段。当插件在多个资源中启用并需要对其元数据字段进行通用更新时,它很有用。
+
+首先,使用 `skywalking-logger` 插件创建路由,并使用您的 OAP 服务器 URI 配置插件:
+
+```shell
+curl "http://127.0.0.1:9180/apisix/admin/routes"; -X PUT \
+ -H "X-API-KEY: ${admin_key}" \
+ -d '{
+ "id": "skywalking-logger-route",
+ "uri": "/anything",
+ "plugins": {
+ "skywalking-logger": {
+ "endpoint_addr": "http://192.168.2.103:12800";
+ }
+ },
+ "upstream": {
+ "nodes": {
+ "httpbin.org:80": 1
+ },
+ "type": "roundrobin"
+ }
+ }'
+```
+
+接下来,配置 `skywalking-logger` 的插件元数据,以记录自定义请求头 `env` 和响应头 `Content-Type`:
+
+```shell
+curl "http://127.0.0.1:9180/apisix/admin/plugin_metadata/skywalking-logger"; -X
PUT \
+ -H "X-API-KEY: ${admin_key}" \
+ -d '{
"log_format": {
- "host": "$host",
- "@timestamp": "$time_iso8601",
- "client_ip": "$remote_addr"
+ "host": "$host",
+ "@timestamp": "$time_iso8601",
+ "client_ip": "$remote_addr",
+ "env": "$http_env",
+ "resp_content_type": "$sent_http_Content_Type"
}
-}'
+ }'
```
-配置成功后,将得到如下日志格式:
+使用 `env` 标头向路由发送请求:
```shell
-{"host":"localhost","@timestamp":"2020-09-23T19:05:05-04:00","client_ip":"127.0.0.1","route_id":"1"}
-{"host":"localhost","@timestamp":"2020-09-23T19:05:05-04:00","client_ip":"127.0.0.1","route_id":"1"}
+curl -i "http://127.0.0.1:9080/anything"; -H "env: dev"
```
-## 启用插件
+您应该收到 `HTTP/1.1 200 OK` 响应。在 [Skywalking UI](http://localhost:8080) 中,导航至
__General Service__ > __Services__。您应该会看到一个名为 `APISIX` 的服务,其中包含与您的请求相对应的日志条目:
+
+```json
+[
+ {
+ "route_id": "skywalking-logger-route",
+ "client_ip": "192.168.65.1",
+ "@timestamp": "2025-01-16T12:51:53+00:00",
+ "host": "127.0.0.1",
+ "env": "dev",
+ "resp_content_type": "application/json"
+ }
+]
+```
+
+### 有条件地记录请求主体
+
+以下示例演示了如何有条件地记录请求主体。
-完成 SkyWalking OAP 配置后,你可以通过以下命令在路由中启用该插件:
+使用 `skywalking-logger` 插件创建一个路由,仅当 URL 查询字符串 `log_body` 为 `yes` 时才包含请求主体:
```shell
-curl http://127.0.0.1:9180/apisix/admin/routes/1 \
--H "X-API-KEY: $admin_key" -X PUT -d '
-{
- "plugins": {
- "skywalking-logger": {
- "endpoint_addr": "http://127.0.0.1:12800";
- }
- },
- "upstream": {
- "type": "roundrobin",
- "nodes": {
- "127.0.0.1:1980": 1
- }
+curl "http://127.0.0.1:9180/apisix/admin/routes"; -X PUT \
+ -H "X-API-KEY: ${admin_key}" \
+ -d '{
+ "id": "skywalking-logger-route",
+ "uri": "/anything",
+ "plugins": {
+ "skywalking-logger": {
+ "endpoint_addr": "http://192.168.2.103:12800";,
+ "include_req_body": true,
+ "include_req_body_expr": [["arg_log_body", "==", "yes"]]
+ }
+ },
+ "upstream": {
+ "nodes": {
+ "httpbin.org:80": 1
},
- "uri": "/hello"
-}'
+ "type": "roundrobin"
+ }
+ }'
```
-## 测试插件
-
-现在你可以向 APISIX 发起请求:
+使用满足以下条件的 URL 查询字符串向路由发送请求:
```shell
-curl -i http://127.0.0.1:9080/hello
+curl -i "http://127.0.0.1:9080/anything?log_body=yes"; -X POST -d '{"env":
"dev"}'
```
-完成上述步骤后,你可以在 SkyWalking UI 查看到相关日志。
+您应该收到 `HTTP/1.1 200 OK` 响应。在 [Skywalking UI](http://localhost:8080) 中,导航到
__General Service__ > __Services__。您应该看到一个名为 `APISIX`
的服务,其中包含与您的请求相对应的日志条目,并记录了请求正文:
-## 删除插件
+```json
+[
+ {
+ "request": {
+ "url": "http://127.0.0.1:9080/anything?log_body=yes";,
+ "querystring": {
+ "log_body": "yes"
+ },
+ "uri": "/anything?log_body=yes",
+ ...,
+ "body": "{\"env\": \"dev\"}",
+ },
+ ...
+ }
+]
+```
-当你需要删除该插件时,可通过以下命令删除相应的 JSON 配置,APISIX 将会自动重新加载相关配置,无需重启服务:
+向路由发送一个没有任何 URL 查询字符串的请求:
```shell
-curl http://127.0.0.1:9180/apisix/admin/routes/1 \
--H "X-API-KEY: $admin_key" -X PUT -d '
+curl -i "http://127.0.0.1:9080/anything"; -X POST -d '{"env": "dev"}'
+```
+
+您不应该观察到没有请求正文的日志条目。
+
+:::info
+
+如果您除了将 `include_req_body` 或 `include_resp_body` 设置为 `true` 之外还自定义了
`log_format`,则插件不会在日志中包含正文。
+
+作为一种解决方法,您可以在日志格式中使用 NGINX 变量 `$request_body`,例如:
+
+```json
{
- "methods": ["GET"],
- "uri": "/hello",
- "plugins": {},
+ "skywalking-logger": {
+ ...,
+ "log_format": {"body": "$request_body"}
+ }
+}
+```
+
+:::
+
+### 将跟踪与日志关联
+
+以下示例演示了如何在路由上配置 `skywalking-logger` 插件,以记录到达路由的请求信息。
+
+使用 `skywalking-logger` 插件创建路由,并使用 OAP 服务器 URI 配置插件:
+
+```shell
+curl "http://127.0.0.1:9180/apisix/admin/routes"; -X PUT \
+ -H "X-API-KEY: ${admin_key}" \
+ -d '{
+ "id": "skywalking-logger-route",
+ "uri": "/anything",
+ "plugins": {
+ "skywalking": {
+ "sample_ratio": 1
+ },
+ "skywalking-logger": {
+ "endpoint_addr": "http://192.168.2.103:12800";
+ }
+ },
"upstream": {
- "type": "roundrobin",
- "nodes": {
- "127.0.0.1:1980": 1
- }
+ "nodes": {
+ "httpbin.org:80": 1
+ },
+ "type": "roundrobin"
}
-}'
+ }'
+```
+
+生成几个对路由的请求:
+
+```shell
+curl -i "http://127.0.0.1:9080/anything";
```
+
+您应该会收到 `HTTP/1.1 200 OK` 响应。
+
+在 [Skywalking UI](http://localhost:8080) 中,导航到 __General Service__ >
__Services__。您应该会看到一个名为 `APISIX` 的服务,其中包含与您的请求相对应的跟踪,您可以在其中查看相关日志:
+
+
+
+