Copilot commented on code in PR #13309:
URL: https://github.com/apache/apisix/pull/13309#discussion_r3151480945
########## docs/en/latest/plugins/aws-lambda.md: ########## @@ -27,37 +27,42 @@ description: This document contains information about the Apache APISIX aws-lamb # --> -## Description +<head> + <link rel="canonical" href="https://docs.api7.ai/hub/aws-lambda"; /> +</head> -The `aws-lambda` Plugin is used for integrating APISIX with [AWS Lambda](https://aws.amazon.com/lambda/) and [Amazon API Gateway](https://aws.amazon.com/api-gateway/) as a dynamic upstream to proxy all requests for a particular URI to the AWS Cloud. +## Description -When enabled, the Plugin terminates the ongoing request to the configured URI and initiates a new request to the AWS Lambda Gateway URI on behalf of the client with configured authorization details, request headers, body and parameters (all three passed from the original request). It returns the response with headers, status code and the body to the client that initiated the request with APISIX. +The `aws-lambda` Plugin eases the integration of APISIX with [AWS Lambda](https://aws.amazon.com/lambda/) and [Amazon API Gateway](https://aws.amazon.com/api-gateway/) to proxy for other AWS services. -This Plugin supports authorization via AWS API key and AWS IAM secrets. The Plugin implements [AWS Signature Version 4 signing](https://docs.aws.amazon.com/IAM/latest/UserGuide/reference_aws-signing.html) for IAM secrets. +The Plugin supports authentication and authorization with AWS via IAM user credentials and API Gateway's API key. ## Attributes -| Name | Type | Required | Default | Valid values | Description | -|----------------------|---------|----------|---------|--------------|--------------------------------------------------------------------------------------------------------------------------------------------| -| function_uri | string | True | | | AWS API Gateway endpoint which triggers the lambda serverless function. | -| authorization | object | False | | | Authorization credentials to access the cloud function. | -| authorization.apikey | string | False | | | Generated API Key to authorize requests to the AWS Gateway endpoint. | -| authorization.iam | object | False | | | Used for AWS IAM role based authorization performed via AWS v4 request signing. See [IAM authorization schema](#iam-authorization-schema). | -| authorization.iam.accesskey | string | True | | Generated access key ID from AWS IAM console. | -| authorization.iam.secretkey | string | True | | Generated access key secret from AWS IAM console. | -| authorization.iam.aws_region | string | False | "us-east-1" | AWS region where the request is being sent. | -| authorization.iam.service | string | False | "execute-api" | The service that is receiving the request. For Amazon API gateway APIs, it should be set to `execute-api`. For Lambda function, it should be set to `lambda`. | -| timeout | integer | False | 3000 | [100,...] | Proxy request timeout in milliseconds. | -| ssl_verify | boolean | False | true | true/false | When set to `true` performs SSL verification. | -| keepalive | boolean | False | true | true/false | When set to `true` keeps the connection alive for reuse. | -| keepalive_pool | integer | False | 5 | [1,...] | Maximum number of requests that can be sent on this connection before closing it. | -| keepalive_timeout | integer | False | 60000 | [1000,...] | Time is ms for connection to remain idle without closing. | - -## Enable Plugin - -The example below shows how you can configure the Plugin on a specific Route: +| Name | Type | Required | Default | Valid values | Description | +|------------------------------|---------|----------|---------------|--------------|--------------------------------------------------------------------------------------------------------------------------------------------------------------------| +| function_uri | string | True | | | AWS Lambda function URL or Amazon API Gateway endpoint that triggers the Lambda function. | +| authorization | object | False | | | Credentials used in authentication and authorization on AWS to invoke Lambda function. | +| authorization.apikey | string | False | | | API key for the REST API Gateway when API key is selected as the security mechanism. | +| authorization.iam | object | False | | | IAM credentials to be authenticated using [AWS Signature Version 4](https://docs.aws.amazon.com/IAM/latest/UserGuide/reference_aws-signing.html) and authorized. | +| authorization.iam.accesskey | string | True | | | IAM user access key. | +| authorization.iam.secretkey | string | True | | | IAM user secret access key. | Review Comment: The table marks `authorization.iam.accesskey`/`secretkey` as `Required: True` even though `authorization.iam` is optional. This reads as globally required and conflicts with the API-key example below. Consider making these fields conditionally required (e.g., set `Required` to `False` and state “Required when `authorization.iam` is configured”, or introduce a “Conditional” convention) to avoid misleading readers. ```suggestion | authorization.iam.accesskey | string | False | | | IAM user access key. Required when `authorization.iam` is configured. | | authorization.iam.secretkey | string | False | | | IAM user secret access key. Required when `authorization.iam` is configured. | ``` ########## docs/en/latest/plugins/aws-lambda.md: ########## @@ -27,37 +27,42 @@ description: This document contains information about the Apache APISIX aws-lamb # --> -## Description +<head> + <link rel="canonical" href="https://docs.api7.ai/hub/aws-lambda"; /> +</head> Review Comment: `<head>` is not valid inside a document body and may render as invalid HTML or be dropped/escaped by the docs pipeline. Prefer using the documentation system’s supported mechanism for injecting head tags (commonly a frontmatter `head:` block or an equivalent page-level meta configuration) for the canonical link. ########## docs/zh/latest/plugins/aws-lambda.md: ########## @@ -27,35 +27,39 @@ description: 本文介绍了关于 Apache APISIX aws-lambda 插件的基本信 # --> -## 描述 +<head> + <link rel="canonical" href="https://docs.api7.ai/hub/aws-lambda"; /> +</head> Review Comment: `<head>` 标签放在页面正文中通常会生成无效 HTML,且可能被文档构建链路丢弃或转义。建议使用站点支持的方式注入 canonical(例如 frontmatter 的 `head:` 配置或等效的页面级 meta 配置)。 ########## docs/en/latest/plugins/aws-lambda.md: ########## @@ -66,152 +71,183 @@ admin_key=$(yq '.deployment.admin.admin_key[0].key' conf/config.yaml | sed 's/"/ ::: -```shell -curl http://127.0.0.1:9180/apisix/admin/routes/1 -H "X-API-KEY: $admin_key" -X PUT -d ' -{ - "plugins": { - "aws-lambda": { - "function_uri": "https://x9w6z07gb9.execute-api.us-east-1.amazonaws.com/default/test-apisix";, - "authorization": { - "apikey": "<Generated API Key from aws console>" - }, - "ssl_verify":false - } - }, - "uri": "/aws" -}' -``` +### Invoke Lambda Function Securely using IAM Access Keys -Now, any requests (HTTP/1.1, HTTPS, HTTP2) to the endpoint `/aws` will invoke the configured AWS Functions URI and the response will be proxied back to the client. +The following example demonstrates how you can integrate APISIX with the Lambda function and configure IAM access keys for authorization. The `aws-lambda` Plugin implements [AWS Signature Version 4](https://docs.aws.amazon.com/IAM/latest/UserGuide/reference_aws-signing.html) for IAM access keys. -In the example below, AWS Lambda takes in name from the query and returns a message "Hello $name": +For IAM access keys, go to **AWS Identity and Access Management (IAM)** and click into the user you would like to use for integration. -```shell -curl -i -XGET localhost:9080/aws\?name=APISIX -``` +Next, in the **Security credentials** tab, select **Create access key**: -```shell -HTTP/1.1 200 OK -Content-Type: application/json -Connection: keep-alive -Date: Sat, 27 Nov 2021 13:08:27 GMT -x-amz-apigw-id: JdwXuEVxIAMFtKw= -x-amzn-RequestId: 471289ab-d3b7-4819-9e1a-cb59cac611e0 -Content-Length: 16 -X-Amzn-Trace-Id: Root=1-61a22dca-600c552d1c05fec747fd6db0;Sampled=0 -Server: APISIX/2.10.2 - -"Hello, APISIX!" -``` +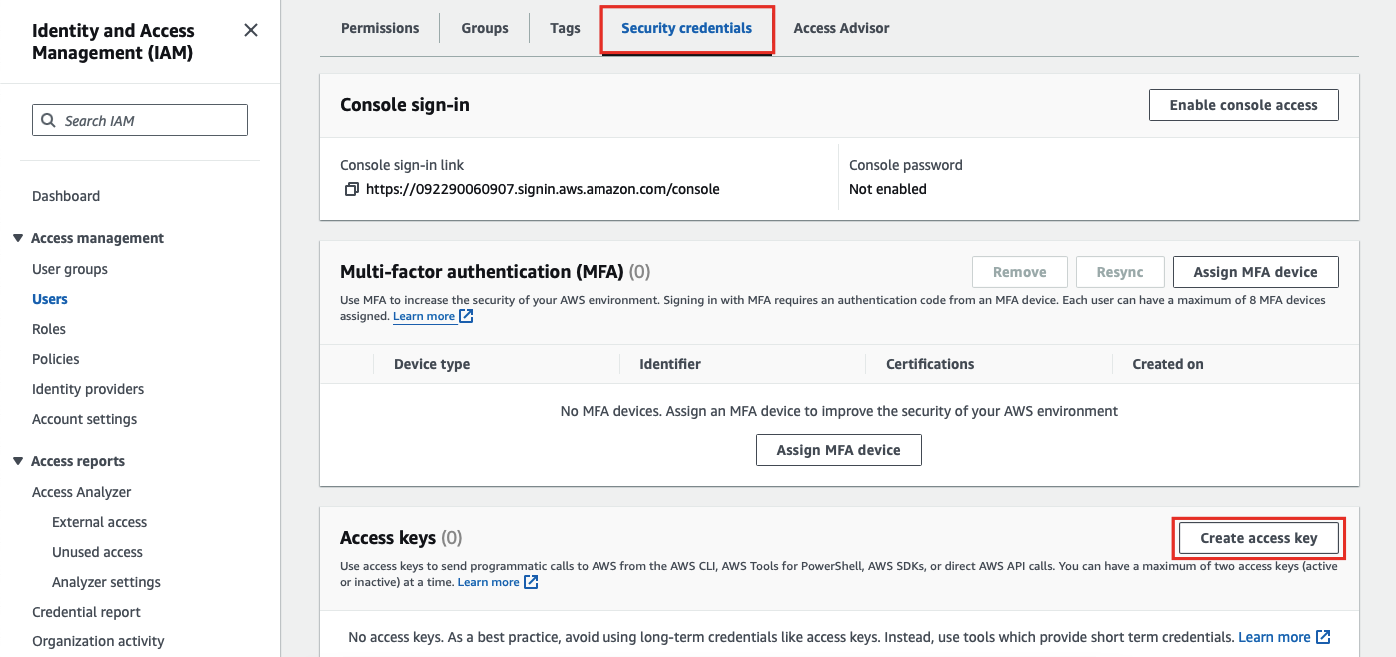 + +Select **Application running outside AWS** as the use case: + +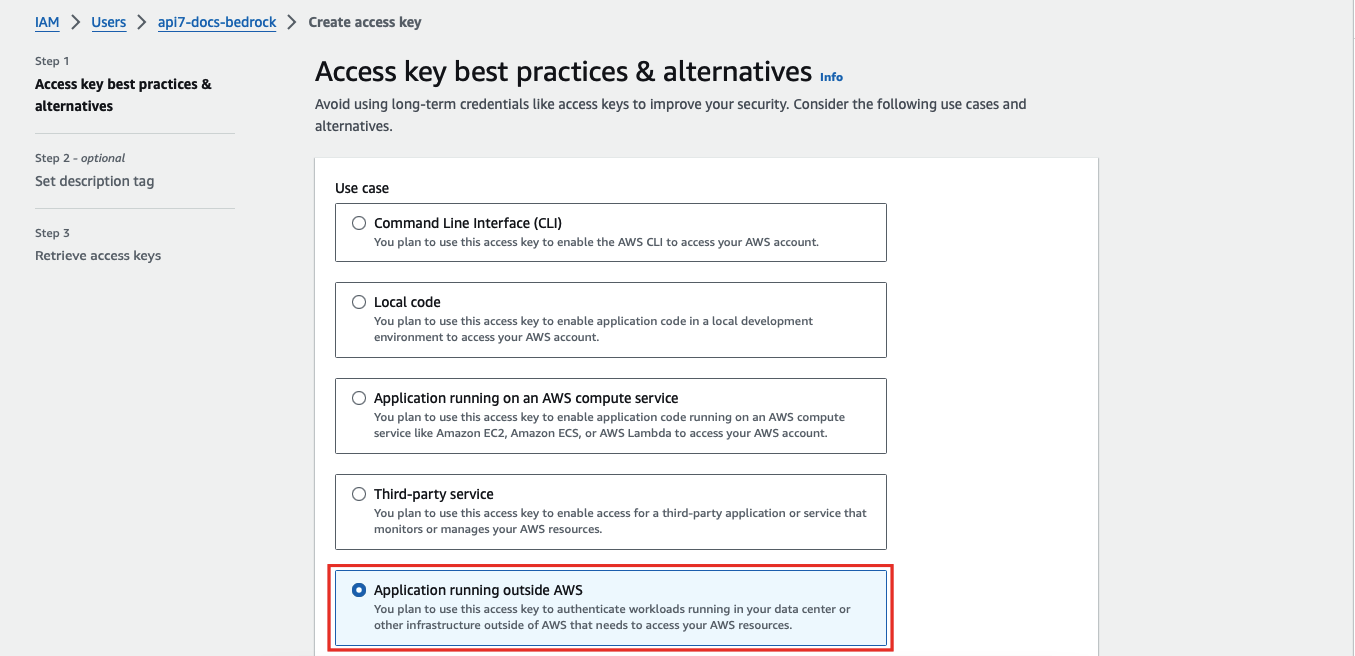 -Another example of a request where the client communicates with APISIX via HTTP/2 is shown below. Before proceeding, make sure you have configured `enable_http2: true` in your configuration file `config.yaml` for port `9081` and reloaded APISIX. See [`config.yaml.example`](https://github.com/apache/apisix/blob/master/conf/config.yaml.example) for the example configuration. +Continue the credential creation and note down the access key and secret access key: + +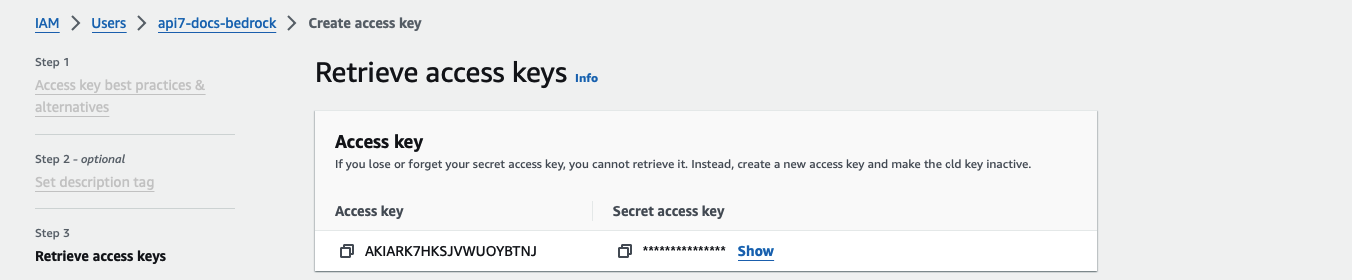 + +To create the Lambda function URL, go to the **Configuration** tab of the Lambda function and under **Function URL**, create a function URL: + +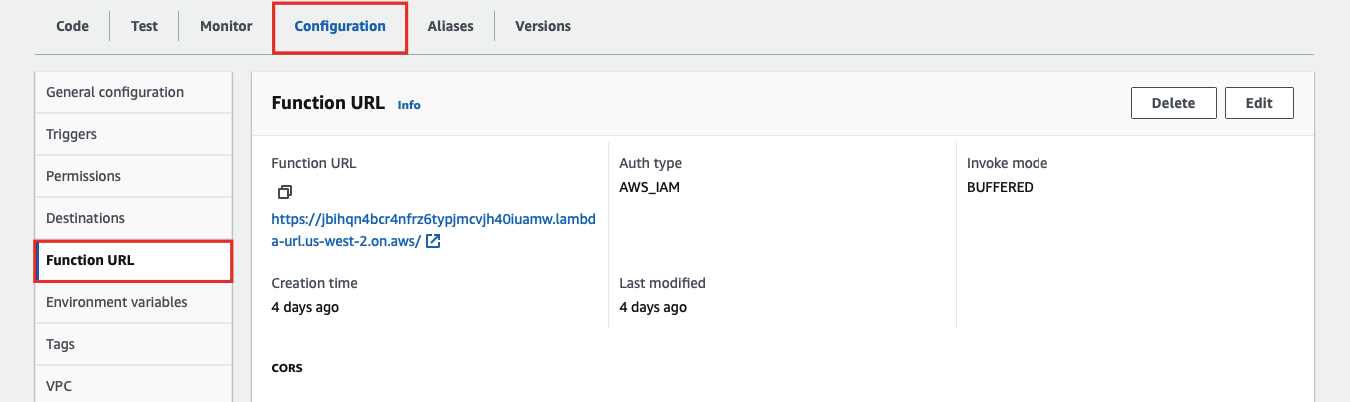 + +Finally, create a Route in APISIX with your function URL and IAM access keys: ```shell -curl -i -XGET --http2 --http2-prior-knowledge localhost:9081/aws\?name=APISIX +curl "http://127.0.0.1:9180/apisix/admin/routes"; -X PUT \ + -H "X-API-KEY: ${admin_key}" \ + -d '{ + "id": "aws-lambda-route", Review Comment: All examples reuse the same Route `id` (`aws-lambda-route`). Running them sequentially will overwrite the previous Route, which is confusing when readers try multiple scenarios. Consider using distinct ids per example (e.g., `aws-lambda-iam-route`, `aws-lambda-apikey-route`, `aws-lambda-subpath-route`) or explicitly state that each example updates/replaces the same Route. ```suggestion "id": "aws-lambda-iam-route", ``` ########## docs/zh/latest/plugins/aws-lambda.md: ########## @@ -67,158 +71,183 @@ admin_key=$(yq '.deployment.admin.admin_key[0].key' conf/config.yaml | sed 's/"/ ::: +### 使用 IAM 访问密钥安全调用 Lambda 函数 + +以下示例演示如何将 APISIX 与 Lambda 函数集成,并使用 IAM 访问密钥进行授权。`aws-lambda` 插件实现了 [AWS Signature Version 4](https://docs.aws.amazon.com/IAM/latest/UserGuide/reference_aws-signing.html) 签名。 + +对于 IAM 访问密钥,请前往 **AWS Identity and Access Management (IAM)** 并选择要用于集成的用户。 + +在 **安全凭证** 标签页中,选择 **创建访问密钥**: + + + +选择 **在 AWS 外部运行的应用程序** 作为使用场景: + + + +继续创建凭证,并记录访问密钥和秘密访问密钥: + + + +要创建 Lambda 函数 URL,请前往 Lambda 函数的 **配置** 标签页,在 **函数 URL** 下创建函数 URL: + + + +最后,在 APISIX 中使用函数 URL 和 IAM 访问密钥创建路由: + ```shell -curl http://127.0.0.1:9180/apisix/admin/routes/1 \ --H "X-API-KEY: $admin_key" -X PUT -d ' -{ +curl "http://127.0.0.1:9180/apisix/admin/routes"; -X PUT \ + -H "X-API-KEY: ${admin_key}" \ + -d '{ + "id": "aws-lambda-route", Review Comment: 三个示例复用了同一个路由 `id`(`aws-lambda-route`),读者按顺序执行时会相互覆盖,容易误解每个场景是否独立。建议为每个示例使用不同的 `id`,或明确说明示例是在更新/替换同一个路由配置。 ```suggestion "id": "aws-lambda-function-url-route", ``` ########## docs/en/latest/plugins/aws-lambda.md: ########## @@ -66,152 +71,183 @@ admin_key=$(yq '.deployment.admin.admin_key[0].key' conf/config.yaml | sed 's/"/ ::: -```shell -curl http://127.0.0.1:9180/apisix/admin/routes/1 -H "X-API-KEY: $admin_key" -X PUT -d ' -{ - "plugins": { - "aws-lambda": { - "function_uri": "https://x9w6z07gb9.execute-api.us-east-1.amazonaws.com/default/test-apisix";, - "authorization": { - "apikey": "<Generated API Key from aws console>" - }, - "ssl_verify":false - } - }, - "uri": "/aws" -}' -``` +### Invoke Lambda Function Securely using IAM Access Keys -Now, any requests (HTTP/1.1, HTTPS, HTTP2) to the endpoint `/aws` will invoke the configured AWS Functions URI and the response will be proxied back to the client. +The following example demonstrates how you can integrate APISIX with the Lambda function and configure IAM access keys for authorization. The `aws-lambda` Plugin implements [AWS Signature Version 4](https://docs.aws.amazon.com/IAM/latest/UserGuide/reference_aws-signing.html) for IAM access keys. -In the example below, AWS Lambda takes in name from the query and returns a message "Hello $name": +For IAM access keys, go to **AWS Identity and Access Management (IAM)** and click into the user you would like to use for integration. -```shell -curl -i -XGET localhost:9080/aws\?name=APISIX -``` +Next, in the **Security credentials** tab, select **Create access key**: -```shell -HTTP/1.1 200 OK -Content-Type: application/json -Connection: keep-alive -Date: Sat, 27 Nov 2021 13:08:27 GMT -x-amz-apigw-id: JdwXuEVxIAMFtKw= -x-amzn-RequestId: 471289ab-d3b7-4819-9e1a-cb59cac611e0 -Content-Length: 16 -X-Amzn-Trace-Id: Root=1-61a22dca-600c552d1c05fec747fd6db0;Sampled=0 -Server: APISIX/2.10.2 - -"Hello, APISIX!" -``` + + +Select **Application running outside AWS** as the use case: + + -Another example of a request where the client communicates with APISIX via HTTP/2 is shown below. Before proceeding, make sure you have configured `enable_http2: true` in your configuration file `config.yaml` for port `9081` and reloaded APISIX. See [`config.yaml.example`](https://github.com/apache/apisix/blob/master/conf/config.yaml.example) for the example configuration. +Continue the credential creation and note down the access key and secret access key: + + + +To create the Lambda function URL, go to the **Configuration** tab of the Lambda function and under **Function URL**, create a function URL: + + + +Finally, create a Route in APISIX with your function URL and IAM access keys: ```shell -curl -i -XGET --http2 --http2-prior-knowledge localhost:9081/aws\?name=APISIX +curl "http://127.0.0.1:9180/apisix/admin/routes"; -X PUT \ + -H "X-API-KEY: ${admin_key}" \ + -d '{ + "id": "aws-lambda-route", + "uri": "/aws-lambda", + "plugins": { + "aws-lambda": { + "function_uri": "https://<YOUR_LAMBDA_FUNCTION_URL>/", + "authorization": { + "iam": { + "accesskey": "<YOUR_ACCESS_KEY>", + "secretkey": "<YOUR_SECRET_KEY>", + "aws_region": "<YOUR_AWS_REGION>", + "service": "lambda" + } + }, + "ssl_verify": false + } + } + }' ``` +Replace `function_uri`, `accesskey`, `secretkey`, and `aws_region` with your actual values. Set `service` to `lambda` when integrating with a Lambda function directly. + +Send a request to the Route: + ```shell -HTTP/2 200 -content-type: application/json -content-length: 16 -x-amz-apigw-id: JdwulHHrIAMFoFg= -date: Sat, 27 Nov 2021 13:10:53 GMT -x-amzn-trace-id: Root=1-61a22e5d-342eb64077dc9877644860dd;Sampled=0 -x-amzn-requestid: a2c2b799-ecc6-44ec-b586-38c0e3b11fe4 -server: APISIX/2.10.2 - -"Hello, APISIX!" +curl -i "http://127.0.0.1:9080/aws-lambda"; ``` -Similarly, the function can be triggered via AWS API Gateway by using AWS IAM permissions for authorization. The Plugin includes authentication signatures in HTTP calls via AWS v4 request signing. The example below shows this method: +You should receive an `HTTP/1.1 200 OK` response with the following message: -```shell -curl http://127.0.0.1:9180/apisix/admin/routes/1 -H "X-API-KEY: $admin_key" -X PUT -d ' -{ - "plugins": { - "aws-lambda": { - "function_uri": "https://ajycz5e0v9.execute-api.us-east-1.amazonaws.com/default/test-apisix";, - "authorization": { - "iam": { - "accesskey": "<access key>", - "secretkey": "<access key secret>" - } - }, - "ssl_verify": false - } - }, - "uri": "/aws" -}' +```text +"Hello from Lambda!" ``` -:::note +### Integrate with Amazon API Gateway Securely with API Key -This approach assumes that you have already an IAM user with programmatic access enabled with the required permissions (`AmazonAPIGatewayInvokeFullAccess`) to access the endpoint. +The following example demonstrates how you can integrate APISIX with Amazon API Gateway and configure the gateway to trigger the execution of Lambda function. -::: +To configure an API Gateway as a Lambda trigger, go to your Lambda function and select **Add trigger**: + +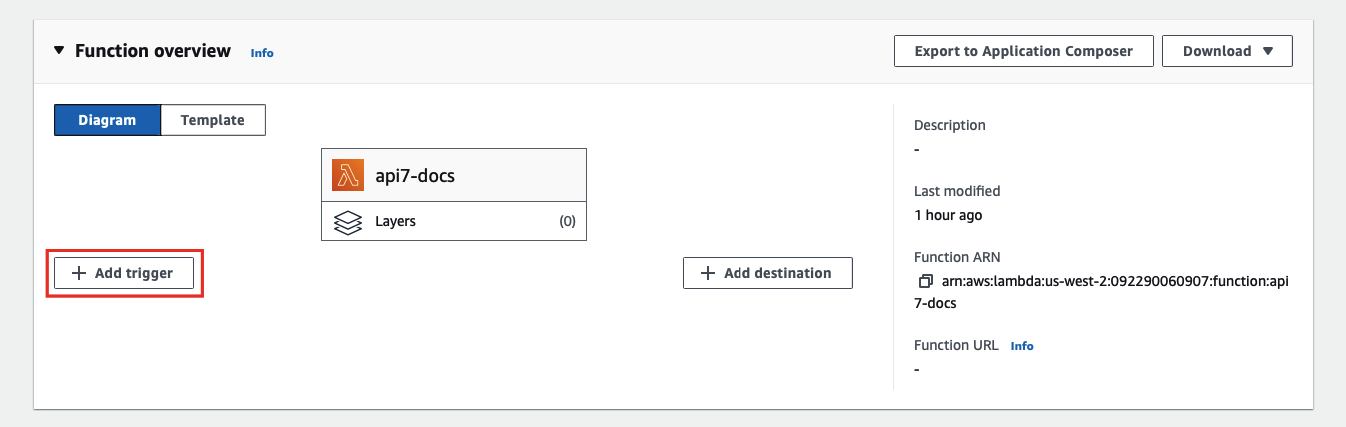 -### Configuring path forwarding +Next, select **API Gateway** as the trigger and **REST API** as the API type, and finish adding the trigger: -The `aws-lambda` Plugin also supports URL path forwarding while proxying requests to the AWS upstream. Extensions to the base request path gets appended to the `function_uri` specified in the Plugin configuration. +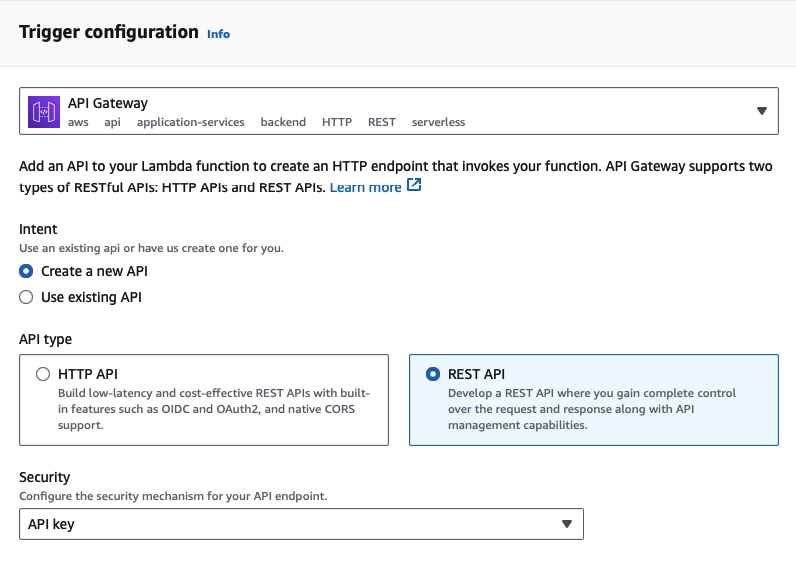 -:::info IMPORTANT +:::note -The `uri` configured on a Route must end with `*` for this feature to work properly. APISIX Routes are matched strictly and the `*` implies that any subpath to this URI would be matched to the same Route. +Amazon API Gateway supports two types of RESTful APIs: HTTP APIs and REST APIs. Only REST APIs offer API key and IAM as security measures. ::: -The example below configures this feature: +You should now be redirected back to the Lambda interface. To find the API key and gateway API endpoint, go to the **Configuration** tab of the Lambda function and under **Triggers**, you can find the details of the API Gateway: + +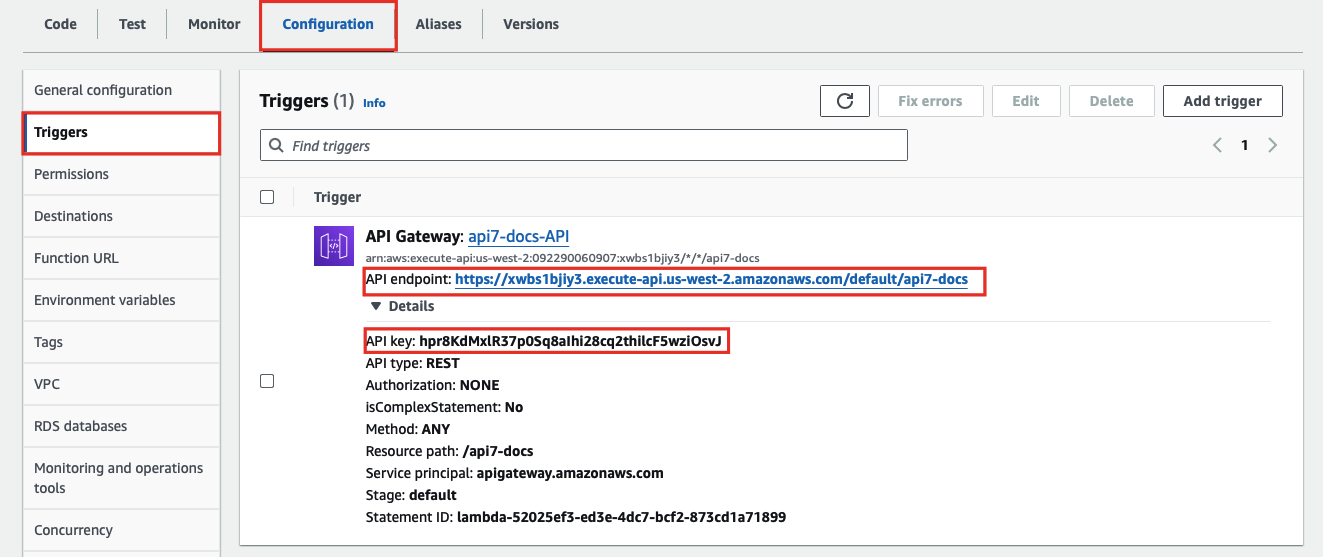 + +Finally, create a Route in APISIX with your gateway endpoint and API key: ```shell -curl http://127.0.0.1:9180/apisix/admin/routes/1 -H "X-API-KEY: $admin_key" -X PUT -d ' -{ +curl "http://127.0.0.1:9180/apisix/admin/routes"; -X PUT \ + -H "X-API-KEY: ${admin_key}" \ + -d '{ + "id": "aws-lambda-route", + "uri": "/aws-lambda", "plugins": { - "aws-lambda": { - "function_uri": "https://x9w6z07gb9.execute-api.us-east-1.amazonaws.com";, - "authorization": { - "apikey": "<Generate API key>" - }, - "ssl_verify":false - } - }, - "uri": "/aws/*" -}' + "aws-lambda": { + "function_uri": "https://<YOUR_API_GATEWAY_ENDPOINT>/default/api7-docs", + "authorization": { + "apikey": "<YOUR_API_KEY>" + }, + "ssl_verify": false + } + } + }' ``` -Now, any requests to the path `aws/default/test-apisix` will invoke the AWS Lambda Function and the added path is forwarded: +Send a request to the Route: ```shell -curl -i -XGET http://127.0.0.1:9080/aws/default/test-apisix\?name\=APISIX +curl -i "http://127.0.0.1:9080/aws-lambda"; ``` -```shell -HTTP/1.1 200 OK -Content-Type: application/json -Connection: keep-alive -Date: Wed, 01 Dec 2021 14:23:27 GMT -X-Amzn-Trace-Id: Root=1-61a7855f-0addc03e0cf54ddc683de505;Sampled=0 -x-amzn-RequestId: f5f4e197-9cdd-49f9-9b41-48f0d269885b -Content-Length: 16 -x-amz-apigw-id: JrHG8GC4IAMFaGA= -Server: APISIX/2.11.0 - -"Hello, APISIX!" +You should receive an `HTTP/1.1 200 OK` response with the following message: + +```text +"Hello from Lambda!" ``` -## Delete Plugin +If your API key is invalid, you should receive an `HTTP/1.1 403 Forbidden` response. + +### Forward Requests to Amazon API Gateway Sub-Paths + +The following example demonstrates how you can forward requests to a sub-path of the Amazon API Gateway and configure the API to trigger the execution of Lambda function. + +Please follow the [previous example](#integrate-with-amazon-api-gateway-securely-with-api-key) to set up an API Gateway first. + +To create a sub-path, go to the **Configuration** tab of the Lambda function and under **Triggers**, click into the API Gateway: + + + +Next, select **Create resource** to create a sub-path: + +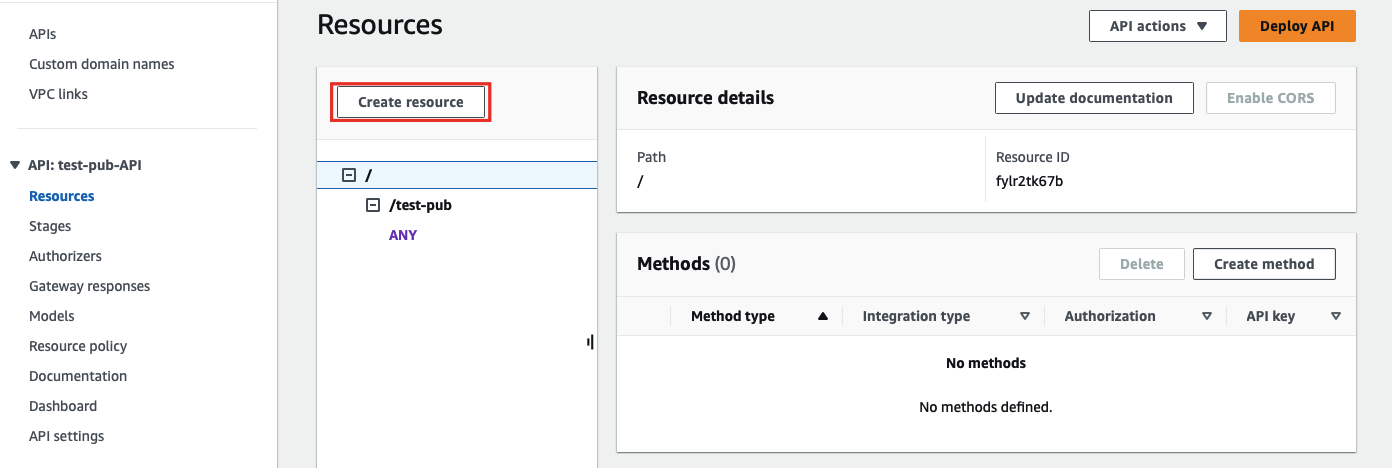 + +Enter the sub-path information and complete creation: + +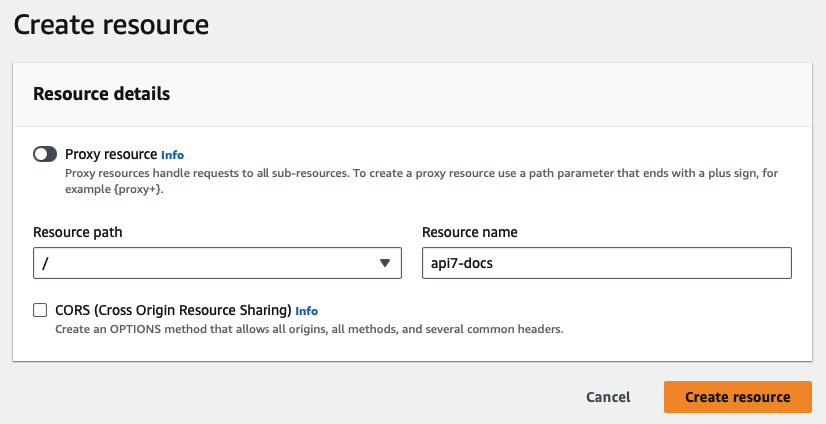 + +Once redirected back to the main gateway console, you should see the newly created path. Select **Create method** to configure HTTP methods for the path and the associated action: -To remove the `aws-lambda` Plugin, you can delete the corresponding JSON configuration from the Plugin configuration. APISIX will automatically reload and you do not have to restart for this to take effect. +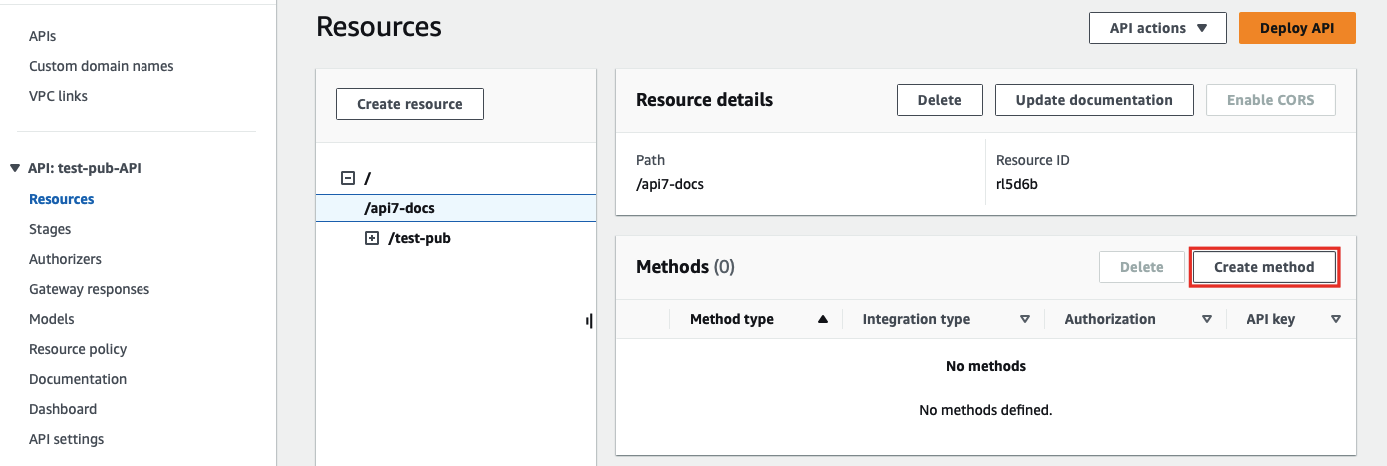 + +Select the allowed HTTP method in the dropdown. For the purpose of demonstration, this example continues to use the same Lambda function as the triggered action when the path is requested: + +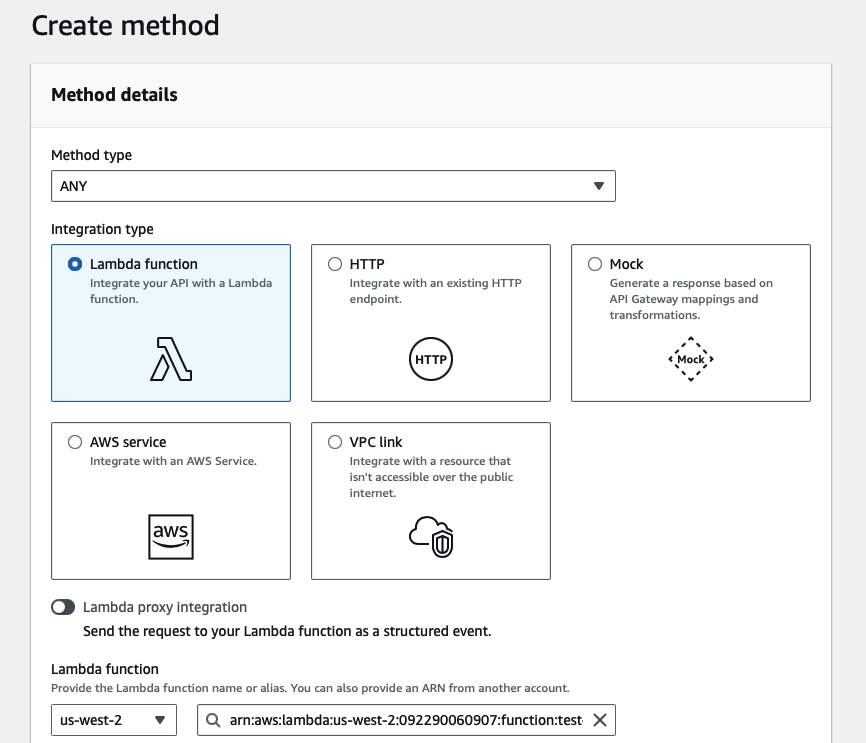 + +Finish the method creation. Once redirected back to the main gateway console, click on **Deploy API** to deploy the path and method changes: + +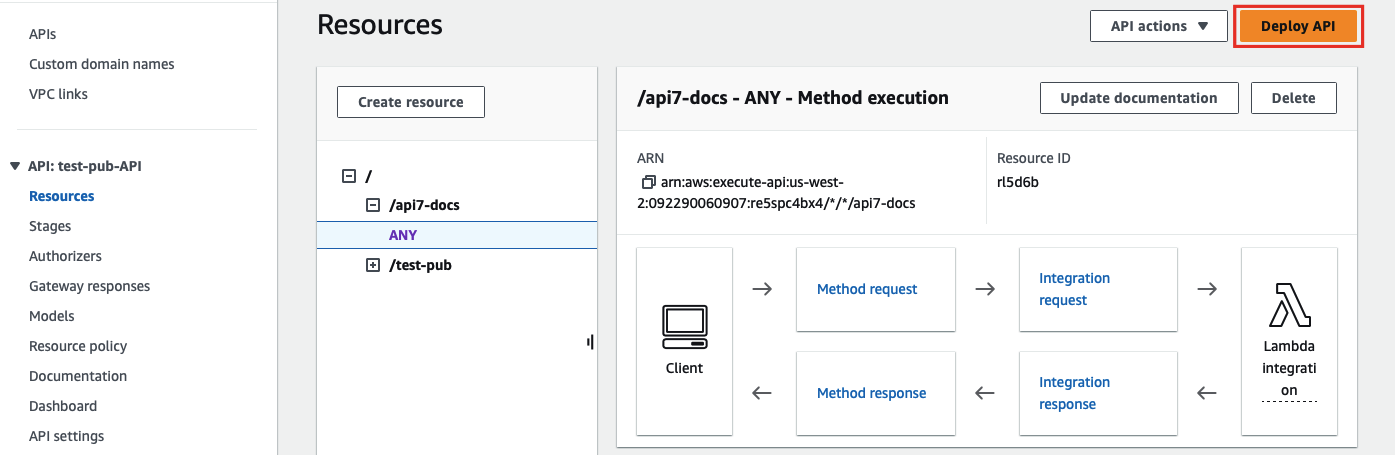 + +Finally, create a Route in APISIX with your gateway endpoint and API key. The `uri` must end with `*` so that any sub-path is matched to the same Route, and the matched sub-path will be appended to `function_uri`: ```shell -curl http://127.0.0.1:9180/apisix/admin/routes/1 -H "X-API-KEY: $admin_key" -X PUT -d ' -{ - "uri": "/aws", - "plugins": {}, - "upstream": { - "type": "roundrobin", - "nodes": { - "127.0.0.1:1980": 1 - } +curl "http://127.0.0.1:9180/apisix/admin/routes"; -X PUT \ + -H "X-API-KEY: ${admin_key}" \ + -d '{ + "id": "aws-lambda-route", Review Comment: All examples reuse the same Route `id` (`aws-lambda-route`). Running them sequentially will overwrite the previous Route, which is confusing when readers try multiple scenarios. Consider using distinct ids per example (e.g., `aws-lambda-iam-route`, `aws-lambda-apikey-route`, `aws-lambda-subpath-route`) or explicitly state that each example updates/replaces the same Route. ```suggestion "id": "aws-lambda-apikey-route", ``` ########## docs/zh/latest/plugins/aws-lambda.md: ########## @@ -67,158 +71,183 @@ admin_key=$(yq '.deployment.admin.admin_key[0].key' conf/config.yaml | sed 's/"/ ::: +### 使用 IAM 访问密钥安全调用 Lambda 函数 + +以下示例演示如何将 APISIX 与 Lambda 函数集成,并使用 IAM 访问密钥进行授权。`aws-lambda` 插件实现了 [AWS Signature Version 4](https://docs.aws.amazon.com/IAM/latest/UserGuide/reference_aws-signing.html) 签名。 + +对于 IAM 访问密钥,请前往 **AWS Identity and Access Management (IAM)** 并选择要用于集成的用户。 + +在 **安全凭证** 标签页中,选择 **创建访问密钥**: + + + +选择 **在 AWS 外部运行的应用程序** 作为使用场景: + + + +继续创建凭证,并记录访问密钥和秘密访问密钥: + + + +要创建 Lambda 函数 URL,请前往 Lambda 函数的 **配置** 标签页,在 **函数 URL** 下创建函数 URL: + + + +最后,在 APISIX 中使用函数 URL 和 IAM 访问密钥创建路由: + ```shell -curl http://127.0.0.1:9180/apisix/admin/routes/1 \ --H "X-API-KEY: $admin_key" -X PUT -d ' -{ +curl "http://127.0.0.1:9180/apisix/admin/routes"; -X PUT \ + -H "X-API-KEY: ${admin_key}" \ + -d '{ + "id": "aws-lambda-route", + "uri": "/aws-lambda", "plugins": { - "aws-lambda": { - "function_uri": "https://x9w6z07gb9.execute-api.us-east-1.amazonaws.com/default/test-apisix";, - "authorization": { - "apikey": "<Generated API Key from aws console>" - }, - "ssl_verify":false - } - }, - "uri": "/aws" -}' + "aws-lambda": { + "function_uri": "https://<YOUR_LAMBDA_FUNCTION_URL>/", + "authorization": { + "iam": { + "accesskey": "<YOUR_ACCESS_KEY>", + "secretkey": "<YOUR_SECRET_KEY>", + "aws_region": "<YOUR_AWS_REGION>", + "service": "lambda" + } + }, + "ssl_verify": false + } + } + }' ``` -通过上述示例配置插件后,任何对 `/aws` URI 的请求(`HTTP/1.1`、`HTTPS`、`HTTP2`)都将调用已配置的 AWS 函数的 URI,并且会将响应信息返回给客户端。 +请将 `function_uri`、`accesskey`、`secretkey` 和 `aws_region` 替换为你的实际值。直接与 Lambda 函数集成时,将 `service` 设置为 `lambda`。 -下述命令的含义是:AWS Lambda 从请求中获取 `name` 参数,并返回一条 `"Hello $name"` 消息: +向路由发送请求: ```shell -curl -i -XGET localhost:9080/aws\?name=APISIX +curl -i "http://127.0.0.1:9080/aws-lambda"; ``` -正常返回结果: +你应该收到 `HTTP/1.1 200 OK` 响应,内容如下: -```shell -HTTP/1.1 200 OK -Content-Type: application/json -... -"Hello, APISIX!" +```text +"Hello from Lambda!" ``` -以下示例是客户端通过 HTTP/2 协议与 APISIX 进行通信。 +### 通过 API 密钥与 Amazon API Gateway 安全集成 -在进行测试之前,由于该 `enable_http2: true` 默认是禁用状态,你可以通过在 `./conf/config.yaml` 中添加 `apisix.node_listen` 下的 `- port: 9081` 和 `enable_http2: true` 字段启用。示例如下 +以下示例演示如何将 APISIX 与 Amazon API Gateway 集成,并配置网关触发 Lambda 函数的执行。 -```yaml -apisix: - node_listen: # 支持监听多个端口 - - 9080 - - port: 9081 - enable_http2: true # 该字段如果不设置,默认值为 `false` -``` +要将 API Gateway 配置为 Lambda 触发器,请前往 Lambda 函数并选择 **添加触发器**: -使用 `curl` 命令测试: + + +选择 **API Gateway** 作为触发器,**REST API** 作为 API 类型,完成触发器添加: + + + +:::note + +Amazon API Gateway 支持两种 RESTful API 类型:HTTP API 和 REST API。只有 REST API 提供 API 密钥和 IAM 作为安全机制。 + +::: + +你将被重定向回 Lambda 界面。要查找 API 密钥和网关 API 端点,请前往 Lambda 函数的 **配置** 标签页,在 **触发器** 下查看 API Gateway 详情: + + + +最后,在 APISIX 中使用网关端点和 API 密钥创建路由: ```shell -curl -i -XGET --http2 --http2-prior-knowledge localhost:9081/aws\?name=APISIX +curl "http://127.0.0.1:9180/apisix/admin/routes"; -X PUT \ + -H "X-API-KEY: ${admin_key}" \ + -d '{ + "id": "aws-lambda-route", + "uri": "/aws-lambda", + "plugins": { + "aws-lambda": { + "function_uri": "https://<YOUR_API_GATEWAY_ENDPOINT>/default/api7-docs", + "authorization": { + "apikey": "<YOUR_API_KEY>" + }, + "ssl_verify": false + } + } + }' ``` -正常返回结果: +向路由发送请求: ```shell -HTTP/2 200 -content-type: application/json -... -"Hello, APISIX!" +curl -i "http://127.0.0.1:9080/aws-lambda"; ``` -与上面的示例类似,AWS Lambda 函数也可以通过 AWS API Gateway 触发,但需要使用 AWS IAM 权限进行授权。`aws-lambda` 插件的配置文件中包含了 `"authorization"` 字段,用户可以在 HTTP 调用中通过 AWS v4 请求签名。 - -以下示例展示了如何通过配置文件实现授权: +你应该收到 `HTTP/1.1 200 OK` 响应,内容如下: -```shell -curl http://127.0.0.1:9180/apisix/admin/routes/1 \ --H "X-API-KEY: $admin_key" -X PUT -d ' -{ - "plugins": { - "aws-lambda": { - "function_uri": "https://ajycz5e0v9.execute-api.us-east-1.amazonaws.com/default/test-apisix";, - "authorization": { - "iam": { - "accesskey": "<access key>", - "secretkey": "<access key secret>" - } - }, - "ssl_verify": false - } - }, - "uri": "/aws" -}' +```text +"Hello from Lambda!" ``` -:::note 注意 +如果 API 密钥无效,你将收到 `HTTP/1.1 403 Forbidden` 响应。 -使用该方法时已经假设你有一个启用了程序化访问的 IAM 用户,并具有访问端点的必要权限(AmazonAPIGatewayInvokeFullAccess)。 +### 将请求转发到 Amazon API Gateway 子路径 -::: +以下示例演示如何将请求转发到 Amazon API Gateway 的子路径,并配置 API 触发 Lambda 函数的执行。 -### 配置路径转发 +请先参考[上一个示例](#通过-api-密钥与-amazon-api-gateway-安全集成)完成 API Gateway 的设置。 -`aws-lambda` 插件在代理请求到 AWS 上游时也支持 URL 路径转发。基本请求路径的扩展被附加到插件配置中指定的 `function_uri` 字段上。 +要创建子路径,请前往 Lambda 函数的 **配置** 标签页,在 **触发器** 下点击进入 API Gateway: -:::info 重要 + -因为 APISIX 路由是严格匹配的,所以为了使 `aws-lambda` 插件正常工作,在路由上配置的 `uri` 字段必须以 `*` 结尾,`*` 意味着这个 URI 的任何子路径都会被匹配到同一个路由。 +选择 **创建资源** 以创建子路径: -::: + -以下示例展示了如何通过配置文件实现路径转发: +填写子路径信息并完成创建: -```shell -curl http://127.0.0.1:9180/apisix/admin/routes/1 \ --H "X-API-KEY: $admin_key" -X PUT -d ' -{ - "plugins": { - "aws-lambda": { - "function_uri": "https://x9w6z07gb9.execute-api.us-east-1.amazonaws.com";, - "authorization": { - "apikey": "<Generate API key>" - }, - "ssl_verify":false - } - }, - "uri": "/aws/*" -}' -``` + + +回到网关主控制台后,你将看到新创建的路径。选择 **创建方法** 为路径配置 HTTP 方法和关联的操作: + + + +在下拉菜单中选择允许的 HTTP 方法。本示例继续使用相同的 Lambda 函数作为请求该路径时的触发操作: + + + +完成方法创建。回到网关主控制台后,点击 **部署 API** 以部署路径和方法变更: -通过上述示例配置插件后,任何访问 `aws/default/test-apisix` 的请求都会调用 AWS Lambda 函数,并转发附加的参数。 + -使用 `curl` 命令测试: +最后,在 APISIX 中使用网关端点和 API 密钥创建路由。`uri` 必须以 `*` 结尾,以便所有子路径都匹配到同一路由,匹配到的子路径将追加到 `function_uri` 的末尾: ```shell -curl -i -XGET http://127.0.0.1:9080/aws/default/test-apisix\?name\=APISIX +curl "http://127.0.0.1:9180/apisix/admin/routes"; -X PUT \ + -H "X-API-KEY: ${admin_key}" \ + -d '{ + "id": "aws-lambda-route", Review Comment: 三个示例复用了同一个路由 `id`(`aws-lambda-route`),读者按顺序执行时会相互覆盖,容易误解每个场景是否独立。建议为每个示例使用不同的 `id`,或明确说明示例是在更新/替换同一个路由配置。 ```suggestion "id": "aws-lambda-api-gateway-route", ``` ########## docs/en/latest/plugins/aws-lambda.md: ########## @@ -66,152 +71,183 @@ admin_key=$(yq '.deployment.admin.admin_key[0].key' conf/config.yaml | sed 's/"/ ::: -```shell -curl http://127.0.0.1:9180/apisix/admin/routes/1 -H "X-API-KEY: $admin_key" -X PUT -d ' -{ - "plugins": { - "aws-lambda": { - "function_uri": "https://x9w6z07gb9.execute-api.us-east-1.amazonaws.com/default/test-apisix";, - "authorization": { - "apikey": "<Generated API Key from aws console>" - }, - "ssl_verify":false - } - }, - "uri": "/aws" -}' -``` +### Invoke Lambda Function Securely using IAM Access Keys -Now, any requests (HTTP/1.1, HTTPS, HTTP2) to the endpoint `/aws` will invoke the configured AWS Functions URI and the response will be proxied back to the client. +The following example demonstrates how you can integrate APISIX with the Lambda function and configure IAM access keys for authorization. The `aws-lambda` Plugin implements [AWS Signature Version 4](https://docs.aws.amazon.com/IAM/latest/UserGuide/reference_aws-signing.html) for IAM access keys. -In the example below, AWS Lambda takes in name from the query and returns a message "Hello $name": +For IAM access keys, go to **AWS Identity and Access Management (IAM)** and click into the user you would like to use for integration. -```shell -curl -i -XGET localhost:9080/aws\?name=APISIX -``` +Next, in the **Security credentials** tab, select **Create access key**: -```shell -HTTP/1.1 200 OK -Content-Type: application/json -Connection: keep-alive -Date: Sat, 27 Nov 2021 13:08:27 GMT -x-amz-apigw-id: JdwXuEVxIAMFtKw= -x-amzn-RequestId: 471289ab-d3b7-4819-9e1a-cb59cac611e0 -Content-Length: 16 -X-Amzn-Trace-Id: Root=1-61a22dca-600c552d1c05fec747fd6db0;Sampled=0 -Server: APISIX/2.10.2 - -"Hello, APISIX!" -``` + + +Select **Application running outside AWS** as the use case: + + -Another example of a request where the client communicates with APISIX via HTTP/2 is shown below. Before proceeding, make sure you have configured `enable_http2: true` in your configuration file `config.yaml` for port `9081` and reloaded APISIX. See [`config.yaml.example`](https://github.com/apache/apisix/blob/master/conf/config.yaml.example) for the example configuration. +Continue the credential creation and note down the access key and secret access key: + + + +To create the Lambda function URL, go to the **Configuration** tab of the Lambda function and under **Function URL**, create a function URL: + + + +Finally, create a Route in APISIX with your function URL and IAM access keys: ```shell -curl -i -XGET --http2 --http2-prior-knowledge localhost:9081/aws\?name=APISIX +curl "http://127.0.0.1:9180/apisix/admin/routes"; -X PUT \ + -H "X-API-KEY: ${admin_key}" \ + -d '{ + "id": "aws-lambda-route", + "uri": "/aws-lambda", + "plugins": { + "aws-lambda": { + "function_uri": "https://<YOUR_LAMBDA_FUNCTION_URL>/", + "authorization": { + "iam": { + "accesskey": "<YOUR_ACCESS_KEY>", + "secretkey": "<YOUR_SECRET_KEY>", + "aws_region": "<YOUR_AWS_REGION>", + "service": "lambda" + } + }, + "ssl_verify": false + } + } + }' ``` +Replace `function_uri`, `accesskey`, `secretkey`, and `aws_region` with your actual values. Set `service` to `lambda` when integrating with a Lambda function directly. + +Send a request to the Route: + ```shell -HTTP/2 200 -content-type: application/json -content-length: 16 -x-amz-apigw-id: JdwulHHrIAMFoFg= -date: Sat, 27 Nov 2021 13:10:53 GMT -x-amzn-trace-id: Root=1-61a22e5d-342eb64077dc9877644860dd;Sampled=0 -x-amzn-requestid: a2c2b799-ecc6-44ec-b586-38c0e3b11fe4 -server: APISIX/2.10.2 - -"Hello, APISIX!" +curl -i "http://127.0.0.1:9080/aws-lambda"; ``` -Similarly, the function can be triggered via AWS API Gateway by using AWS IAM permissions for authorization. The Plugin includes authentication signatures in HTTP calls via AWS v4 request signing. The example below shows this method: +You should receive an `HTTP/1.1 200 OK` response with the following message: -```shell -curl http://127.0.0.1:9180/apisix/admin/routes/1 -H "X-API-KEY: $admin_key" -X PUT -d ' -{ - "plugins": { - "aws-lambda": { - "function_uri": "https://ajycz5e0v9.execute-api.us-east-1.amazonaws.com/default/test-apisix";, - "authorization": { - "iam": { - "accesskey": "<access key>", - "secretkey": "<access key secret>" - } - }, - "ssl_verify": false - } - }, - "uri": "/aws" -}' +```text +"Hello from Lambda!" ``` -:::note +### Integrate with Amazon API Gateway Securely with API Key -This approach assumes that you have already an IAM user with programmatic access enabled with the required permissions (`AmazonAPIGatewayInvokeFullAccess`) to access the endpoint. +The following example demonstrates how you can integrate APISIX with Amazon API Gateway and configure the gateway to trigger the execution of Lambda function. -::: +To configure an API Gateway as a Lambda trigger, go to your Lambda function and select **Add trigger**: + + -### Configuring path forwarding +Next, select **API Gateway** as the trigger and **REST API** as the API type, and finish adding the trigger: -The `aws-lambda` Plugin also supports URL path forwarding while proxying requests to the AWS upstream. Extensions to the base request path gets appended to the `function_uri` specified in the Plugin configuration. + -:::info IMPORTANT +:::note -The `uri` configured on a Route must end with `*` for this feature to work properly. APISIX Routes are matched strictly and the `*` implies that any subpath to this URI would be matched to the same Route. +Amazon API Gateway supports two types of RESTful APIs: HTTP APIs and REST APIs. Only REST APIs offer API key and IAM as security measures. ::: -The example below configures this feature: +You should now be redirected back to the Lambda interface. To find the API key and gateway API endpoint, go to the **Configuration** tab of the Lambda function and under **Triggers**, you can find the details of the API Gateway: + + + +Finally, create a Route in APISIX with your gateway endpoint and API key: ```shell -curl http://127.0.0.1:9180/apisix/admin/routes/1 -H "X-API-KEY: $admin_key" -X PUT -d ' -{ +curl "http://127.0.0.1:9180/apisix/admin/routes"; -X PUT \ + -H "X-API-KEY: ${admin_key}" \ + -d '{ + "id": "aws-lambda-route", Review Comment: All examples reuse the same Route `id` (`aws-lambda-route`). Running them sequentially will overwrite the previous Route, which is confusing when readers try multiple scenarios. Consider using distinct ids per example (e.g., `aws-lambda-iam-route`, `aws-lambda-apikey-route`, `aws-lambda-subpath-route`) or explicitly state that each example updates/replaces the same Route. ```suggestion "id": "aws-lambda-apikey-route", ``` ########## docs/zh/latest/plugins/aws-lambda.md: ########## @@ -27,35 +27,39 @@ description: 本文介绍了关于 Apache APISIX aws-lambda 插件的基本信 # --> -## 描述 +<head> + <link rel="canonical" href="https://docs.api7.ai/hub/aws-lambda"; /> +</head> -`aws-lambda` 插件用于将 [AWS Lambda](https://aws.amazon.com/lambda/) 和 [Amazon API Gateway](https://aws.amazon.com/api-gateway/) 作为动态上游集成至 APISIX,从而实现将访问指定 URI 的请求代理到 AWS 云。 +## 描述 -启用 `aws-lambda` 插件后,该插件会终止对已配置 URI 的请求,并代表客户端向 AWS Lambda Gateway URI 发起一个新的请求。这个新请求中携带了之前配置的授权详细信息,包括请求头、请求体和参数(以上参数都是从原始请求中传递的),然后 `aws-lambda` 插件会将带有响应头、状态码和响应体的响应信息返回给使用 APISIX 发起请求的客户端。 +`aws-lambda` 插件简化了 APISIX 与 [AWS Lambda](https://aws.amazon.com/lambda/) 和 [Amazon API Gateway](https://aws.amazon.com/api-gateway/) 的集成,用于代理至其他 AWS 服务。 -该插件支持通过 AWS API key 和 AWS IAM secrets 进行授权。当使用 AWS IAM secrets 时,该插件支持 [AWS Signature Version 4 signing](https://docs.aws.amazon.com/IAM/latest/UserGuide/reference_aws-signing.html)。 +该插件支持通过 IAM 用户凭证和 API Gateway 的 API 密钥进行 AWS 身份验证和授权。 ## 属性 -| 名称 | 类型 | 必选项 | 默认值 | 有效值 | 描述 | -| ------------------ - | ------- | -------- | ------- | ------------ | ------------------------------------------------------------ | -| function_uri | string | 是 | | | 触发 lambda serverless 函数的 AWS API Gateway 端点。 | -| authorization | object | 否 | | | 访问云函数的授权凭证。 | -| authorization.apikey | string | 否 | | | 生成的 API 密钥,用于授权对 AWS Gateway 端点的请求。 | -| authorization.iam | object | 否 | | | 用于通过 AWS v4 请求签名执行的基于 AWS IAM 角色的授权。请参考 [IAM 授权方案](#iam-授权方案)。 | -| authorization.iam.accesskey | string | 是 | | 从 AWS IAM 控制台生成的访问密钥 ID。 | -| authorization.iam.secretkey | string | 是 | | 从 AWS IAM 控制台生成的访问密钥。 | -| authorization.iam.aws_region | string | 否 | "us-east-1" | 发出请求的 AWS 区域。有关更多 AWS 区域代码的信息请参考 [AWS 区域代码表](https://docs.aws.amazon.com/zh_cn/general/latest/gr/rande.html#region-names-codes)。 | -| authorization.iam.service | string | 否 | "execute-api" | 接收该请求的服务。若使用 Amazon API gateway APIs, 应设置为 `execute-api`。若使用 Lambda function, 应设置为 `lambda`。 | -| timeout | integer | 否 | 3000 | [100,...] | 代理请求超时(以毫秒为单位)。 | -| ssl_verify | boolean | 否 | true | true/false | 当设置为 `true` 时执行 SSL 验证。 | -| keepalive | boolean | 否 | true | true/false | 当设置为 `true` 时,保持连接的活动状态以便重复使用。 | -| keepalive_pool | integer | 否 | 5 | [1,...] | 在关闭该连接之前,可以在该连接上发送的最大请求数。 | -| keepalive_timeout | integer | 否 | 60000 | [1000,...] | 当连接空闲时,保持该连接处于活动状态的时间,以毫秒为单位。 | - -## 启用插件 - -你可以通过以下命令在指定路由中启用该插件: +| 名称 | 类型 | 必选项 | 默认值 | 有效值 | 描述 | +|------------------------------|---------|--------|---------------|------------|-----------------------------------------------------------------------------------------------------------------------------------------------------------| +| function_uri | string | 是 | | | 触发 Lambda 函数的 AWS Lambda 函数 URL 或 Amazon API Gateway 端点。 | +| authorization | object | 否 | | | 在 AWS 上调用 Lambda 函数时用于身份验证和授权的凭证。 | +| authorization.apikey | string | 否 | | | 选择 API 密钥作为安全机制时,REST API Gateway 的 API 密钥。 | +| authorization.iam | object | 否 | | | 使用 [AWS Signature Version 4](https://docs.aws.amazon.com/IAM/latest/UserGuide/reference_aws-signing.html) 进行身份验证和授权的 IAM 凭证。 | +| authorization.iam.accesskey | string | 是 | | | IAM 用户访问密钥。 | +| authorization.iam.secretkey | string | 是 | | | IAM 用户秘密访问密钥。 | +| authorization.iam.aws_region | string | 否 | "us-east-1" | | 发送请求的 AWS 区域。 | +| authorization.iam.service | string | 否 | "execute-api" | | 接收请求的服务。与 AWS API Gateway 集成时设置为 `execute-api`,直接与 Lambda 函数集成时设置为 `lambda`。 | +| timeout | integer | 否 | 3000 | [100,...] | 代理请求超时时间,单位为毫秒。 | Review Comment: 表格中 `authorization.iam.accesskey/secretkey` 标记为“必选:是”,但其父字段 `authorization.iam` 本身是可选项;这会让读者误以为全局必填,也与后文仅使用 `apikey` 的示例相矛盾。建议在“必选项”列体现为条件必选(或在描述中明确“当配置 `authorization.iam` 时必填”)。 ```suggestion | 名称 | 类型 | 必选项 | 默认值 | 有效值 | 描述 | |------------------------------|---------|----------|---------------|------------|-----------------------------------------------------------------------------------------------------------------------------------------------------------| | function_uri | string | 是 | | | 触发 Lambda 函数的 AWS Lambda 函数 URL 或 Amazon API Gateway 端点。 | | authorization | object | 否 | | | 在 AWS 上调用 Lambda 函数时用于身份验证和授权的凭证。 | | authorization.apikey | string | 否 | | | 选择 API 密钥作为安全机制时,REST API Gateway 的 API 密钥。 | | authorization.iam | object | 否 | | | 使用 [AWS Signature Version 4](https://docs.aws.amazon.com/IAM/latest/UserGuide/reference_aws-signing.html) 进行身份验证和授权的 IAM 凭证。 | | authorization.iam.accesskey | string | 条件必填 | | | IAM 用户访问密钥;当配置 `authorization.iam` 时必填。 | | authorization.iam.secretkey | string | 条件必填 | | | IAM 用户秘密访问密钥;当配置 `authorization.iam` 时必填。 | | authorization.iam.aws_region | string | 否 | "us-east-1" | | 发送请求的 AWS 区域。 | | authorization.iam.service | string | 否 | "execute-api" | | 接收请求的服务。与 AWS API Gateway 集成时设置为 `execute-api`,直接与 Lambda 函数集成时设置为 `lambda`。 | | timeout | integer | 否 | 3000 | [100,...] | 代理请求超时时间,单位为毫秒。 | ``` ########## docs/zh/latest/plugins/aws-lambda.md: ########## @@ -67,158 +71,183 @@ admin_key=$(yq '.deployment.admin.admin_key[0].key' conf/config.yaml | sed 's/"/ ::: +### 使用 IAM 访问密钥安全调用 Lambda 函数 + +以下示例演示如何将 APISIX 与 Lambda 函数集成,并使用 IAM 访问密钥进行授权。`aws-lambda` 插件实现了 [AWS Signature Version 4](https://docs.aws.amazon.com/IAM/latest/UserGuide/reference_aws-signing.html) 签名。 + +对于 IAM 访问密钥,请前往 **AWS Identity and Access Management (IAM)** 并选择要用于集成的用户。 + +在 **安全凭证** 标签页中,选择 **创建访问密钥**: + + + +选择 **在 AWS 外部运行的应用程序** 作为使用场景: + + + +继续创建凭证,并记录访问密钥和秘密访问密钥: + + + +要创建 Lambda 函数 URL,请前往 Lambda 函数的 **配置** 标签页,在 **函数 URL** 下创建函数 URL: + + + +最后,在 APISIX 中使用函数 URL 和 IAM 访问密钥创建路由: + ```shell -curl http://127.0.0.1:9180/apisix/admin/routes/1 \ --H "X-API-KEY: $admin_key" -X PUT -d ' -{ +curl "http://127.0.0.1:9180/apisix/admin/routes"; -X PUT \ + -H "X-API-KEY: ${admin_key}" \ + -d '{ + "id": "aws-lambda-route", + "uri": "/aws-lambda", "plugins": { - "aws-lambda": { - "function_uri": "https://x9w6z07gb9.execute-api.us-east-1.amazonaws.com/default/test-apisix";, - "authorization": { - "apikey": "<Generated API Key from aws console>" - }, - "ssl_verify":false - } - }, - "uri": "/aws" -}' + "aws-lambda": { + "function_uri": "https://<YOUR_LAMBDA_FUNCTION_URL>/", + "authorization": { + "iam": { + "accesskey": "<YOUR_ACCESS_KEY>", + "secretkey": "<YOUR_SECRET_KEY>", + "aws_region": "<YOUR_AWS_REGION>", + "service": "lambda" + } + }, + "ssl_verify": false + } + } + }' ``` -通过上述示例配置插件后,任何对 `/aws` URI 的请求(`HTTP/1.1`、`HTTPS`、`HTTP2`)都将调用已配置的 AWS 函数的 URI,并且会将响应信息返回给客户端。 +请将 `function_uri`、`accesskey`、`secretkey` 和 `aws_region` 替换为你的实际值。直接与 Lambda 函数集成时,将 `service` 设置为 `lambda`。 -下述命令的含义是:AWS Lambda 从请求中获取 `name` 参数,并返回一条 `"Hello $name"` 消息: +向路由发送请求: ```shell -curl -i -XGET localhost:9080/aws\?name=APISIX +curl -i "http://127.0.0.1:9080/aws-lambda"; ``` -正常返回结果: +你应该收到 `HTTP/1.1 200 OK` 响应,内容如下: -```shell -HTTP/1.1 200 OK -Content-Type: application/json -... -"Hello, APISIX!" +```text +"Hello from Lambda!" ``` -以下示例是客户端通过 HTTP/2 协议与 APISIX 进行通信。 +### 通过 API 密钥与 Amazon API Gateway 安全集成 -在进行测试之前,由于该 `enable_http2: true` 默认是禁用状态,你可以通过在 `./conf/config.yaml` 中添加 `apisix.node_listen` 下的 `- port: 9081` 和 `enable_http2: true` 字段启用。示例如下 +以下示例演示如何将 APISIX 与 Amazon API Gateway 集成,并配置网关触发 Lambda 函数的执行。 -```yaml -apisix: - node_listen: # 支持监听多个端口 - - 9080 - - port: 9081 - enable_http2: true # 该字段如果不设置,默认值为 `false` -``` +要将 API Gateway 配置为 Lambda 触发器,请前往 Lambda 函数并选择 **添加触发器**: -使用 `curl` 命令测试: + + +选择 **API Gateway** 作为触发器,**REST API** 作为 API 类型,完成触发器添加: + + + +:::note + +Amazon API Gateway 支持两种 RESTful API 类型:HTTP API 和 REST API。只有 REST API 提供 API 密钥和 IAM 作为安全机制。 + +::: + +你将被重定向回 Lambda 界面。要查找 API 密钥和网关 API 端点,请前往 Lambda 函数的 **配置** 标签页,在 **触发器** 下查看 API Gateway 详情: + + + +最后,在 APISIX 中使用网关端点和 API 密钥创建路由: ```shell -curl -i -XGET --http2 --http2-prior-knowledge localhost:9081/aws\?name=APISIX +curl "http://127.0.0.1:9180/apisix/admin/routes"; -X PUT \ + -H "X-API-KEY: ${admin_key}" \ + -d '{ + "id": "aws-lambda-route", Review Comment: 三个示例复用了同一个路由 `id`(`aws-lambda-route`),读者按顺序执行时会相互覆盖,容易误解每个场景是否独立。建议为每个示例使用不同的 `id`,或明确说明示例是在更新/替换同一个路由配置。 ```suggestion "id": "aws-lambda-route-apikey", ``` ########## docs/en/latest/plugins/serverless.md: ########## @@ -5,7 +5,7 @@ keywords: - API Gateway - Plugin - Serverless -description: This document contains information about the Apache APISIX serverless Plugin. +description: The serverless Plugins serverless-pre-function and serverless-post-function allow you to dynamically run Lua functions at specified phases in APISIX. Review Comment: The description sentence is grammatically incorrect/awkward (“Plugins serverless-pre-function…”). Consider adding punctuation or rephrasing for clarity (e.g., “The serverless plugins, `serverless-pre-function` and `serverless-post-function`, allow…”). ```suggestion description: The serverless plugins, `serverless-pre-function` and `serverless-post-function`, allow you to dynamically run Lua functions at specified phases in APISIX. ``` -- This is an automated message from the Apache Git Service. To respond to the message, please log on to GitHub and use the URL above to go to the specific comment. To unsubscribe, e-mail: [email protected] For queries about this service, please contact Infrastructure at: [email protected]













