juzhiyuan commented on a change in pull request #776:
URL: https://github.com/apache/apisix-website/pull/776#discussion_r758026372
########## File path: CONTRIBUTING.md ########## @@ -0,0 +1,338 @@ +# Apache APISIX Blog Contributing Guide + +## Overview + +Welcome to Apache APISIX's website and blog repository. + +This guideline will teach you how to contribute if you want to add a new blog, or modify existing blog contents. + +If you find an issue on current documents, please feel free to file an issue to let the community know about it, or you can sumbit a pull request to fix or update. Both actions are welcome and recommended. + +The blogs are written in two languages: English and Chinese. We encourage contributors to add blogs in their preferred language. It is completely up to you. We can handle translations and ask you to do a pull request review later. + +English blogs are located in the `website/blog` directory, in which they are categorized by year, month and date. For example, `website/blog/2021/11/22/develop-apisix-ingress-with-nocalhost-in-kubernetes.md` means that a blog named `develop-apisix-ingress-with-nocalhost-in-kubernetes.md` was published on November 22nd, 2021, and it is located in the `website/blog/2021/11/22 directory`. + +Similarly, Chinese blogs are located in `website/i18n/zh/docusaurus-plugin-content-blog` directory and follow the same rules described above. + +## What you can contribute + +### Add a new blog + +To add a new blog, please perform the following steps: + +1. Find the right place to store your blog. + 1. If you plan to submit a blog written in English, please create a markdown file under `website/blog` directory. + 2. If you plan to submit a blog written in Chinese, please create a markdown file under `website/i18n/zh/docusaurus-plugin-content-blog` directory. + 3. If you cannot find an existing year, month, or date directory that fits your desired published date, you can go ahead and create such directory on your own. + +2. Create a markdown file in the directory. Please make sure that the file name is written in English with **no** capitalized letters. During review session, we may suggest changing it to achieve better SEO performance. (Yes, currently some files names contain capitalized letters, we are working on it, see https://github.com/apache/apisix-website/issues/713) + +3. Add text, images, diagrams, charts to the markdown file. + 1. There is nothing much to say about adding text. + 2. To add images, please upload images to https://markdown.apiseven.com/#/ , and copy the links from there. + 3. To add charts or diagrams, we are happy to see any sort of charts and diagrams, as long as it formats correctly on the page. From previous experience, charts with 4 columns or less are the perfect size displayed on screen. + +4. Optional: run locally to inspect any typos or formatting issues left behind. Although we implemented lint and error checks in the repository, we suggest running it locally to avoid repeated work. To run it locally, please run `cd website`, and then run `yarn start` commands in your terminal. + +5. Submit a pull request to our repository. + +#### Blog's header information + +Our blogs start with a header like this: + +``` +title: "blog's title" +author: "blog's author" +authorURL: "author's GitHub ID" +authorImageURL: "author's GitHub Image" +keywords: +- keywords 1 +- keywords 2 +- keywords 3 +- keywords 4 +- keywords 5 +description: description of this blog +tags: [tag1] +``` + +##### title + +Required field, the title of the article, the standard expression in the form of `title: "title"`, although the actual test single quotation marks or no quotation marks can be, but in order to maintain the standard, the unified use of English double quotation marks to wrap the text. + +##### author + +Required field, the article's author name, the standard form of expression for author: "author", although the actual test single quotation marks or no quotation marks can be, but in order to maintain the standard, the unified use of English double quotation marks to wrap the text. + +1. community author: if you are willing to provide your real name, use your real name, if not, use your GitHub account name. + +2. business case authors: real names, such as John Doe. + +##### authorURL + +For business users or business cases, you can leave this item blank. Because GitHub is personal, and in the case of a business case, the person represents his company rather than himself, it is recommended that you leave this blank to avoid unnecessary controversy. This does not mean leave `authorURL`: blank, it means just delete the entire line that corresponds to it, including the variable name. + +##### authorImageURL + +The author's GitHub avatar, it is related with `authorURL`. For the same reason described above, this is an optional field. See below for how to get the avatar. + +##### keywords + +Required field, keyword, which is used to enhance better SEO performance. Usually the first three keywords are "APISIX", "Apache APISIX", "API Gateway", and the last two are the article's own keywords. + +##### description + +Required field, the description, which is used to enhance better SEO performance. Usually you can summarize the first or last paragraph of the article, forming about 120 words of text, and put it here. + +##### tags + +Required field, tag, which is used to categorize the blog. Each post has and can only have one tag. If more than one tag is suitable, please choose the most suitable one. The available tags and explanations are as follows. + +- Community: community related, e.g. "How to contribute to an open source project without writing code?" +- Events: event-related, for example: online live stream, event previews, meetups, and online meeting, etc. +- Interview: Interviews, e.g., Dr. Yang Li interview, Summer of Programming interview. +- Practical Case: Best practices, easily confused with Technology. The factors that determine whether an article is a Technology or a Practical Case are: the content of the article and the subject of the description. For example, if the article is about "Running Apache APISIX on xxx platform", then it is a Practical Case; for example, if the article is about technical stuff, "Apache APISIX v.s. Envoy", then it is Technology. +- Release: Release notes, this is better understood. It should be noted that the release notes inside the blog are polished, while the release notes inside the release are written by developers. +- Security: Security vulnerability notification and methods to bypass security vulnerabilities, currently there are only two articles, very good to identify, generally have CVE-xxxxxxx is it. +- Technology: Technical articles, easily confused with Practical Case. The factors that determine whether an article is a Technology or a Practical Case are: the content of the article and the subject of the description. For example, if the article is about "Running Apache APISIX on xxx platform", then it is a Practical Case; for example, if the article is about technical stuff, "Apache APISIX v.s. Envoy", then it is Technology. +- User Case: User Case, this is also very recognizable, so I won't talk about it. + +#### How to get the authorImageURL + +1. Open Chrome +2. Enter the author's GitHub address to access the author's GitHub home page +3. Press Fn + F12 or just press F12 +4. Find the link that corresponds to the author's avatar +5. Copy and paste it into the authorImageURL field +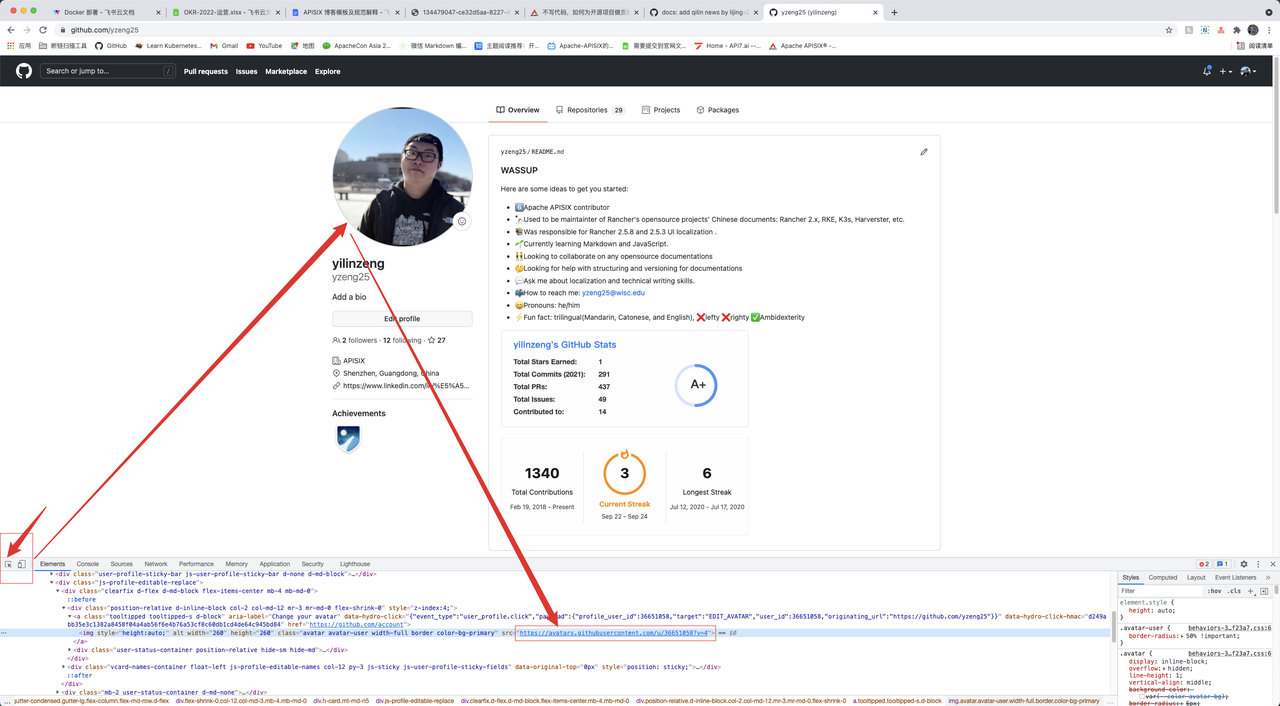 + +#### truncate and overview + +``` +> overview + +<!--truncate--> +``` + +An overview is entered starting with `>` and a space followed by texts. The overview can be your own summary of the article, or it can be the first paragraph of the article with a summary description. When you are done, type `<! --truncate-->`. `<! --truncate--->` serves to display the `<! --truncate--->` above the blog overview, or if there is no overview, nothing will be displayed; if there is an overview but no `<! --truncate--->`, it will show the whole thing. + +#### Difference between Description and Overview + +Some people may ask: why the description and the overview are both summary text? Why they should be reused? First of all, they are indeed both summary text. Second, they are different in the following aspects: + +1. Description is for search engines to see, overview is for people to see. +2. Description is something that is not perceptible to the user, it does not appear on the page in any form. +3. The overview will appear on the blog overview page and the details page, it is important. + +### Fix typos or formats + +1. Locate the file. Chinese blogs are located in `website/i18n/zh/docusaurus-plugin-content-blog` directory. English blogs are located in the `website/blog` directory. +2. Fix the typos or formats. +3. Submit a pull request to our repository. + +## Before you contribute + +### Commit message style + +1. The initial/first commit message should follow this style: `docs: type in your actual commit message`. Otherwise, the CI tests would fail and you would need to modify the commit message. +2. The later commit messages would be nice if you follow these style (it is totally fine if you do it your way): + 1. `update: type in your actual commit message` + 2. `fix: type in your actual commit message` + +### Pull request title guide + +Pull request title is usually generated from the first commit message, this is why we need a uniformed message for the first commit message. It is easier to maintain this way. Remember this is repository for website and blog, so a pull request title start with docs: can help us track down particular pull requests. + +## How to contribute via git command line + +### Adding and configuring a local repository + +1. Open your browser and visit https://github.com/apache/apisix-website. +2. Click 'fork' in the upper right corner to fork it to your own repository. +3. Copy your own remote repository address. +4. Open your terminal, and type in the following commands. Change to your desired directory to store the files, and git clone it from remote. + + ``` + cd {path or directory name} + git clone '{our own remote repository address}' + ``` + +5. View the local and remote relationship. + + ``` + git remote -v + ``` + + The reuslt should be two lines containing 'origin' messages only. Now you need to add the main repository as 'upstream'. + + ``` + git remote add upstream {URL} + ``` + +To verify that 'upstream' is added: run git remote -v , the result should be 4 lines, 2 with 'origin' and 2 with 'upstream'. + +These steps conclude the process of adding and configuring a local repository. Next, let's see how to add a new blog, modify contents, and how to resolve conflicts. + +### Add a new blog + +1. First switch to the apisix-website path. + + ``` + cd apisix-website + ``` + +2. Then find out how many branches there are and which branch you are currently in. + + ``` + git branch + ``` + +Ideally, there should be few branches and they should stay on the branch where the last change was made or on the master branch. + +3. Create a new branch and specify that it is upstream of the master branch of the GitHub master repository. + + ``` + git checkout -b {branch name} upstream/master + ``` + +4. Pull the latest changes to the master branch. + + ``` + git fetch upstream master + ``` + +5. Synchronize changes to the local branch. + + ``` + git rebase + ``` + +6. Add new blog. + +7. When you're done making changes, first run git add to temporarily store. + + ``` + git add . + ``` + +8. Then run git commit to record the changes + + ``` + git commit -m "docs: brife message about this change" + ``` + +9. Finally, run git push to push the changes to the remote repository. + + ``` + git push origin + ``` + +10. Open the GitHub code repository in your browser, create the PR, and edit the change information. + +11. Complete the PR. + +### Fix typos or formats + +1. First switch to the apisix-website path. + + ``` + cd apisix-website + ``` + +2. Then find out how many branches there are and which branch you are currently in. + + ``` + git branch + ``` + +Ideally, there should be few branches and they should stay on the branch where the last change was made or on the master branch. + +3. Create a new branch and specify that it is upstream of the master branch of the GitHub master repository. + + ``` + git checkout -b {branch name} upstream/master + ``` + +4. Pull the latest changes to the master branch. + + ``` + git fetch upstream master + ``` + +5. Synchronize changes to the local branch. + + ``` + git rebase + ``` + +6. Fix typos or formats. + +7. When you're done making changes, first run git add to temporarily store. + + ``` + git add . + ``` + +8. Then run git commit to record the changes + + ``` + git commit -m "docs: brife message about this change" + ``` + +9. Finally, run git push to push the changes to the remote repository. + + ``` Review comment: ```suggestion ```sh $ git xxx ``` ``` -- This is an automated message from the Apache Git Service. To respond to the message, please log on to GitHub and use the URL above to go to the specific comment. To unsubscribe, e-mail: notifications-unsubscr...@apisix.apache.org For queries about this service, please contact Infrastructure at: us...@infra.apache.org