Yep.  I wonder what hull number they made the design change?  touche' is
#83.
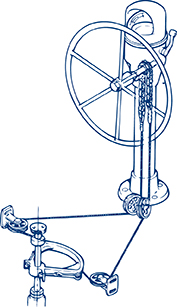
Dennis C.

On Tue, Jan 29, 2019 at 10:54 AM schiller via CnC-List <
cnc-list@cnc-list.com> wrote:

> Dennis,
>
> Looks very similar to what was on Corsair, Hull #7.
>
> https://drive.google.com/open?id=1sTBZGtbZlym6_0Iw0S5DZOiWYHahCVI7
>
> Neil Schiller
> 1983 C&C 35-3, #028. "Grace"
> Whitehall, Michigan
> WLYC
>
> On 1/29/2019 9:20 AM, Dennis C. via CnC-List wrote:
>
> The original post is below.
>
> My buddy has the pedestal and associated parts for stripping and painting
> with AwlGrip.  Aircraft stripper does indeed remove powder coat.
> https://drive.google.com/open?id=1OgW3dWk9fqRkoQwowu_fwg5fGehKcd_g
>
> A local rigging shop is duplicating the wire rope cable for me.  The
> fitting on the end of the cable that attaches to the chain is apparently
> called a chain eye as opposed to a marine eye or aircraft eye.
>
> There seems to be a major change in the rudder stop design.  Touche' is
> Hull 83.
>
> Thanks to Russ, I have a good example of what a rudder stop should look
> like.  Note the strong vertical structural member with gussets.  The two
> plates mounted to the bottom of the quadrant stop against aluminum plates
> with rubber cushions on either side of the vertical structural member.
>
> https://drive.google.com/open?id=1_9BPN1H7YXs586x93QLT8saZVIKJxDSr
>
> Unfortunately, Touche' only has a thin gusset for the rudder tube:
>
> https://drive.google.com/open?id=1jaJX92DAx9vOgV2TWk-fchKrc3k3Zj2h
>
> One other difference is that Touche's quadrant is installed upside down
> from the one on Russ' boat.  Go figure.  That doesn't seem to be a big
> deal.  The plates will just have to be mounted on the top of the quadrant.
>
> I am going to have to install a vertical structural member.  Still
> finalizing the design but it will be similar to Russ' boat.  Going to be
> very uncomfortable working in there.
>
> I'm thinking about bonding 3 pieces of marine ply together with the middle
> piece shorter so the thing slips down over the existing rudder post
> gusset.  I can then through bolt it in place and then tab it to the hull.
> I will probably also make it with the athwartships gussets in place so all
> I need do is tab them to the hull.  The gussets are extremely important due
> to the side loading of the stops.  The more I do outside the space the
> easier it will be.
>
> I won't start the job until March after I return from skiing.  I'll
> document the process and provide a link.
>
> Dennis C.
> Touche' 35-1 #83
> Mandeville, LA
>
> On Wed, Jan 23, 2019 at 2:50 PM Dennis C. via CnC-List <
> cnc-list@cnc-list.com> wrote:
>
>> Well, I disassembled Touche's steering system yesterday for a loooong
>> overdue maintenance session.  As in it's never been done in 47 years!
>> Touche's steering system is by Morch.
>>
>> If you haven't checked your steering system, maybe this will inspire you
>> to do so.
>>
>> Oh, no!  Someone stole my pedestal!!
>> https://drive.google.com/open?id=12p-nlp8FEwqR0zhDrqlHqxkb7UMa0iSx
>>
>> I hope you find this helpful.  I found some items of concern.
>>
>> Concern 1.  One of the steering cables had a broken strand.
>>
>>    - See:
>>    https://drive.google.com/open?id=1Mu-dmCnPnDFdd5jGHnkBAGSqbGL6jnrw
>>    - The break occurred where the cable made a sharp bend around the
>>    quadrant just before the adjusting stud.
>>    - See:
>>
>> http://www.bwsailing.com/bw/wp-content/uploads/2014/10/Edson-Quadrant-Dwg.jpg
>>    - A buddy of mine who recently rebuilt the system in his Hans
>>    Christian 38 said he saw the same on his
>>
>> Concern 2.  Some of the teeth on the chain sprocket were damaged.  This
>> was a complete surprise.
>>
>>    - See:
>>    https://drive.google.com/open?id=1amngA8i-rm1IkBvn0HhyVGeNrj7T6NSk
>>    - And:
>>    https://drive.google.com/open?id=1a1czFpkvfnyQuFbNIlfHZehhwk-Wyl-8
>>    - This was apparently caused by the way C&C/Morch made stops to limit
>>    the travel of the rudder.  They put a bolt at each end of the chain. The
>>    bolts must have caused the damage when the wheel reached its limit.
>>    - Note the two bolts with washers and nuts through the links of the
>>    chain here:
>>    https://drive.google.com/open?id=1nvJzh8xWDgetBCEE8eeOAtz4-up4ZvCf
>>
>> Non-concerns.  The rest of the system looked pretty good.  The idler
>> sheaves and bracket under the pedestal appeared to be in good condition.  I
>> started to remove it but decided it will be easier to just pull the pins,
>> remove the sheaves, clean, lube and re-install.
>>
>> The turning sheaves and brackets looked to be in good condition.  (See:
>> https://drive.google.com/open?id=1jie9IxSqSKorp3FaJtcKjbsNh3nD1TBU).  I
>> cleaned them and will lube and re-install.
>>
>> Next I needed to disassemble the engine control assembly so it can be
>> stripped and painted.  Using guidance from Chuck, here's that process.
>>
>>    - Back off or remove the two small Phillips head retaining machine
>>    screws.
>>    https://drive.google.com/open?id=1VxT_ApckY55M7xXKoctIShPmIKxgrFUj
>>    - Move one lever COMPLETELY to one side and push the other lever
>>    out.
>>    https://drive.google.com/open?id=1nqwnvA1UYDEHFVfuH9xi_-sy6YJrSOLE
>>    - Then remove the other lever.
>>    https://drive.google.com/open?id=1pjlIMBqk3lTdZ0vtSWg6TfnNFOcpXQZY
>>
>> Next steps.
>>
>>    - Strip powder coat off the pedestal and associated parts and paint
>>    with AwlGrip.  Buddy of mine has leftover paint from painting his mast.
>>    - Replace both cables.  I'm deciding on this.  Edson's cable and wire
>>    kits look like simple swaged thimble eyes and fine thread eye bolts.  I
>>    have a Nicropress swaging tool, swages and thimbles.  I could make up the
>>    wire and buy the eye bolts.  On the other hand, we have a local rigging
>>    shop who could machine swage nicer replacements.  I think I may ask them
>>    for a quote.
>>    - The sprocket.  Hmmmm.  The chain makes a full 180 degree wrap over
>>    the sprocket.  I believe there are plenty of undamaged teeth that will
>>    work.  On the other hand, I could try to get the sprocket off the shaft
>> and
>>    have a machine shop make a new one.  I think that would be a risky option.
>>    First, I'm not sure how I would remove the sprocket.  It has set screws (
>>    https://drive.google.com/open?id=12GbE75ERXZGgz_NalJ93RcXf6rKvL5fi).
>>    I removed a small one on the sprocket and a larger one on a collar
>> adjacent
>>    to it.  I suspect there is a keyway on the sprocket.  It showed no signs
>> of
>>    moving.  There are some inventive ways to try to pull the shaft but again,
>>    they all have risk.  Then there's the issue of the bearings.  If I muck up
>>    the bearings, I'm screwed.
>>    - Give some thought to a better way to stop the wheel at the travel
>>    limits.
>>
>> Here's the link to the folder with all the pics.
>> https://drive.google.com/open?id=14-oaTFUoebWqxBo8xeUm9K8tPn7xObKE
>>
>> So, again, if you haven't check your steering system, you might want to
>> move that up your work list a bit.  :)
>>
>> Dennis C.
>> Touche' 35-1 #83
>> Mandeville, LA
>>
>>
>>
> _______________________________________________
>
> Thanks everyone for supporting this list with your contributions.  Each and
> every one is greatly appreciated.  If you want to support the list - use
> PayPal to send contribution --   https://www.paypal.me/stumurray
>
>
> _______________________________________________
>
> Thanks everyone for supporting this list with your contributions.  Each
> and every one is greatly appreciated.  If you want to support the list -
> use PayPal to send contribution --   https://www.paypal.me/stumurray
>
>
_______________________________________________

Thanks everyone for supporting this list with your contributions.  Each and
every one is greatly appreciated.  If you want to support the list - use PayPal
to send contribution --   https://www.paypal.me/stumurray